When there is an occupied room directly above your garage, the garage ceiling is no longer just a lid on a storage space. It becomes a critical control layer that separates a cold, fume-filled, fire-prone zone from the living space where people sleep, eat, and spend their time. Insulating it correctly is not simply a matter of stuffing batts between joists. It is a building-science problem that combines fire safety, air sealing, moisture management, and thermal performance.
Getting it wrong can lead to cold floors, high energy bills, condensation, and, in the worst cases, carbon monoxide or fire entering the room above. This guide walks through the code requirements, the material choices, and the step-by-step process so you can approach the project with a clear understanding of what is at stake and how to do it right.
Why This Is Different From Insulating a Normal Ceiling
A standard ceiling separates conditioned space below from an unconditioned attic above. The garage ceiling with a room above is the opposite: the occupied space is above, and the garage below is typically unheated, often vented, and exposed to vehicle exhaust, fuel vapors, and road salt. That inversion changes everything about how the assembly should be built.
The most important difference is the fire separation requirement. Building codes treat the garage as a high-risk area because of the fuels and vehicles stored there. The ceiling assembly must slow the spread of fire from the garage into the habitable room above, giving occupants time to escape. Insulation alone does not satisfy that requirement. You need a code-compliant gypsum board layer on the garage side, and the insulation must be installed in a way that does not compromise that fire barrier.
The second difference is air quality. Garage air can contain carbon monoxide, fuel vapors, and other pollutants. If the ceiling assembly is not air-sealed, those contaminants can be drawn into the living space above through gaps, penetrations, and the natural stack effect of the house. A robust air barrier is not optional; it is a health and safety requirement.
The third difference is moisture. The garage side is typically colder in winter, and the occupied side is warmer and more humid. If warm, moist air from the living space migrates into the cold ceiling cavity, it can condense on cold surfaces and create a hidden mold problem. The insulation and vapor control strategy must account for the direction of heat and moisture flow, which is upward in this case, from the garage into the occupied space.
Code Requirements: Fire Separation and R-Value
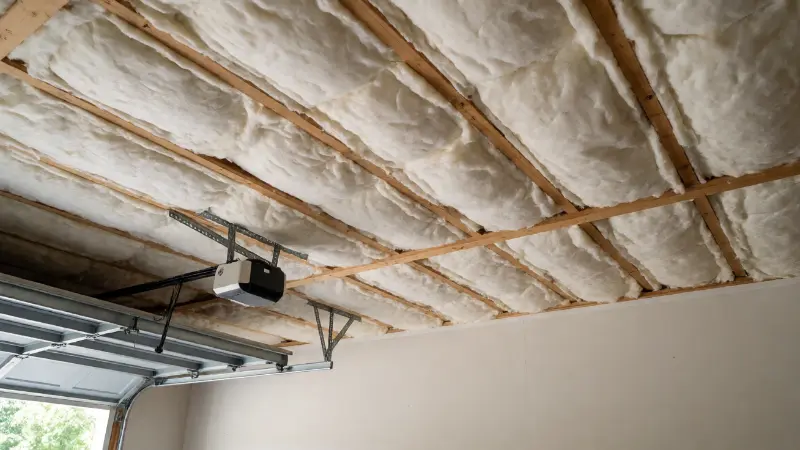
Before you buy a single bag of insulation, confirm what your local building department requires. The International Residential Code (IRC) is the model code adopted in many jurisdictions, often with amendments. The two provisions that matter most are the fire separation requirements in IRC R302.6 and the insulation R-value requirements in the energy code tables.
For fire separation, the IRC specifies that the garage ceiling beneath habitable rooms must be protected by not less than 5/8-inch Type X gypsum board or an equivalent material applied to the garage side. For separation between the garage and the residence generally, 1/2-inch gypsum board on the garage side is the baseline. The code also requires that where the separation is a floor-ceiling assembly, the supporting structure may need protection as well, depending on the edition and local amendments.
The R-value requirement depends on your climate zone and on whether the garage is heated or unheated. The 2021 IRC and related energy tables list ceiling R-values that range from R-19 in warmer zones to R-38 or higher in colder zones. For a floor over a garage beneath a bonus room, the table lists R-13 in climate zones 0 to 2, R-19 in zones 3 and 4, R-30 in zones 4C, 5, and 6, and R-38 in zones 7 and 8. Some sources also cite R-19 as the minimum when the insulation is sized to fill the framing cavity.
Do not guess at these numbers. A permit inspector will check the fire separation and the R-value, and an undersized insulation job can fail inspection. If you are unsure which climate zone you are in or which edition of the code your jurisdiction enforces, call the building department before you start. A five-minute phone call can save you a costly redo.
R-Value Targets by Climate Zone
The table below summarizes the insulation targets for a floor assembly over a garage, based on the 2021 IRC energy tables. Treat these as a starting point for planning and confirm the exact requirement with your local code official, because amendments and alternative compliance paths can change the numbers.
| Climate zone | Floor over garage R-value target | Practical notes | Typical cavity depth needed |
|---|---|---|---|
| 0–2 | R-13 | Cooling-dominated climates; air sealing still critical | 2×4 or 2×6 joists may be sufficient |
| 3 | R-19 | Mixed climates; vapor control depends on local conditions | 2×6 joists or deeper |
| 4 (except Marine) | R-19 | Heating and cooling both matter | 2×6 or deeper, depending on material |
| 4C, 5, 6 | R-30 | Cold winters; condensation risk higher | 2×10 joists or a combination of cavity and rigid foam |
| 7, 8 | R-38 | Very cold; deep cavities or high-performance materials needed | 2×12 joists or spray foam plus other layers |
If your existing garage ceiling has 2×6 joists and you need R-30, you cannot fit a standard batt that reaches that R-value in a 5.5-inch cavity. You have three options: add rigid foam insulation below the joists, use a higher-R-per-inch material such as closed-cell spray foam, or build down the ceiling to create a deeper cavity. Each has trade-offs in cost, headroom, and fire protection.
Choosing the Right Insulation for a Garage Ceiling
The insulation material you choose affects thermal performance, air sealing, moisture behavior, and fire safety. No single material is best for every situation, and the right choice depends on your climate, your joist depth, and whether the ceiling is already finished or open.
Mineral wool is a strong all-around choice for this application. It is non-combustible, it resists moisture better than fiberglass, and it cuts cleanly to fit around obstructions. Products like Rockwool Comfortbatt are available in R-values that fit common joist depths, and mineral wool is often recommended for ceilings with a room above because of its fire resistance and sound-dampening properties.
Fiberglass batts are the most common and least expensive option. They perform well when installed correctly, but they are vulnerable to air movement and compression. If they are not encapsulated or covered by a continuous air barrier, their effective R-value can drop. Fiberglass is acceptable in this assembly, but only if the air sealing is meticulous and the batts are not compressed.
Closed-cell spray foam offers the highest R-value per inch and acts as its own air barrier and vapor retarder. That makes it attractive when joist depth is limited or when air sealing is difficult. It is also more expensive, and it requires a skilled installer for safety and consistency. Open-cell spray foam has a lower R-value per inch and is more vapor-permeable, so it is less suitable on the cold side of this assembly unless the design is carefully detailed.
Rigid foam boards such as polyisocyanurate or XPS can be added below the joists to boost R-value without reducing headroom as much as a dropped ceiling. Foil-faced polyiso can serve as an air barrier when the seams are taped and the edges are sealed. If you go this route, the rigid foam must be covered with code-compliant gypsum board on the garage side to maintain fire separation.
Comparison Table: Insulation Options for a Garage Ceiling
| Material | R-value per inch (approximate) | Air sealing | Moisture behavior | Fire performance | Best for |
|---|---|---|---|---|---|
| Mineral wool batts | R-3.8 to R-4.3 | Needs separate air barrier | Resists moisture, drains well | Non-combustible | Open cavities, fire resistance, sound control |
| Fiberglass batts | R-3.1 to R-4.3 | Needs meticulous air sealing | Can trap moisture if compressed | Non-combustible but air-permeable | Budget projects with good detailing |
| Closed-cell spray foam | R-6 to R-7 | Excellent; acts as air barrier | Low vapor permeance | Requires thermal barrier | Shallow cavities, difficult air sealing |
| Open-cell spray foam | R-3.5 to R-4 | Good air sealing | Vapor-permeable; can hold water | Requires thermal barrier | Interior applications with careful moisture control |
| Rigid foam board (polyiso/XPS) | R-5 to R-6.5 | Good when seams are taped | Foam is moisture-resistant; joints need sealing | Must be covered with gypsum | Adding R-value below joists without deep cavities |
Air Sealing: The Step That Makes or Breaks the Job
Insulation slows heat flow, but it does not stop air movement. If the garage ceiling is leaky, air carrying moisture, carbon monoxide, and other pollutants can bypass the insulation entirely and enter the living space above. Air sealing is the first and most important step in this project, and it must be done before any insulation is installed.
Start by identifying the air barrier. In a typical floor-over-garage assembly, the subfloor above the joists can serve as part of the air barrier if its seams are sealed. The gypsum board on the garage side can serve as a second air barrier if its seams and penetrations are sealed. The goal is a continuous, durable air barrier on the garage side or within the assembly, not just a layer of insulation.
Seal every penetration. This includes electrical wiring, plumbing pipes, ductwork, recessed light fixtures, and any other opening through the ceiling. Use caulk for small gaps and closed-cell spray foam for larger openings around pipes and wires. Pay special attention to the perimeter where the ceiling meets the walls. The rim joist area is a common leak point, and it is often overlooked because it is at the edge of the cavity.
If the existing ceiling has drywall, patch and seal the seams and any cracks before adding insulation. If the ceiling is open with exposed joists, seal the subfloor seams from below if you can access them, or use a taped sheathing layer as the air barrier. Do not rely on fiberglass batts alone to stop air movement. They cannot do that job.
Step-by-Step Installation: Open Ceiling
If the garage ceiling is open with exposed joists, you have the best access and the most options. This is the ideal time to do the job thoroughly, because you can see every penetration and every cavity.
- Inspect and prepare. Check the joists for rot, insect damage, or previous water stains. Repair any structural issues before insulating. Make sure the electrical wiring in the ceiling is in good condition and that any recessed light fixtures are rated for insulation contact (IC-rated). If they are not, you will need to keep insulation clear of them or replace them.
- Air seal. Seal all penetrations with caulk or spray foam. Seal the perimeter where the joists meet the walls. If the subfloor above is accessible, seal its seams with a compatible tape or sealant. This step is the most important one in the entire project.
- Install the fire separation layer. If the ceiling is open, you may need to install the gypsum board on the garage side before or after insulating, depending on your approach. Many contractors install the insulation first, then attach the 5/8-inch Type X gypsum board to the joists. The gypsum board must be on the garage side to protect the occupied space above.
- Install the insulation. Cut batts to fit snugly between the joists. Do not compress them. If you are using mineral wool or fiberglass, make sure the batts fill the cavity from edge to edge and are in contact with the subfloor above and the gypsum board below. If you are using spray foam, have it installed by a qualified professional who can achieve the required thickness and coverage.
- Add a second layer if needed. If the cavity depth is not enough to reach the required R-value, add rigid foam board below the joists or build down the ceiling. If you add rigid foam, tape the seams and seal the edges to maintain the air barrier. Then cover it with the required gypsum board.
- Finish the ceiling. Install the 5/8-inch Type X gypsum board on the garage side, tape and mud the seams, and finish it to your desired level. If you installed rigid foam below the joists, the gypsum board goes over the foam. Do not leave foam exposed in a garage; it must be covered for fire safety.
Step-by-Step Installation: Finished Ceiling

If the garage ceiling is already finished with drywall, you have two main options. The first is to work from above by removing the subfloor in the room above or accessing the cavity through an attic or crawl space. The second is to work from below by removing sections of the garage ceiling drywall, insulating, and then patching and refinishing.
Working from above is less disruptive to the garage but may not be possible if the room above has finished flooring. If you can access the cavity from above, follow the same sequence: air seal, install insulation, and ensure the fire separation layer on the garage side is intact. If the existing ceiling drywall is in good condition and properly sealed, it can serve as the air barrier and fire separation, but you must seal any penetrations from below or above.
Working from below is more disruptive but often more practical. Cut out sections of the ceiling drywall between joists, keeping the cuts neat so they can be patched later. Air seal all penetrations, install the insulation, and then install new 5/8-inch Type X gypsum board to restore the fire separation. Tape, mud, and finish the patches. This approach gives you full access to the cavity and allows you to correct any problems you find.
A third option is to add rigid foam insulation below the existing ceiling and cover it with new gypsum board. This is useful when the existing cavity is already filled but the R-value is insufficient. The rigid foam adds R-value without requiring you to remove the existing ceiling, and the new gypsum layer maintains the fire separation. The trade-off is lost headroom in the garage, which may or may not be acceptable depending on your ceiling height and how you use the space.
Common Mistakes to Avoid
- Skipping air sealing. Insulation without air sealing allows garage air to bypass the insulation and enter the living space. This is the most common and most serious mistake.
- Using the wrong gypsum board. Standard 1/2-inch drywall is not sufficient beneath habitable rooms. You need 5/8-inch Type X or an approved equivalent.
- Compressing the insulation. Squeezing batts into a cavity that is too shallow reduces their R-value. Use the right thickness for the cavity or add rigid foam.
- Leaving gaps around penetrations. Even small gaps can leak significant air. Seal around every wire, pipe, and fixture.
- Installing a vapor barrier in the wrong place. In this assembly, the vapor control strategy depends on the climate and the materials. Do not install a polyethylene vapor barrier on the garage side, where it can trap moisture. Consult a building science resource or your local code official for the correct approach in your climate.
- Covering recessed lights with insulation. Unless the fixture is IC-rated, insulation must be kept clear. Non-IC fixtures can overheat and create a fire hazard.
- Forgetting the fire separation on the supporting structure. In some assemblies, the joists or beams supporting the ceiling may also need protection. Check the code details for your situation.
FAQ
Can I just install insulation without new drywall?
If the existing ceiling drywall is in good condition and meets the fire separation requirement, you may be able to keep it and add insulation from above. But if the existing drywall is standard 1/2-inch and the room above is a habitable space, it may not satisfy the 5/8-inch Type X requirement. Check with your local building department before assuming the existing ceiling is adequate.
Do I need a vapor barrier on the garage ceiling?
The vapor control strategy depends on your climate and the assembly. In general, you do not want a vapor barrier on the garage side, because it can trap moisture in the cavity. A vapor retarder may be appropriate on the warm side of the insulation in some climates, but the details matter. Consult a building science resource or a local professional rather than guessing.
What R-value do I need for a garage ceiling with a room above?
The target R-value depends on your climate zone and whether the garage is heated or unheated. The 2021 IRC tables list values ranging from R-13 in warm climates to R-38 in cold climates for a floor over a garage. Some sources cite R-19 as the minimum when the insulation fills the framing cavity. Confirm the requirement with your local code official.
Can I use spray foam instead of batts?
Yes. Closed-cell spray foam is an excellent choice when you need high R-value in a shallow cavity or when air sealing is difficult, because it acts as its own air barrier. Open-cell foam is also an option but has lower R-value per inch and different moisture behavior. Spray foam must be covered with a code-compliant thermal barrier in a garage.
How do I insulate a finished garage ceiling without removing the drywall?
You can access the cavity from above if the room above has an accessible floor or attic, or you can add rigid foam insulation below the existing ceiling and cover it with new 5/8-inch Type X gypsum board. The second approach adds R-value without major demolition but reduces garage headroom. A third option is to cut out sections of the ceiling, insulate, and patch, which is more disruptive but gives full access.
Why is my room above the garage still cold after insulating?
Insulation alone may not solve the problem if the air sealing is incomplete or if there are thermal bridges that bypass the insulation. Cold floors above a garage are often caused by air leakage at the rim joist, gaps around penetrations, or an inadequate R-value. A blower door test can identify the leaks, and a building performance contractor can recommend targeted fixes.
When to Call a Professional
This is a project where the consequences of a mistake are higher than in a typical insulation job. If you are not confident in your ability to air seal thoroughly, install the fire separation correctly, or manage the moisture details, hire a qualified insulation contractor or a building performance specialist. Many contractors offer air sealing and insulation as a combined service, and some can perform a blower door test before and after the work to verify that the air barrier is effective.
A professional can also help you navigate the code requirements, especially if your jurisdiction has adopted amendments or if the assembly is unusual. If the garage ceiling contains complex ductwork, plumbing, or electrical systems, a contractor can coordinate the trades and ensure that the insulation and air sealing do not create new problems. For related projects, the guide on insulating drafty garage door panels covers another part of the garage envelope that affects the comfort of the room above. If you are also considering flooring changes in the occupied space, the article on installing vinyl plank flooring over tile may be useful, though the floor assembly itself should not be altered without understanding how it interacts with the ceiling below. For older homes with different framing and material constraints, the review of sustainable insulation options for old houses offers additional context on material choices and compatibility.