Ice dam prevention on a roof without heat cable starts with a simple but uncomfortable truth: the ice is not the problem. The dam is a symptom of warm air escaping from the house into the attic, melting the underside of the snow, and sending that meltwater down to the cold eaves where it refreezes. Heat cable treats the symptom. Air sealing, insulation, and ventilation treat the cause, and they cost less to run over a winter.
This guide explains how ice dams form, why heat cable is a poor substitute for building science, and the five fixes that address the source. It covers attic air sealing, insulation depth, ventilation, snow management from the ground, and roof-level defenses that belong in a planned re-roof. It also covers what not to do and when a professional is the safer choice.
Why Ice Dams Form on a Roof
An ice dam needs three conditions at the same time: snow on the roof, a roof deck that is above freezing in the middle and below freezing at the eaves, and liquid water that can refreeze. The warm deck comes from heat inside the house. The cold eaves come from the overhang, which extends beyond the heated wall and loses heat to the outdoor air.
Heat escapes into the attic in two ways. Conduction moves heat through the ceiling assembly when insulation is thin or missing. Convection moves warm air through gaps, cracks, and penetrations in the ceiling plane. Convection is usually the bigger problem, because a small hole can carry a surprising amount of warm, moist air into a cold attic.
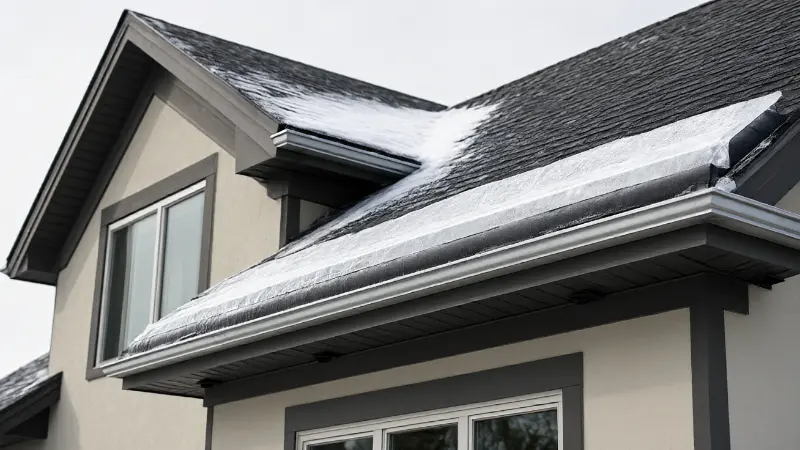
Once warm air reaches the attic, it warms the underside of the roof sheathing. Snow melts, water runs down the slope, and when it reaches the overhang it freezes. More meltwater arrives, the ice grows into a dam, and water backs up under the shingles. From there it can enter the attic, soak insulation, stain ceilings, and promote mold.
That is why an uninsulated attic often has fewer ice dams than a poorly sealed insulated one. An uninsulated attic loses so much heat that the snow melts and clears from the roof, so there is nothing left to refreeze. A partially insulated attic is the worst case: enough heat to melt snow, not enough to clear it, and a cold eave waiting to freeze the runoff.
Fix One: Air Seal the Attic Ceiling Plane
Air sealing is the highest-value step, and it is the one most often skipped. The goal is to close every path that connects the heated house to the attic. That means working from the attic side and sealing the top plates of walls, the gaps around plumbing and wiring penetrations, recessed light housings, the attic hatch, chimney chases, and duct boots.
Use materials appropriate to each opening. Caulk works for narrow cracks, expanding foam works for larger gaps around pipes and wires, and rigid material plus sealant works for larger openings such as a chimney chase. Recessed lights need covers rated for contact with insulation, and the covers should be sealed to the drywall. A leaky attic hatch should have weatherstripping and an insulated lid.
Pay attention to the less obvious paths. A knee wall in a one-and-a-half-story house is a common bypass, because the space behind it often connects directly to the attic. Dropped soffits, chases for ducts, and the gaps around a whole-house fan are also common leaks. Anywhere a wire, pipe, or duct passes through the ceiling is a candidate.
A blower door test before and after the work shows how much progress you made, but it is not required. A simpler approach is to go into the attic on a cold day and feel for warm air moving through gaps. Smoke from a incense stick or a theatrical smoke pencil can make the leaks visible. Seal what you find, then check again.
Do not seal ventilation openings
Air sealing targets the ceiling plane between the house and the attic. It does not mean sealing the soffit vents, the ridge vent, or the gable vents. Those openings are part of the roof ventilation system, and blocking them makes moisture and ice dam problems worse. Seal the house-to-attic boundary, not the attic-to-outdoor boundary.
Fix Two: Insulate to the Right Depth for Your Climate
Insulation slows conductive heat loss, and it keeps the attic closer to outdoor temperature. The right depth depends on climate, but the general guidance is higher than many older homes have. A common benchmark is a minimum of R-30, with R-38 or more preferred in colder climates, and deeper insulation is often recommended in the coldest zones.
The insulation must be continuous and free of gaps. Blown-in cellulose or fiberglass is common in attics, and it works well when it is installed to a consistent depth. Batts can work too, but they are easy to leave compressed, gapped, or lifted away from the ceiling. Compressed insulation loses R-value, so do not stuff it into tight spaces and expect the same performance.
The edges of the attic are the hardest part. There is often limited space above the exterior wall, especially where the roof slope meets the top plate. That area needs a baffle to keep a ventilation channel open above the insulation, and it needs as much insulation as the space allows. Spray foam is useful here because it air seals and insulates in one step, and rigid foam board can be cut to fit.
Do not cover the eaves with insulation in a way that blocks the soffit vents. The attic needs air to enter at the soffit, travel up the underside of the roof deck, and exit at the ridge or another high vent. A baffle keeps that path open while the insulation stays in place.
Insulation alone is not enough
Adding insulation without air sealing is a common mistake. Warm air still moves through the bypasses, and the added insulation may not stop the melting. Think of insulation as a blanket and air sealing as closing the windows. Both are needed for the blanket to work.
Fix Three: Correct the Attic Ventilation
Ventilation keeps the roof deck cold by moving outdoor air along the underside of the sheathing. The ideal is a continuous intake at the soffit and a continuous exhaust at the ridge. Air enters low, travels up the roof slope, and exits high, carrying heat and moisture with it.
Check that the soffit vents are open and not blocked by insulation, paint, or debris. Check that the ridge vent is clear and that it was installed correctly. Gable vents can provide some cross ventilation, but they are less effective than a balanced soffit-to-ridge system, and they can short-circuit the flow if they are used together with a ridge vent.
Do not add a powered attic fan as a substitute for air sealing and insulation. A powered fan can pull conditioned air out of the house through the same bypasses you are trying to seal, which increases the heat loss and can make the problem worse. Natural ventilation is the better approach once the ceiling plane is sealed.
Ventilation also helps in summer by removing attic heat and moisture. That makes it a year-round improvement rather than a winter-only fix. If the roof is being replaced, it is the right time to correct a ventilation system that was never designed properly.
Fix Four: Manage Snow From the Ground
Snow removal is a practical, low-cost measure that reduces the fuel for an ice dam. The goal is not to clear the entire roof. It is to remove the snow from the lower edge, where the dam forms, so meltwater can drain instead of backing up. A roof rake lets you do that from the ground.

Use a roof rake with a telescoping handle and a protective buffer or bumper that keeps the blade off the shingles. Pull the snow down rather than pushing it, and work from a safe position away from the falling snow. Clear the first three or four feet above the eaves, and do not worry about the rest of the roof unless the snow load is heavy.
Do not climb onto a snowy or icy roof. Do not use a ladder on snow-covered ground. Do not chip at the ice with an axe, a hammer, or a chisel. Those methods damage shingles, gutters, and flashing, and they put you at risk of a fall. Chemical de-icers can also damage roofing materials and landscaping, and they are not a substitute for the building-science fixes.
If the snow load is heavy or the roof is steep, high, or difficult to reach, hire a professional. A roofing contractor or snow removal service has the equipment and insurance to do the work safely. The cost of a service call is small compared with a fall injury or a damaged roof.
Keep gutters and downspouts clear
Clean leaves and debris out of the gutters before winter. A clogged gutter holds water that freezes and backs up under the roof edge. Keep the downspouts clear so meltwater can drain away from the foundation. In winter, check the gutters and downspouts for ice and clear what you can reach safely from the ground.
Fix Five: Add Roof-Level Defenses During a Re-Roof
Some defenses belong in the roof assembly rather than in the attic. The most important is a self-adhering ice-and-water shield membrane installed along the eaves. This membrane does not stop an ice dam from forming, but it prevents water that backs up from passing through the roof sheathing and into the house.
Building codes commonly require an ice barrier in cold climates, extending from the eave edge to a point inside the exterior wall line. The exact dimensions depend on the code and the roof design, but the principle is to cover the area where ice dams form and water backs up. The membrane goes under the shingles and over the drip edge, and it must be installed according to the manufacturer’s instructions.
Metal drip edge flashing at the eaves and rakes helps direct water away from the fascia and into the gutter. On metal roofs, an ice belt or a heavier gauge eave panel can resist ice damage, and the fasteners and seams need to be detailed for freeze-thaw conditions. These are roof-level improvements that make sense when the roof is being replaced or repaired, not as an emergency fix in January.
A roof that is well sealed and well insulated may need little or no ventilation, depending on the design. That is a decision for a building professional who can assess the assembly. Do not guess at the ventilation requirements for a cathedral ceiling or a complicated roof with valleys and dormers.
What Not to Do
Do not install heat cable as a substitute for air sealing and insulation. It adds to energy costs and does not address the heat loss that causes the problem. It can also create new problems if it is installed incorrectly or if it is relied on instead of fixing the attic.
Do not use a powered attic fan to solve ice dams. Do not chip ice with hand tools. Do not pour chemicals on the roof. Do not climb onto the roof in winter conditions. Do not block the soffit vents in an attempt to keep the attic warm. Each of those approaches treats a symptom or creates a new hazard.
If water is already coming into the house, focus on containment and drying rather than heroic roof work. Move valuables, place buckets, and document the damage. Then arrange a professional assessment of the attic and the roof. A small leak that is caught early is a repair; a leak that is ignored becomes a mold and structural problem.
When to Call a Professional
Call a roofing contractor or an insulation contractor if the attic is difficult to access, if the roof has complicated valleys and dormers, if the insulation is wet or contaminated, or if the air sealing work requires moving ducts or electrical components. A professional can assess the whole assembly and recommend the right combination of sealing, insulation, and ventilation.
Call an ice dam removal service that uses steam if a dam is already causing interior water damage. Steam removes the ice without damaging the shingles. Never let anyone chip the ice off with an axe or a power tool, and never let anyone apply a torch to the roof.
Other winter systems deserve attention at the same time. A heat pump that cannot keep up in cold weather may have a capacity or defrost issue, and a guide to a heat pump not heating below 30 degrees covers the checks for that equipment. If the auxiliary heat is not engaging, a guide to heat pump auxiliary heat not coming on explains the thermostat and staging issues. And when you are working on the roof, the fastener and clip choices matter, as covered in a guide to hanging holiday lights without damaging roof.
Quick Reference: Prevention Methods and What They Address
The table below matches each prevention method with what it actually fixes and its limitations. Use it to prioritize the work rather than to pick a single fix.
| Method | What It Addresses | Best Timing | Limitations |
|---|---|---|---|
| Air sealing the ceiling plane | Stops warm air from entering the attic | Any time; best before adding insulation | Requires attic access and attention to detail |
| Insulation to R-30 or higher | Reduces conductive heat loss through the ceiling | After air sealing | Must not block soffit ventilation; gaps reduce performance |
| Soffit-to-ridge ventilation | Keeps the roof deck cold and removes moisture | During re-roof or attic retrofit | Needs open intake and exhaust; powered fans are not a substitute |
| Roof rake snow removal | Removes the snow that feeds the ice dam | After each heavy snowfall | Limited reach; requires safe ground position |
| Cleaning gutters and downspouts | Allows meltwater to drain away | Before winter and as needed | Does not address attic heat loss |
| Ice-and-water shield membrane | Prevents backed-up water from entering the roof deck | During re-roof | Does not stop ice dams; must follow code and manufacturer details |
| Drip edge and metal ice belt | Directs water away and resists ice damage | During re-roof | Roof-level defense, not a heat-loss fix |
| Heat cable | Creates a drainage channel at the eave | Temporary or supplemental | Does not address the cause; adds energy cost |
FAQ
Can I prevent ice dams without installing heat cable?
Yes. The most effective approach is to air seal the attic ceiling plane, insulate to the recommended level, and correct the ventilation. Those steps address the warm air and heat loss that cause the melt. Snow removal with a roof rake and clean gutters handle the water side. Heat cable is a supplemental measure, not the primary fix.
Will adding insulation alone stop ice dams?
Insulation alone rarely solves the problem if the attic is leaky. Warm air can still move through bypasses and melt the snow. Air sealing should come first or be done at the same time as the insulation. The combination is what keeps the roof deck cold.
Should I use a roof rake or call a professional?
Use a roof rake from the ground if the roof is safely reachable and the snow is not too deep. Clear the lower three or four feet above the eaves. If the roof is steep, high, or difficult to access, or if the snow load is heavy, hire a professional rather than climbing or using a ladder in winter conditions.
Does an ice-and-water shield stop ice dams?
No. It stops water that backs up from getting through the roof deck. Ice can still form on top and damage shingles or gutters. The membrane is a valuable defense during a re-roof, but it works best alongside air sealing, insulation, and ventilation.
Conclusion
Ice dam prevention without heat cable comes down to keeping the roof cold and keeping meltwater moving. Air sealing the ceiling plane stops the warm air that starts the melt. Insulation to the right depth reduces conductive heat loss. Balanced soffit-to-ridge ventilation keeps the roof deck closer to outdoor temperature. Those three fixes address the cause rather than the symptom.
Snow management and drainage handle the rest. A roof rake used from the ground removes the snow at the eaves where the dam forms, and clean gutters let the meltwater drain away. Ice-and-water shield and proper drip edge belong in a planned re-roof, where they protect the deck if water does back up.
Do not rely on heat cable, powered attic fans, ice chippers, or chemicals to solve the problem. They treat symptoms, add cost, or create hazards. If the attic is difficult to work in or the roof is complicated, bring in a professional. A methodical approach keeps the roof cold, the attic dry, and the house warm without an ice dam forming above the ceiling.