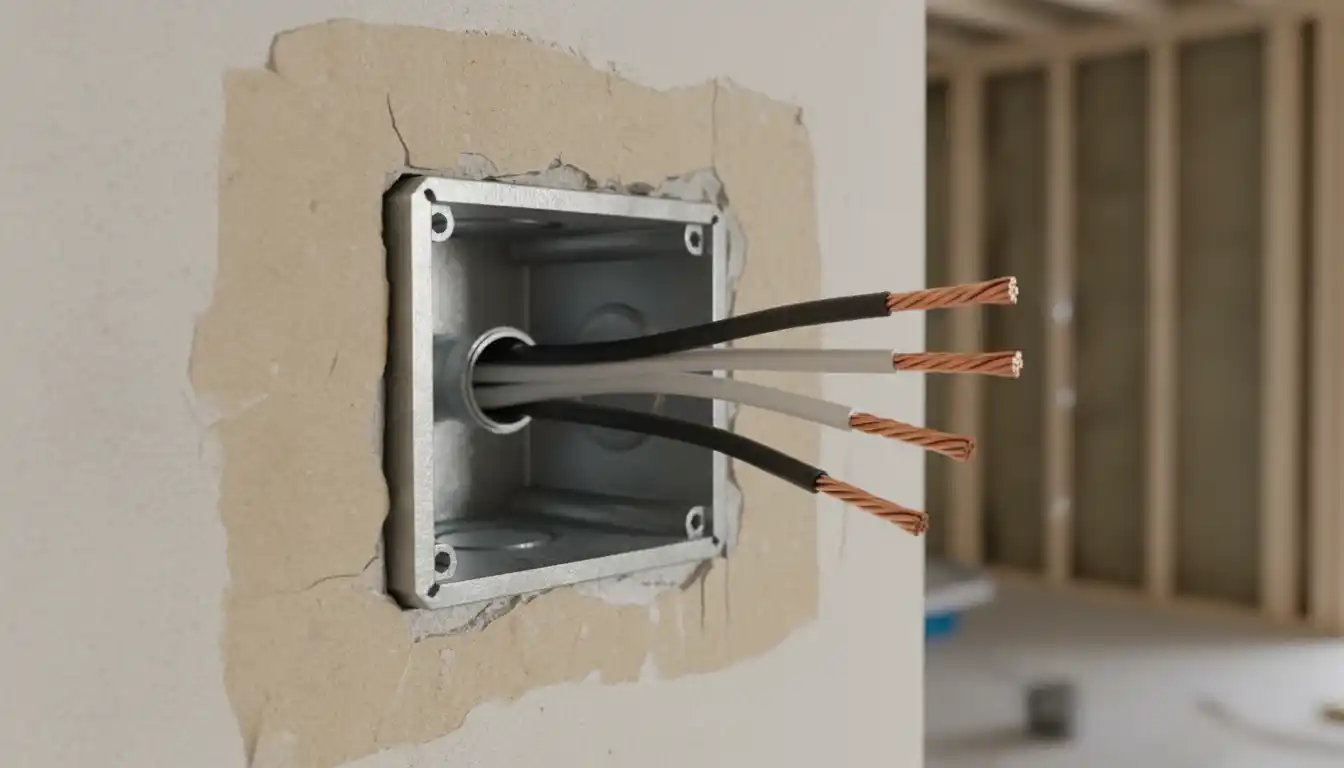
You opened an electrical box to replace a simple outlet, expecting the standard two or four wires. Instead, you are staring at a confused nest of 3 black wires, 3 white wires, and a cluster of copper ground wires. If you are asking yourself, “How do I fit all these onto one receptacle?” you are not alone—and you are right to be cautious.
The short answer: You cannot connect three wires directly to the standard side screws of a receptacle. Most outlets are designed for a maximum of four main conductors (two hot, two neutral). Attempting to jam a third set of wires into the backstab holes or doubling them up under screws is a serious fire hazard. The correct, code-compliant solution is to use a “pigtail” connection to consolidate the wires before they ever touch the outlet.
This guide will walk you through exactly why your wiring looks this way, why “backstabbing” is dangerous, and the step-by-step professional method to wire this outlet safely.
Why Does My Outlet Have 3 Black and 3 White Wires?
Finding three cables (bundles of wires) in a single box is a very common scenario in residential wiring, especially in bedrooms and living rooms. It doesn’t necessarily mean the wiring is “wrong,” but it does mean this specific electrical box is acting as a hub.
1. The “Daisy Chain” Hub
In standard modern wiring, power runs from the breaker panel to the first outlet, then to the second, and so on. This is called a daisy chain. If your box has two cables, it’s a simple “Line In” (power from panel) and “Load Out” (power to next outlet).
When you see three cables, you are looking at:
- Cable 1 (Line): Brings power into the box from the panel or previous outlet.
- Cable 2 (Load): Carries power downstream to the next outlet in the chain.
- Cable 3 (Branch): Splits off to power a light fixture, a switch, or an outlet in a completely different room.
2. The Switched Outlet
In some older homes, one of the cables might be going to a wall switch that controls half of the outlet (common for plugging in floor lamps). If you replaced the outlet and the switch no longer works, or the breaker immediately trips, you may have missed a broken “tab” on the side of the old outlet. However, if all the blacks were tied together and all the whites were tied together on the old device, you are likely dealing with the standard hub scenario described above.
The Danger of “Backstabbing” vs. Side Wiring
Many DIYers see the four screws on the side of an outlet and the four (or eight) little holes on the back and assume they can plug all six wires into the device. This is a critical mistake.
Why Backstabbing Fails
The small holes on the back of a cheap receptacle, known as “backstabs,” rely on a tiny metal spring to grip the wire. They are notoriously unreliable. Over time, thermal expansion (wires heating up and cooling down) causes these springs to loosen.
If you force a third wire into a backstab while using the side screws for the others, you create weak points. A loose connection causes arcing (sparking), which melts the plastic and can start a fire inside your walls. Never rely on backstabs to manage overflow wiring.
The “Two Wires One Screw” Violation
Another common error is wrapping two wires around a single screw terminal. This is a code violation. Standard outlet screws are designed to secure exactly one wire. Two wires under one screw will eventually wiggle loose, leading to the same arcing and fire hazards mentioned above.
The Correct Solution: Pigtailing Explained
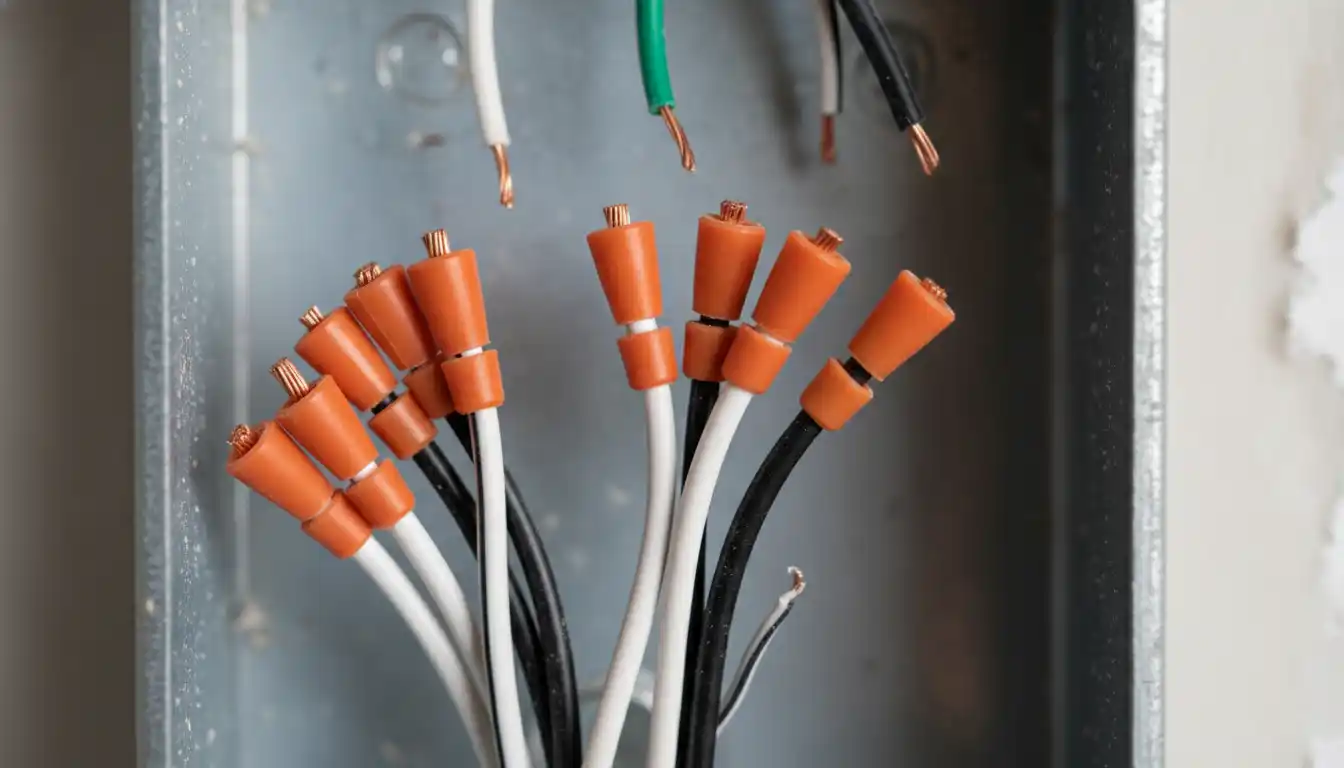
To safely wire an outlet with 3 black and 3 white wires, you must use the pigtail method. This involves combining the wires before they reach the outlet, so only one single hot wire and one single neutral wire actually connect to the device.
Tools You Will Need
- Wire Nuts or Wago Connectors: Ensure they are rated for at least 4 wires (Red wire nuts are usually best for this quantity of 12 or 14 gauge wire).
- Wire Strippers/Cutters: Sharp tools prevent nicking the copper.
- Extra Wire (Scrap Romex): You need about 6 inches of black and white wire to create the pigtails.
- Voltage Tester: Non-contact voltage tester to ensure safety.
Step-by-Step Pigtail Wiring Guide
Follow these steps to convert your messy 3-wire setup into a clean, safe connection.
- Turn Off Power: Flip the breaker and use your non-contact voltage tester to confirm absolutely no power is flowing to the box.
- Prep the Pigtails: Cut a 6-inch piece of black wire and a 6-inch piece of white wire. Strip 3/4 inch of insulation off both ends.
- Group the Grounds: Gather all bare copper ground wires. Add a 6-inch bare copper pigtail. Twist them all together with a wire nut. The free end of the pigtail will go to the green screw on your outlet.
- Group the Neutrals (Whites): Take the 3 white wires coming from the wall PLUS your new white pigtail wire. Twist them together securely with a wire nut. Tug on each wire to make sure none are loose.
- Group the Hots (Blacks): Repeat the process with the 3 black wires from the wall and your new black pigtail wire. Secure them with a wire nut.
- Connect the Outlet: You should now have just three wires extending from the wire nuts: one black, one white, and one ground.
- Connect the Black Pigtail to the Brass/Gold Screw.
- Connect the White Pigtail to the Silver Screw.
- Connect the Ground Pigtail to the Green Screw.
- Fold and Finish: Carefully push the wire nuts to the back of the box and screw the outlet into place.
Safety Critical: Box Fill Calculations
One aspect often ignored by blogs—but strictly enforced by electrical inspectors—is Box Fill. Jamming three cables and a device into a small box isn’t just difficult; it might be illegal.
Electrical codes assign a specific volume allowance for every conductor, clamp, and device in a box. If you exceed this volume, heat cannot dissipate, melting insulation and causing short circuits. Here is how to check if your box is too small for 3 black and 3 white wires.
| Item in Box | Count Calculation | Volume (14 AWG) | Volume (12 AWG) |
|---|---|---|---|
| Current Carrying Wires | 6 wires (3 black + 3 white) | 12.00 cu in | 13.50 cu in |
| Device (Outlet) | Counts as 2 wires | 4.00 cu in | 4.50 cu in |
| Ground Wires | All grounds count as 1 wire | 2.00 cu in | 2.25 cu in |
| Cable Clamps | Internal clamps count as 1 wire | 2.00 cu in | 2.25 cu in |
| TOTAL MINIMUM VOLUME | 10 Wire Equivalents | 20.00 cu in | 22.50 cu in |
The Verdict: A standard single-gang metal box is often only 12.5 to 18 cubic inches. If you have 3 cables entering a box, you almost certainly need a “deep” box (22+ cu in) or a plastic box which tends to be more spacious. If your metal box is too small, you may need to install a box extension ring to legally increase the volume without ripping out drywall.
For more on modifying home structures during renovations, you might find our guide on managing structural drainage helpful, as similar spacing principles apply.
Troubleshooting After Installation
If you wired everything up using the pigtail method but things still aren’t working, check these common issues.
“The Outlet Works but the Light in the Next Room Died”
This usually happens if a wire nut connection is loose. Even if the outlet has power, a loose connection in the “Line” or “Load” bundle inside the wire nut will break the chain for downstream devices. Turn the power off and re-twist your wire nuts, ensuring the wires are stripped to the correct length.
“The Breaker Tripped Immediately”
You likely have a “Ground Fault” or “Short Circuit.” This happens if a bare ground wire touches a hot terminal screw on the side of the outlet. When you push the outlet back into a crowded box (common with 3 cables), the ground wire can easily shift and touch the brass screw. To prevent this, always wrap electrical tape around the perimeter of the outlet to cover the side screws before installation.
Renovation Context
If you are uncovering this wiring during a kitchen or bathroom remodel, be aware that code requirements for these rooms are stricter (GFCI protection). If you are tiling around these outlets, ensure your box is flush with the new surface. See our discussion on tile preparation for related renovation tips.
When to Call a Pro
While pigtailing 3 black and 3 white wires is a standard task for an experienced DIYer, you should call an electrician if:
- The wires in the box are brittle, crumbling, or wrapped in cloth (knob and tube or early cloth NM).
- The box is visibly rusted or loose in the wall.
- You are confused by red wires or additional cables that don’t match the “3 and 3” pattern.
- You suspect previous improper work, such as abandoned utility lines or buried junction boxes nearby.
Handling three cables in one box requires patience and hand strength to twist thick wires together properly. If you cannot get a solid connection, do not risk a fire—call a professional to make the final termination.