Old, unused gas piping isn’t just an eyesore in your basement; it can be a silent hazard lurking behind your walls. Whether you are remodeling a kitchen, removing an obsolete space heater, or simply cleaning up the utility systems in a historic home, dealing with gas lines requires precision and respect for the fuel source. Many homeowners assume they can just saw off a pipe and cap it, but improper removal can lead to dangerous leaks or code violations.
The safest way to remove old gas lines is to completely shut off the main gas supply at the meter, bleed the remaining pressure from the system, disconnect the unused piping at the nearest active branch or T-fitting, and immediately seal the live side with a code-compliant black iron cap or plug using yellow gas-rated Teflon tape. NEVER leave a “dead leg”—a long section of capped pipe that remains connected to the system—as these can trap air and moisture, leading to internal corrosion over time.
Understanding the Risks Before You Start
Before you pick up a pipe wrench, you must understand the architecture of your home’s gas system. Unlike water pipes, where a small leak is merely messy, a gas leak is life-threatening. The primary goal when removing old lines is not just to get the pipe out of the way, but to ensure the remaining active system is perfectly sealed and pressurized.
The Hidden Danger of “Dead Legs”
A “dead leg” occurs when you cut a gas line far away from the main branch and cap it, leaving a long, dead section of pipe still pressurized with gas but with no flow. Professional plumbers and code inspectors strongly advise against this. Over years, these stagnant sections can collect condensation. Since the gas isn’t moving to dry it out, the moisture sits inside the iron pipe, causing it to rust from the inside out. Eventually, this can create a pinhole leak in a wall or ceiling that you might not notice until it is too late. The best practice is always to trace the line back to the main trunk and cap it as close to the source as possible.
Active vs. Inactive Lines
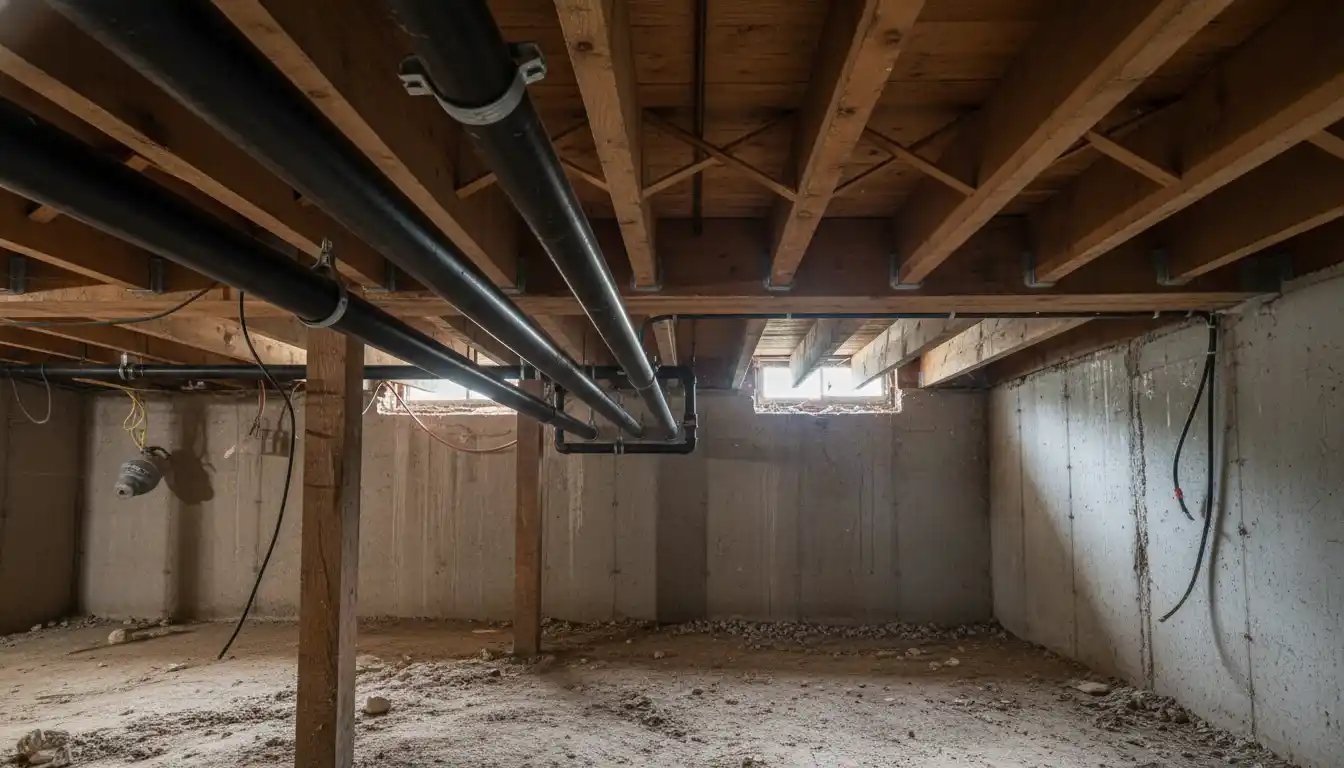
In older homes, it is common to find pipes that look like gas lines but were actually for old oil lamps or steam heat. Identifying them correctly is critical. Active gas lines in the US are typically black iron (which looks black or dark grey), while water lines are copper or galvanized steel (silver-grey). However, older DIY work might have used galvanized pipe for gas, which complicates identification. You can sometimes tell by the smell; old gas pipes that have been disconnected for decades often have a distinct, stale chemical odor that differs from the fresh “rotten egg” smell of mercaptan in live gas.
Permits and Legal Safety
In many jurisdictions, a homeowner is allowed to *repair* plumbing but is restricted from *altering* gas piping without a permit. Removing a line counts as an alteration. While you can physically do the work yourself, you should check your local building codes. If you sell your house later, an inspector may ask for a permit record for the modified gas system. If you are uncomfortable with the risks, hiring a licensed master plumber is a small price to pay for peace of mind.
Preparation and Essential Tools
Successful gas line removal is 90% preparation. You cannot rush this process. Ensure you have the right tools on hand so you aren’t scrambling while the gas is shut off.
Shutting Off the Main Supply
Locate your gas meter, usually found on the side of the house or in the basement. You will see a valve on the pipe coming out of the ground before it enters the meter (or immediately after it). Using an adjustable wrench, turn the valve widely until the tab is crosswise (perpendicular) to the pipe. This cuts the flow. Once off, go to your stove or gas fireplace and turn it on. You will hear a hiss as the remaining pressure bleeds out, and then silence. This “bleeding” step is vital to ensure no pocket of pressurized gas remains in the pipe you are about to unscrew.
Required Tools and Materials
You will need two pipe wrenches: one to turn the pipe you are removing, and the second to hold the fitting you are keeping in place (this prevents you from accidentally loosening the wrong joint further down the line). For sealing, do not use standard white Teflon tape intended for water; it is not rated for gas. You must use yellow Teflon tape or a gas-rated pipe thread sealant (pipe dope). You will also need a “sniffer” (electronic gas leak detector) or a bottle of non-corrosive leak detection fluid.
Personal Protective Equipment
Wear safety glasses to protect your eyes from falling rust and debris, especially if you are working overhead in a basement. Gloves are helpful for grip but ensure they aren’t so bulky that you lose dexterity with the tape. If you are working in a tight crawlspace, consider a respirator, as old dust and insulation often accompany these pipes.
Step-by-Step Guide to Removing the Pipe
Once the gas is off and the lines are bled, you can begin the physical removal. This process is physically demanding, as black iron pipes are threaded tightly and may have rusted in place over decades.
Disconnecting Fittings and Joints
Start at the appliance end of the line (e.g., where the old heater was) and work your way back toward the main line. Place one pipe wrench on the fitting you want to save and the other on the pipe you are removing. Pull the wrenches in opposite directions. This technique, known as “backing off,” ensures you don’t twist the main gas trunk while trying to loosen a branch. If a joint is seized, apply a penetrating oil like WD-40 Specialist or PB Blaster and let it sit for 15 minutes. In extreme cases, heating the fitting with a heat gun (never an open flame) can help expand the metal and break the rust seal.
Cutting vs. Unscrewing
If you have a very long run of pipe that is impossible to unscrew because it passes through studs or joists, you may need to cut it. A reciprocating saw with a metal-cutting blade works well here. WARNING: Only cut the pipe if you are 100% certain it is disconnected from the supply and fully bled. Sparks from a saw can ignite residual gas pockets. It is safer to unscrew sections whenever possible. If you must cut, cut a section in the middle of the disconnected run first to verify it is empty.
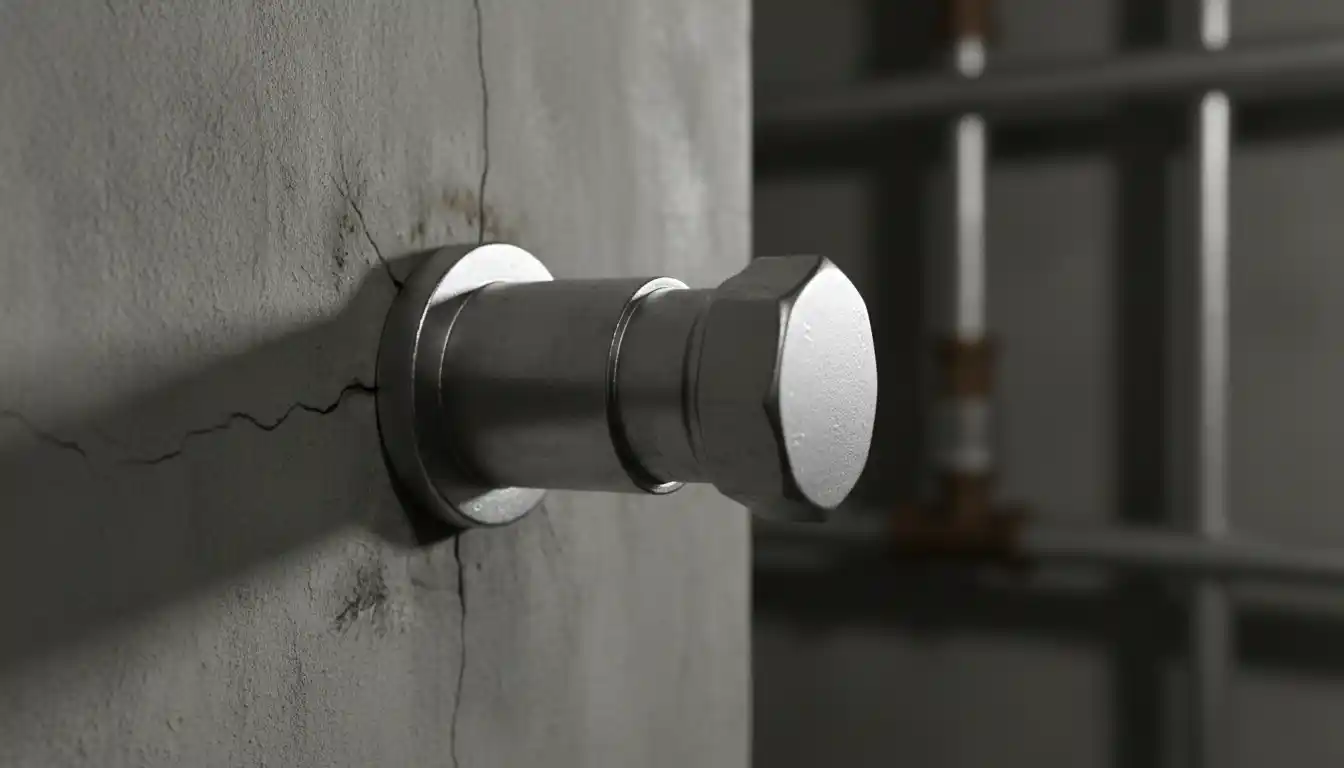
Capping the Active Line
Once you have removed the pipe back to the main T-fitting or branch, you need to seal the opening. Clean the threads of the remaining fitting with a wire brush to remove old dried “dope.” Wrap the threads of your new black iron plug or cap with yellow Teflon tape, winding clockwise so the tape doesn’t unravel when you screw it in. Apply a small amount of pipe dope on top of the tape for a backup seal. Thread the plug in by hand to avoid cross-threading, then tighten it firmly with your pipe wrench. It should be snug, but don’t overtighten to the point of cracking the fitting.
Post-Removal Safety and Verification
You have removed the pipe and capped the line. Now comes the most critical phase: testing. You must verify that your new seal is airtight before you walk away.
The Bubble Test
Turn the main gas valve back on slowly. Do not rush this; a sudden rush of pressure can sometimes trigger safety valves in modern appliances. Once the gas is on, mix a solution of dish soap and water (or use a commercial leak detector fluid). Spray or brush it generously over the new cap and fitting. Watch closely for 5 minutes. If you see bubbles forming and growing, you have a leak. Turn the gas off immediately, tighten the fitting slightly, and test again. If bubbles persist, you may need to redo the tape and dope.
Repairing the Area
With the pipe gone, you will likely have holes in your floor or walls. If the pipe ran through a finished area, you might need to patch drywall. When repairing these surfaces, ensure you seal any drafts. For drywall repairs, knowing the difference between a skim coat vs primer is essential for getting a smooth finish that hides the old utility hole. If the pipe ran near plumbing, you might encounter PVC lines. If you accidentally jostled a drain line during the removal, you may need to join PVC pipe with a rubber coupling to ensure your plumbing remains as secure as your gas lines.
Material Comparison for Gas Lines
When removing old lines, you might encounter different materials. Understanding what you are looking at helps determine the difficulty of the job.
| Material Type | Visual Identifier | Common Usage | Removal Difficulty |
|---|---|---|---|
| Black Iron | Dark grey/black rigid metal, threaded joints | Standard for natural gas | High (Heavy, requires pipe wrenches) |
| Galvanized Steel | Silver/Zinc coated, threaded | Older water or gas lines | High (Often seized/rusted tight) |
| Copper | Reddish-gold metal, soldered or flared | Propane or some older gas runs | Medium (Soft, easy to cut but kinks easily) |
| CSST (Corrugated Stainless Steel) | Yellow or black plastic coating, flexible | Modern retrofits | Low (Flexible, easy to disconnect fittings) |
When to Call a Professional
While this guide empowers you to handle straightforward removals, certain situations demand a pro. If the pipe you want to remove is the main supply line feeding your furnace or water heater, do not touch it. Modifying the main trunk requires re-calculating the gas load to ensure your appliances get enough pressure. Furthermore, if the pipes are rusted to the point of crumbling, trying to wrench them off could snap a live pipe further down the line, causing a catastrophic leak.
Additionally, if you find the gas lines are intertwined with structural elements or complex stair framing, you might need more than just a plumber. For example, if you are renovating a staircase and wondering what size screws for balusters you should use to work around the old piping void, a general contractor might be necessary to ensure structural integrity isn’t compromised during the demo.
Final Thoughts on Safety
Removing old gas lines clears up space and removes the risk of dormant leaks in your home. However, the margin for error is zero. Always double-check your shut-off valves, use the correct gas-rated sealants, and never skip the leak test. If you smell gas at any point during the process and cannot stop it, evacuate the house immediately and call the utility company. Your safety is worth more than the cost of a service call.