You have an emergency leak or a planned renovation, you turn the main shut-off valve clockwise until it stops, but when you cut the pipe or open the faucet, water is still flowing. The most common reasons for water running after the main shut-off is closed are residual water draining from the upper floors (which can take up to 15 minutes) or a faulty gate valve that hasn’t fully seated due to mineral sediment buildup.
Panic is the natural reaction, especially if you have already cut into a pipe. However, in most cases, the flow is not coming from the city supply but from the gallons of water trapped inside your home’s piping system. Before you call an emergency plumber, follow this guide to diagnose whether you have a true valve failure or just a gravity problem, and learn the professional tricks to stop the drip.
Is It Residual Water or a True Leak?
Before assuming your main valve is broken, you must rule out “residual drainage.” Your home’s plumbing is a complex web of pipes holding gallons of water. When you close the main valve, that water doesn’t disappear; it stays there until gravity pulls it out.
The 10-Minute Rule
If you live in a two-story home, the water in the upstairs pipes must drain down to the lowest open point. This can often look like a full-pressure stream for the first minute, slowing to a steady trickle. If the water pressure has dropped significantly but hasn’t stopped completely after 10 to 15 minutes, you are likely dealing with a passing valve. If the water is still blasting out at full pressure, your shut-off valve has failed completely.
How to “Bleed” the Lines Correctly
To drain the system faster and stop the dripping, you need to break the airlock. Think of your plumbing like a straw full of liquid; if you cover the top with your finger, the liquid stays inside. To empty it, you must remove your finger.
Follow these steps to bleed the lines:
- Keep the main shut-off valve closed.
- Go to the lowest faucet in your house (usually a basement utility sink or an outside hose bib) and open it fully.
- Go to the highest faucet (top floor bathroom) and open it. This acts as a vent, allowing air to enter the system and pushing the water out of the lowest point.
Diagnosing a Faulty Main Shut-Off Valve
If you have bled the lines and waited 15 minutes, but the water continues to trickle or flow, your main shut-off valve is likely the culprit. This is incredibly common in older homes equipped with gate valves.
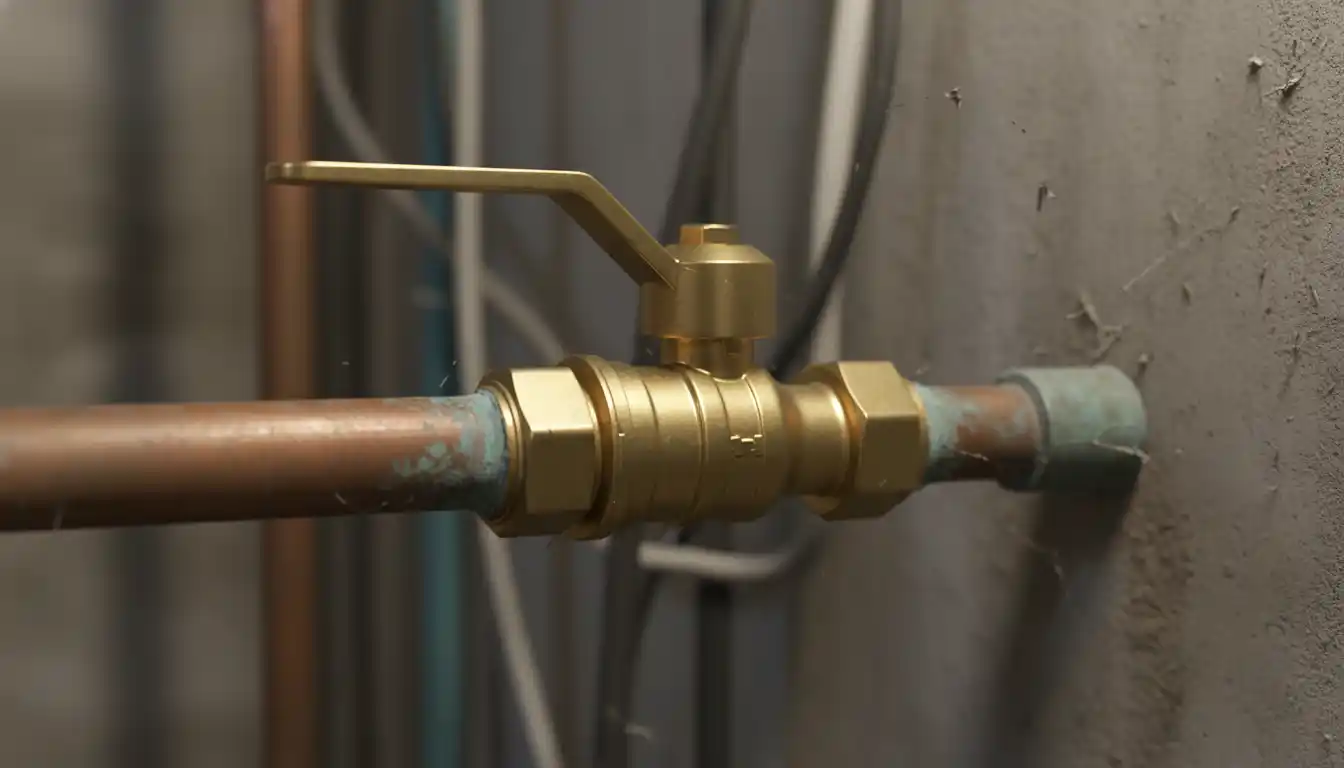
The Gate Valve Failure (Sediment & Broken Stems)
Gate valves are the ones with the round, wheel-like handle. They work by lowering a brass gate into the path of the water. Over decades, mineral deposits and sediment accumulate in the bottom track of the valve. When you try to close it, the gate hits this rock-hard sediment and stops before it can make a watertight seal. To your hand, the valve feels “tight” and fully closed, but a small gap remains, allowing water to pass.
In worse scenarios, the valve stem itself may snap. If you turn the handle and it spins freely without resistance, or if it felt tight and then suddenly “popped,” the internal stem has broken. The gate is likely stuck in the open position, regardless of what you do with the handle.
Ball Valves: Better but Not Invincible
Ball valves have a lever handle and are generally more reliable. However, they can still fail. If the internal plastic or Teflon seals wear out, water can bypass the ball. Additionally, in very old installations, the handle might strip, turning the exterior lever while the internal ball remains open. Just like a dryer blower wheel stripped of its grip prevents the machine from working, a stripped valve handle renders your shut-off useless.
Immediate Fixes You Can Do Yourself
If you determine the valve is leaking, you don’t always need to replace it immediately. There are a few tricks to stop the flow or work around it.
Tightening the Packing Nut
If water is leaking from the stem of the valve (right behind the handle) rather than through the pipe, you can often fix this in seconds. Locate the small nut directly behind the handle wheel—this is the packing nut. Use an adjustable wrench to tighten it about 1/8th to 1/4 of a turn. This compresses the packing material inside and often stops the leak.
The “Bread Trick” for Emergency Soldering
If you need to solder a copper pipe but a small trickle of water keeps cooling the metal, you cannot get the solder to melt. This is a classic plumber’s nightmare. The solution is simple: white bread.
Take a piece of soft white bread (remove the crust), ball it up, and shove it into the pipe upstream of your repair area. The bread acts as a temporary dam, absorbing the water and stopping the trickle long enough for you to solder the fitting. Once the water is turned back on, the bread dissolves instantly and flushes out of the faucet aerator.
Advanced Tools and Techniques
Sometimes the bread trick isn’t enough, or you are working with PEX or threaded fittings where bread isn’t suitable. Here are some advanced methods that few homeowners know about.
Using a Shop-Vac to Create a Vacuum
If you cannot stop the water from trickling, you can pull the water away from your work area. Open a faucet downstream from where you are working and place a wet/dry shop vac over the spout. Turn it on to create suction. This vacuum pressure will pull the residual water away from the open pipe you are trying to solder or glue, keeping the joint dry. This is far safer than working in a panic, and avoids hazards in tight spaces—similar to the caution needed when dealing with trapped wildlife, like drowning a skunk in a live trap, you want to control the environment before you act.
“Jet Swet” and Compression Fittings
Professional plumbers use a tool called a “Jet Swet.” This is a long rod with a rubber gasket that you insert into the pipe. You tighten a nut to expand the gasket, sealing the pipe from the inside while you solder the valve or fitting right over the tool. Once cool, you loosen the nut and slide the tool out. If you don’t want to buy an expensive tool, consider using a SharkBite (push-to-connect) shut-off valve. These can be installed even on wet pipes with a steady trickle, instantly solving the problem.
When the Valve is Truly Dead: Replacement Options
If the main valve is passing a significant amount of water, it must be replaced. This usually requires shutting off the water at the street level.
The Street-Side Curb Stop
Every home has a curb stop valve, usually located in a metal box near the sidewalk or street. You will need a “meter key” (a long T-handle tool) to turn this valve. However, be extremely careful: these valves are often owned by the city. In some municipalities, touching them is illegal. In others, it is acceptable in emergencies. If this valve breaks while you are turning it, the city may hold you liable for the repair.
If you are planning a major renovation, such as double window framing that requires moving plumbing in the walls, it is highly recommended to test your main shut-off valve days in advance. If it fails, you can schedule the city to turn off the water at the curb, allowing you to replace your main valve safely.
Troubleshooting Matrix: Valve Symptoms and Fixes
| Symptom | Likely Cause | Recommended Fix |
|---|---|---|
| Water slows to a drip after 10 mins | Residual Water | Open high and low faucets to bleed air. Wait 15 mins. |
| Handle turns but nothing happens | Broken Stem | Turn off water at street/curb. Replace valve. |
| Valve feels tight but water runs | Sediment in Gate Valve | Open/close gently to flush debris. Do not over-tighten. |
| Leak at the handle stem | Loose Packing Nut | Tighten packing nut 1/8 turn or replace packing washer. |
| Constant steady stream (no pressure drop) | Total Valve Failure | Use “Bread Trick” for soldering or install SharkBite valve. |
Dealing with a main shut-off valve that won’t shut off is stressful, but it is rarely a disaster if you keep a cool head. Most of the time, patience and a simple bleed of the lines will solve the issue. If the valve is truly broken, utilizing a temporary stopper or a push-to-connect fitting can save the day without requiring a city excavation.