If you are renovating a cathedral ceiling or finishing an attic with 2×8 rafters, you have likely run into a frustrating mathematical wall. Building codes in many climate zones require a minimum of R-38 ceiling insulation, but a standard 2×8 rafter only provides 7.25 inches of actual depth. Since standard fiberglass batts require 12 to 14 inches to achieve R-38, the numbers simply don’t add up.
This is a common headache for homeowners and contractors alike. Trying to cram thick fiberglass into a shallow bay compresses the material, drastically reducing its R-value and potentially leading to moisture issues, mold, and rot. Ignoring the problem leads to a freezing room in winter and a baking oven in summer.
The most effective way to achieve R-38 in 2×8 rafters is to utilize high-density closed-cell spray foam, which offers approximately R-7 per inch, or to install a hybrid system that combines cavity insulation with a continuous layer of rigid foam board across the underside of the rafters to break thermal bridging.
In this guide, we will break down the physics of the problem and provide three specific, code-compliant solutions to hit that R-38 target without rebuilding your entire roof.
The Physics Problem: Why Standard Insulation Fails
To solve this, you must first understand the constraints of your framing. A “2×8” is a nominal dimension; the actual lumber measures 1.5 inches by 7.25 inches. This 7.25-inch depth is your primary limitation.
The R-Value Per Inch Reality
Different insulation materials resist heat flow at different rates. Here is why off-the-shelf solutions often fail in a 2×8 cavity:
- Fiberglass Batts: Roughly R-3.2 to R-3.7 per inch. In a 7.25-inch space, you effectively get R-23 to R-26.
- Mineral Wool: Roughly R-4.0 per inch. Maxes out around R-29.
- Cellulose: Roughly R-3.5 per inch. Maxes out around R-25.
None of these traditional materials can reach R-38 within 7.25 inches. Furthermore, if your roof assembly requires ventilation (an air gap between the insulation and the roof deck), you lose another 1 to 2 inches of depth, leaving you with only 5.25 inches of usable space.
The Thermal Bridging Factor
Even if you filled the cavity with a magical high-R material, the wood rafters themselves act as “thermal bridges.” Wood has an R-value of roughly R-1 per inch. Every 16 or 24 inches, you have a solid wood stud conducting heat right through your assembly, bypassing your insulation. To truly get a high-performance ceiling, you need to address both the cavity and the rafters.
Solution 1: Closed-Cell Spray Foam (The Gold Standard)
If you need to hit R-38 strictly within the rafter cavity—perhaps because you cannot lower the ceiling height—closed-cell spray foam (CCSF) is often the only viable option. Unlike open-cell foam or fiberglass, closed-cell foam is incredibly dense and provides the highest R-value per inch available on the market.
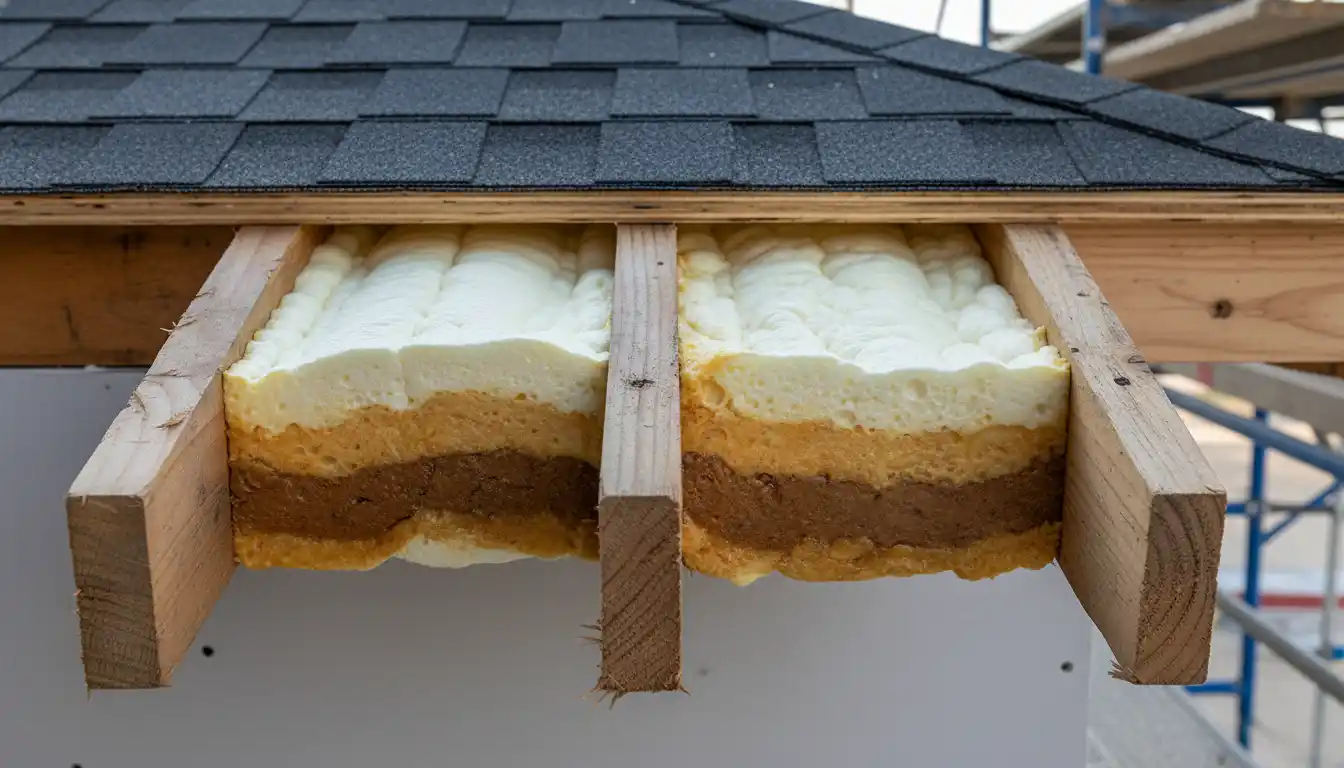
Achieving R-Value in Tight Spaces
Closed-cell foam typically offers between R-6.5 and R-7.0 per inch. To achieve R-38, you generally need about 5.5 to 6 inches of foam. Since your cavity is 7.25 inches deep, this fits comfortably with room to spare.
This method is particularly powerful because closed-cell foam acts as its own vapor barrier. In “hot roof” or unvented assemblies, the foam is sprayed directly against the underside of the roof deck, sealing every crack and crevice. This eliminates the need for a ventilation gap, allowing you to utilize the full depth of the rafter.
The Cost vs. Benefit
The downside is cost. CCSF is significantly more expensive than fiberglass. However, the performance benefits are unmatched. It adds structural rigidity to your roof, seals air leaks that account for up to 40% of energy loss, and prevents the moisture accumulation that rots roof decks. Before spraying, ensure you inspect the roof deck thoroughly. You don’t want to seal in existing problems, similar to how you wouldn’t want to trap a pest; imagine drowning a skunk in a live trap—it’s a mess you want to deal with before the final enclosure.
Solution 2: The Hybrid “Flash and Batt” Method
If the budget for full spray foam is too high, the “Flash and Batt” method offers a middle ground. This involves spraying a thinner layer of closed-cell foam to seal the deck and provide a vapor barrier, followed by filling the rest of the cavity with a cheaper fiber insulation like mineral wool or fiberglass.
The Math of Hybrid Systems
In a 2×8 cavity, you might apply 2 inches of closed-cell foam against the roof deck (providing ~R-14 and an air seal). This leaves 5.25 inches of space. You can then fill that space with a high-density mineral wool batt (approx. R-23). The total system R-value would be around R-37 or R-38.
Condensation Warning
This method requires careful calculation. The foam layer must be thick enough to prevent the inner surface of the foam from reaching the dew point during winter. If the foam is too thin, moisture from inside the house can pass through the fibrous insulation, hit the cold foam, and condense. Consult your local code (IRC Table R806.5) to determine the minimum foam thickness required for your specific climate zone.
Solution 3: Continuous Rigid Foam (Breaking the Bridge)
This is often the favorite method for building scientists and energy-conscious DIYers. Instead of trying to cram everything between the rafters, you add a layer of insulation under them. This is known as continuous insulation.
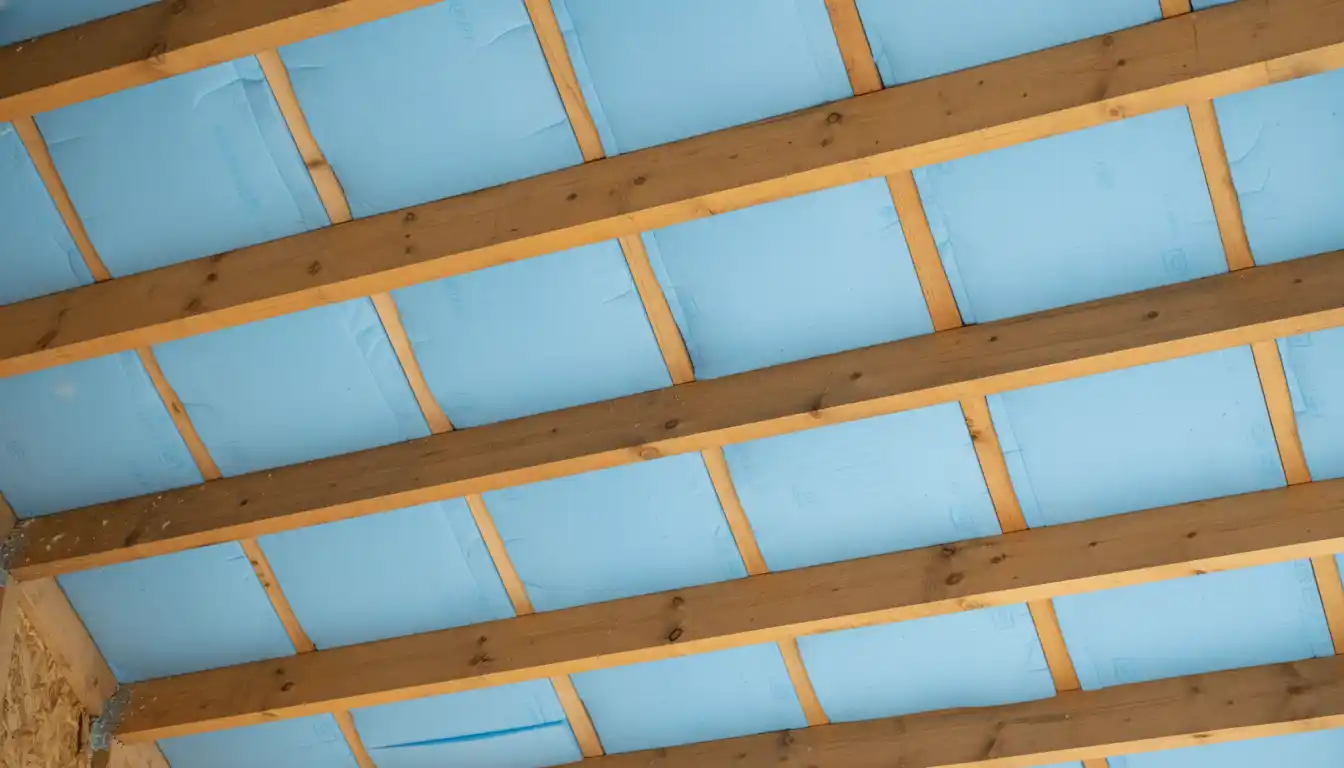
How It Works
1. Fill the Cavity: Install R-23 mineral wool or high-density fiberglass into the 7.25-inch rafter bay.
2. Add Rigid Foam: Screw 2-inch or 3-inch rigid foam boards (Polyiso or XPS) across the bottom of the rafters.
3. Finish: Install drywall over the rigid foam using long screws.
Why This is Superior
A 2-inch layer of foil-faced Polyiso board adds roughly R-13. Combined with R-23 in the cavity, you hit R-36 to R-38. More importantly, the rigid foam covers the bottom edge of the wooden rafters. This stops the “thermal bridging” where heat escapes through the wood. The result is a ceiling that performs significantly better than a standard R-38 fiberglass batt installation.
Note on Installation: When installing rigid foam layers, ensure they are tightly fitted and taped. Loose layers can sometimes rub against each other or the framing with temperature changes. If you are concerned about strange sounds from your ceiling, you might want to read up on how to stop thermal expansion noise to ensure your new insulation stack is quiet.
Comparative Analysis of Insulation Methods
To help you decide, here is a breakdown of how different materials perform specifically in a 2×8 (7.25″) cavity.
| Insulation Method | Approx. R-Value per Inch | Max R-Value in 7.25″ | Pros | Cons |
|---|---|---|---|---|
| Fiberglass Batt | 3.2 – 3.7 | R-23 – R-26 | Cheap, DIY friendly | Cannot reach R-38 alone; prone to air leaks. |
| Mineral Wool | 4.0 – 4.2 | R-29 – R-30 | Fire resistant, hydrophobic | Still falls short of R-38 in 2×8 depth. |
| Open Cell Foam | 3.5 – 3.8 | R-25 – R-27 | Air seals well, expands fully | Requires vapor retarder paint; lower R-value. |
| Closed Cell Foam | 6.5 – 7.0 | R-47 – R-50 | High R-value, vapor barrier, rigid | Expensive; requires professional installation. |
| Hybrid (Batt + Rigid Foam) | Variable | R-38 – R-45 | Breaks thermal bridging, cost-effective | Lowers ceiling height by 2-3 inches. |
Addressing Ventilation and Moisture
The decision to vent or not to vent is critical. In a traditional “vented” assembly, air enters the soffit and exits the ridge, carrying away moisture. If you use fiberglass or mineral wool, you must maintain this 1-inch air gap, which reduces your insulation space to 6.25 inches. This makes hitting R-38 with batts mathematically impossible without furring out the rafters.
The “Hot Roof” Alternative
An unvented or “hot roof” assembly treats the attic space as conditioned space. This is where spray foam shines. By adhering the insulation directly to the roof deck, you eliminate the need for venting. However, this must be done perfectly. If moisture gets trapped in a hot roof assembly, it can rot the sheathing from the inside out.
Electrical Considerations
When you add layers to your ceiling—especially if you choose the continuous rigid foam method—you will effectively deepen the ceiling surface. This means standard electrical boxes for ceiling lights or fans may no longer sit flush. You will need to install box extenders or adjust the rough-ins. This is also a good time to inspect your wiring. If you are updating older wiring or adding safety devices, ensure you understand requirements like a switched GFCI to keep your new room code-compliant and safe.
Final Recommendation
Don’t try to force R-38 fiberglass batts into a 2×8 space. You will compress the fiberglass, reduce its efficiency, and likely bow your drywall.
For the best balance of performance and cost, the Continuous Insulation method (Solution 3) is often the winner. It hits the R-value number, eliminates thermal bridging, and costs less than a full spray foam job. However, if ceiling height is precious and you cannot afford to lose 2 inches, Closed-Cell Spray Foam is the investment that solves the problem instantly.