Flashing where siding meets concrete is an important exterior water-management detail. This transition has to manage rain splash, drainage, and moisture movement. When the detail is poorly designed or installed, water can reach the wall assembly and remain hidden behind the siding until damage becomes apparent.
This guide explains why the joint can leak, how to diagnose problems, and how to approach a durable flashing detail. It covers materials, clearances, repair steps, siding-specific concerns, and maintenance.
Why Siding-to-Concrete Junctions Fail
Concrete is porous and can absorb water from rain, irrigation, and wet soil. Moisture can also move through porous concrete by capillary action, especially where siding or wall materials are in direct contact with it.
Siding and concrete also respond differently to temperature and moisture changes. Siding can expand, contract, or move while concrete changes much less dimensionally over the same conditions. A caulk-only joint may eventually crack or lose adhesion.
Many failures involve inadequate flashing, improperly lapped drainage materials, blocked drainage paths, or siding installed too close to concrete. Water that gets behind the cladding needs a continuous path back to the exterior rather than a way into the sheathing or framing.
The Hidden Mechanics: Capillary Action, Pressure, and Vapor
Capillary action can contribute to moisture problems at a siding-concrete joint. Water can move through very small gaps and porous materials, but the amount and distance depend on the materials, gap size, moisture conditions, and time. A specific gap such as 1/16 inch should not be treated as a universal threshold.
Wind-driven rain can also move water behind siding, especially during severe storms or where the cladding and flashing are poorly detailed. A bead of caulk may reduce some water or air movement, but it is not a substitute for a properly integrated drainage plane and flashing.
Concrete can retain moisture after rain and release some of that moisture over time. If the wall assembly cannot dry adequately, moisture can accumulate within the assembly. Vapor diffusion is only one part of this process; bulk water leakage and air movement can also transport substantial moisture.
This is why the detail needs a drainage strategy: flashing should direct water outward, while the wall’s weather-resistive barrier and drainage space should provide a continuous path for water that gets behind the cladding.
Signs You Have a Flashing Problem
Look for white mineral deposits on concrete. Efflorescence indicates that moisture has moved through the concrete and carried dissolved salts toward the surface. It can be a useful clue, although it does not by itself prove that the siding-to-concrete joint is leaking.
Check for swollen siding, peeling paint, or failed sealant. Wood and fiber cement may deteriorate when repeatedly exposed to moisture. Vinyl may continue to look normal while water damages sheathing or framing behind it.
Other clues include rusted fasteners, dark stains, and persistent musty odors indoors. In severe cases, deterioration can create openings that allow pests to enter. A moisture meter can help identify elevated moisture, but readings need to be interpreted in context and should not be treated as proof of a particular leak source.
Interior symptoms matter too. A damp rim joist, sill plate, or basement wall may point to an exterior moisture problem, but water can travel from other parts of the wall before appearing indoors. If sheathing or sill details are unclear, review whether sheathing should cover the sill plate before opening the wall: Should Sheathing Cover the Sill Plate?.
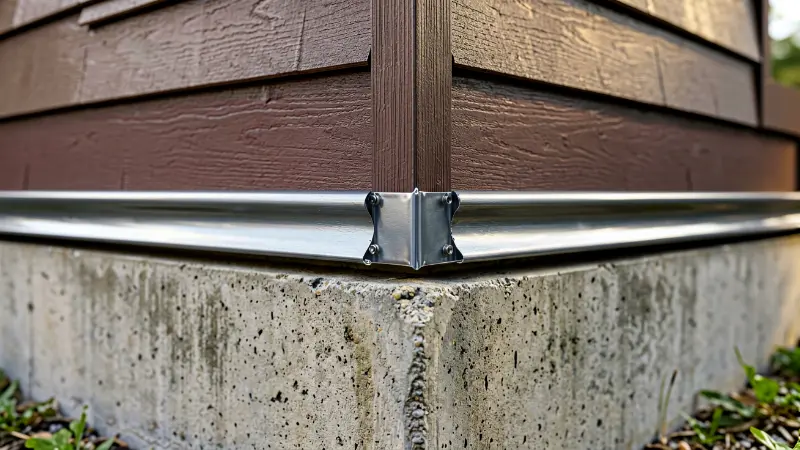
First, Check Clearance and Grade
Siding should not be buried in concrete, soil, or mulch. Many siding systems require a substantial clearance above grade, often around 6 inches, but the exact requirement depends on the cladding and installation instructions. Above concrete flatwork, the required clearance also varies by siding manufacturer and detail, so do not treat 1 to 2 inches as a universal requirement.
These clearances help provide drainage, drying, and inspection access while reducing direct moisture contact. If the concrete is too high, removing or trimming the bottom siding course may be necessary, depending on the siding system.
If the concrete is a porch slab or stoop, confirm the slab edge, slope, and drainage details. A slab that directs water toward the wall can overwhelm a poorly designed transition. Review concrete porch slab overhang guidance before changing grade or trim: Concrete Porch Slab Overhang.
Regrade soil so it drains away from the foundation where practical. Keep gutters and downspouts working and discharge roof water away from the wall. Good site drainage reduces the amount of water the flashing detail must manage.
Code, Manufacturer, and Warranty Expectations
Building codes generally require exterior wall assemblies to be protected against water intrusion, with flashing and water-resistive barriers installed according to the applicable requirements. Flashing should be corrosion-resistant and integrated with the wall’s drainage plane.
Manufacturer instructions are equally important for siding installation. Different products have different clearance, flashing, fastening, and sealant requirements.
Insurance coverage depends on the policy and circumstances, so do not assume that a particular installation defect will determine a claim. Document the existing condition with photos before covering the repair and keep material and professional-service records.
Flashing Options: Which Material Belongs at Concrete?
Material choice affects corrosion, durability, compatibility, and appearance. Concrete is alkaline, and some metals can corrode or deteriorate more quickly when exposed to concrete, cement products, or alkaline runoff. Dissimilar metals can also create galvanic corrosion when moisture is present.
| Flashing Material | Best Use at Siding-Concrete Junction | Strengths | Cautions |
|---|---|---|---|
| PVC or vinyl | Residential siding transitions where the siding and flashing system permit plastic flashing | Does not rust; easy to cut and form; available in different profiles | Can be less rigid than metal; must be supported and fastened as specified |
| Stainless steel | Coastal, high-moisture, or demanding long-life assemblies | Excellent corrosion resistance; strong and durable | Higher cost; use compatible fasteners and installation methods |
| Copper | Architectural accents and custom flashing details where compatible materials are used | Long service life; easy to form | Can stain concrete; incompatible metal contact can cause corrosion |
| Galvanized steel | Many standard exterior flashing applications where the environment and assembly are suitable | Strong; widely available | Cut edges and prolonged wet exposure can reduce service life; compatibility matters |
| Aluminum | Applications where the manufacturer permits aluminum and it can be isolated from incompatible materials | Lightweight; easy to form | Can corrode in alkaline or dissimilar-metal contact; use appropriate isolation |
The flashing profile matters at least as much as the material. A properly formed base flashing should have an upturned portion integrated with the wall’s drainage plane and an outward-projecting portion that directs water away from the wall. The exact profile depends on the siding and foundation detail.
Anatomy of a Correct Flashing Detail
A correct detail starts with a continuous weather-resistive barrier or other approved drainage plane over the sheathing. The drainage plane must be integrated with the flashing so water is directed downward and outward rather than behind the flashing.
End dams can be important where the flashing configuration could allow water to run sideways toward the wall or ends. Use properly formed or manufacturer-approved end conditions, and seal or tape laps only where the flashing system requires it.
Fasteners and penetrations should follow the flashing and siding system’s instructions. Where possible, avoid unnecessary penetrations through horizontal drainage surfaces because every penetration can create a potential leak path. Use corrosion-resistant fasteners compatible with the flashing and adjacent materials.
The siding must stop above the concrete rather than sit on it. The required gap depends on the siding product and application. Do not caulk the bottom edge if doing so would block a required drainage or ventilation path; follow the siding manufacturer’s instructions.
Step-by-Step Repair and Installation
1. Remove the Bottom Siding Courses
Start by removing enough siding to expose the suspected damage. Work carefully to avoid damaging reusable pieces. Label or mark courses so they can be reinstalled in the same order.
Inspect the sheathing, framing, and sill area. Probe suspect wood carefully for deterioration. If rot or structural damage is present, remove and replace affected material with appropriate methods; extensive deterioration may require a qualified contractor.
2. Repair the Wall and Drainage Plane
Replace damaged sheathing with compatible material. Install or repair the weather-resistive barrier so it integrates with the flashing and drains water outward. Seal penetrations and transitions with products approved for the particular WRB.
If the wall has no WRB, adding one may require more siding removal and a system-specific approach. A partial repair that does not establish a continuous drainage path may leak again. In some assemblies, a fluid-applied or self-adhered membrane may be appropriate, but it must be compatible with the existing wall system.
3. Cut and Fit the Flashing
Measure the wall length and provide the overlap and end conditions required by the flashing system. Cut metal flashing with the appropriate tool and handle it carefully because edges can be sharp. Follow manufacturer safety instructions for cutting plastic or membrane products.
Dry-fit the flashing before fastening. The upper portion should integrate with the drainage plane, while the lower portion should project outward and direct water away from the wall. Do not create a reverse slope that sends water back toward the sheathing.
4. Install the Flashing in the Correct Order
Fasten the flashing where permitted by the manufacturer and keep penetrations integrated with the drainage plane. Do not add fasteners through drainage surfaces unless the flashing system specifically requires them.
Lap flashing components in the direction of drainage and use the overlap, tape, sealant, and end treatment specified for the particular system. Do not assume a universal 6-inch lap applies to every siding or flashing product.
5. Restore the Weather-Resistive Barrier and Siding
Integrate the WRB with the flashing so the layers shed water outward in shingle fashion. The exact sequence varies with the wall assembly, so follow the WRB and siding manufacturer’s instructions.
6. Seal, Finish, and Verify
Apply sealant only where the siding or flashing system calls for it, such as at selected trim ends or penetrations. Use backer rod where required for a properly sized sealant joint. Select a sealant compatible with the concrete, siding, flashing, and surrounding materials.
After the repair, perform a controlled water test if appropriate for the assembly. Use a gentle spray and avoid forcing water directly into joints. Have another person inspect the interior if possible, and stop if water enters the wall. Check the area again after significant rainfall.
Details by Siding Type
Vinyl Siding
Vinyl siding is designed to move with temperature changes. Do not restrict that movement with unnecessary caulk. Keep the clearance required by the siding manufacturer and use a base flashing or trim detail that permits drainage.
J-channel or other trim at the bottom can trap water if it is not designed and installed to drain. Some systems use sill trim or other receivers. Follow the siding manufacturer’s specific base detail.
Fiber Cement Siding
Fiber cement is durable but is not a substitute for proper water management. Cut edges and bottom edges may require specific treatment depending on the product. Keep the manufacturer’s required clearance and prime, seal, or paint cut edges when the instructions call for it.
Flashing should protect the bottom edge from splash and direct water outward. A drip edge can help control runoff, but the exact profile should match the siding system. Sealant should not replace required flashing.
Wood Siding
Wood siding is vulnerable to decay when it remains repeatedly wet. Use the clearance and flashing detail specified for the siding. Corrosion-resistant flashing and compatible fasteners are particularly important where moisture exposure is high.
Back-priming or otherwise coating exposed wood surfaces may improve moisture resistance when recommended for the siding product. Inspect the bottom course regularly for deterioration, paint failure, and trapped moisture.
Stucco and EIFS
Stucco commonly uses a weep screed or other base drainage detail. The base detail provides a path for moisture to escape from behind the cladding. Do not block required weep openings with caulk or paint.
EIFS systems vary, and many modern systems incorporate specific drainage features. The flashing must connect correctly to the system’s drainage plane. Repairs should follow the EIFS manufacturer’s details and may require a contractor experienced with the particular system.
Manufactured Stone and Masonry Veneer
Masonry veneer and manufactured stone assemblies commonly require flashing, drainage space, and weep openings. The base flashing must direct water out of the assembly rather than allow it to enter the wall. Concrete contact can also contribute to efflorescence and, depending on materials, corrosion.
Do not let mortar or other materials block required drainage paths. Use flashing materials compatible with the mortar, concrete, and fasteners. Stainless steel may be appropriate for demanding applications, but the manufacturer’s system requirements control.
Metal Siding and Panels
Metal siding and panels rely on system-specific clips, fasteners, seams, and flashing. Thermal movement can be significant, particularly with long panels. Use the fastening and joint details specified by the panel manufacturer.
Avoid direct contact between incompatible metals. Moisture and alkaline runoff can accelerate corrosion in some combinations. Use an approved isolation material where required rather than assuming a particular strip or tape is suitable for every system.
How to Test and Verify the Fix
A controlled water test can help reveal some exterior leaks. Use a gentle spray, starting at the lower area and working upward gradually. Do not use high-pressure spray or deliberately force water into joints.
Have someone inside check the basement, crawlspace, or room below when accessible. A moisture meter can help identify elevated moisture, but compare readings with known-dry areas and consider the meter’s limitations. Photograph any damp spots for reference.
Repeat testing after the repair has dried if necessary. There is no universal 15- or 20-minute test that proves a wall detail is watertight. Monitor the area during subsequent storms, especially after wind-driven rain.
Common Mistakes to Avoid
Do not rely on caulk alone. Caulk can help seal selected joints, but it cannot replace a drainage plane and flashing designed to manage bulk water. It can also fail as materials move or the joint ages.
Do not bury the siding in concrete, soil, or mulch. This can trap moisture and conceal deterioration. Keep the clearance required by the siding manufacturer even if that means modifying the bottom course.
Do not skip the drip edge when the flashing design calls for one. Properly directing water outward reduces the chance that water will track back toward the wall.
Do not add unnecessary fasteners through horizontal drainage surfaces. Each penetration can become a potential leak path. Follow the flashing manufacturer’s fastening requirements.
Do not mix metals carelessly. Copper, aluminum, galvanized steel, stainless steel, and concrete can have compatibility issues under wet conditions. Use compatible fasteners and approved isolation where required.
Do not forget required end dams or end treatments. Where the flashing configuration allows lateral water movement, properly formed ends help keep water from reaching the wall.
Do not reverse laps. Layers should shed water downward and outward. A reversed lap can direct water into the sheathing or behind the drainage plane.
Maintenance Plan for the Siding-Concrete Joint
Inspect the joint at least annually and after severe storms. Look for gaps, stains, efflorescence, failed sealant, and deterioration. Check the bottom edge of the siding for swelling, softness, cracking, or other signs of moisture damage.
Keep gutters clean and downspouts extended away from the foundation. Maintain positive drainage around the building where practical. Trim vegetation so it does not remain wet against the wall.
Replace sealant only after cleaning and drying the joint and only where the system calls for it. Remove failed sealant and use backer rod when appropriate for a deep joint. Use a high-quality exterior sealant compatible with all adjacent materials.
If the concrete surface is a driveway or patio, avoid directing water toward the wall. Splash from hard surfaces can reach the joint. Where appropriate, drainage improvements or a properly designed separation can reduce splash and runoff.
When to Call a Professional
Call a qualified professional for multi-story walls, stucco, EIFS, or manufactured stone when the repair involves concealed drainage details. These systems have layered requirements that are easy to disrupt. A poorly executed repair can conceal ongoing moisture problems.
Signs of structural damage also require expert help. Sagging siding, significantly deteriorated framing, or extensive mold or moisture damage inside the wall may require qualified building-envelope, structural, or remediation professionals.
If the leak continues after a proper flashing repair, the source may be above the joint. Windows, roof intersections, penetrations, and other wall transitions can send water down the wall. A qualified moisture investigation can help locate the actual entry point.
For garage projects, hidden wall details often connect to the main house. Review garage addition guidance before altering the wall-to-slab transition: Adding a Garage in Front of Existing Garage.
Frequently Asked Questions
Should siding touch concrete?
No, siding generally should not rest directly on concrete. Maintain the clearance specified by the siding manufacturer and applicable code. The gap helps provide drainage, drying, and inspection access while reducing direct moisture contact.
Can caulk stop a leak where siding meets concrete?
Caulk alone is not a reliable solution for bulk water. It may seal selected joints and reduce minor splash or air movement, but properly integrated flashing and drainage are the primary water-management measures.
What is the best flashing for siding over concrete?
There is no single best material for every assembly. PVC or other approved plastic flashing can work well in many residential applications, while stainless steel can be appropriate for demanding or corrosive environments. The siding and flashing system’s compatibility requirements should determine the choice.
How far should siding be above concrete?
The required clearance depends on the siding product, the type of concrete surface, local requirements, and the installation detail. Do not use 1 to 2 inches as a universal rule. Check the siding manufacturer’s written requirements, including separate requirements for grade and paved surfaces.
Should the bottom of siding be caulked?
Usually, the bottom edge should not be sealed in a way that blocks a required drainage or ventilation path. Some siding systems have specific sealant requirements, so follow the manufacturer’s instructions.
Does concrete wick water upward?
Yes. Concrete is porous and can transport moisture by capillary action. The amount of moisture movement depends on the concrete, moisture conditions, contact area, and other factors. A properly detailed clearance and drainage system helps reduce direct moisture transfer to the siding.
What if the concrete is already too high?
Do not leave siding buried in or tightly against concrete. Depending on the siding system, options may include trimming or removing the bottom course, modifying the concrete or grade, or using a manufacturer-approved transition detail. If changing the concrete could affect drainage or structure, consult a qualified professional.
Final Thoughts
Flashing where siding meets concrete is a small but important water-management detail. It helps protect the wall from rain splash, runoff, and moisture movement while providing a path for water to drain outward.
The durable approach combines adequate clearance, a continuous drainage plane, compatible flashing, proper drainage at the base, and manufacturer-approved sealants and fasteners where required. Sealant supports the detail but does not replace flashing or drainage. Inspect the joint regularly and address deterioration early.
A properly detailed siding-to-concrete transition keeps water moving toward the exterior. It helps protect sheathing, framing, insulation, and interior finishes while reducing the chance of concealed moisture damage.