When framing a house or building an addition, one specific detail often sparks debate among contractors and DIYers: how the exterior wall sheathing interacts with the foundation. Yes, generally speaking, exterior sheathing should cover the sill plate and overlap the concrete foundation by approximately 1/2 to 1 inch to create a continuous load path and improve air sealing.
However, simply nailing plywood over the seam isn’t enough. If done incorrectly, this method can turn your sheathing into a wick for moisture, leading to rot, or create a hidden highway for termites. The “overlap” method is superior for structural integrity, but it requires strict attention to waterproofing details that many builders overlook.
In this guide, we will dissect the pros and cons of overlapping sheathing versus installing it flush, explain the building codes that influence this decision, and provide a step-by-step method to seal this critical joint effectively.
The Core Debate: Flush vs. Overlap
The connection point where your wood framing meets the concrete foundation is one of the most vulnerable areas of a home. It is a transition zone where air leaks, water infiltration, and insect intrusion are most likely to occur. There are two primary schools of thought on how to handle the sheathing here.
The Case for Flush Sheathing
Some builders prefer to cut the sheathing so it sits flush with the bottom of the sill plate, resting on top of the foundation wall without overlapping the concrete. The main argument here is moisture protection. By keeping the wood sheathing away from the concrete, you eliminate the risk of the wood wicking moisture directly from the porous foundation. It also leaves the gap between the sill plate and foundation visible, which can make termite inspections easier.
The Case for Overlapping the Sill Plate
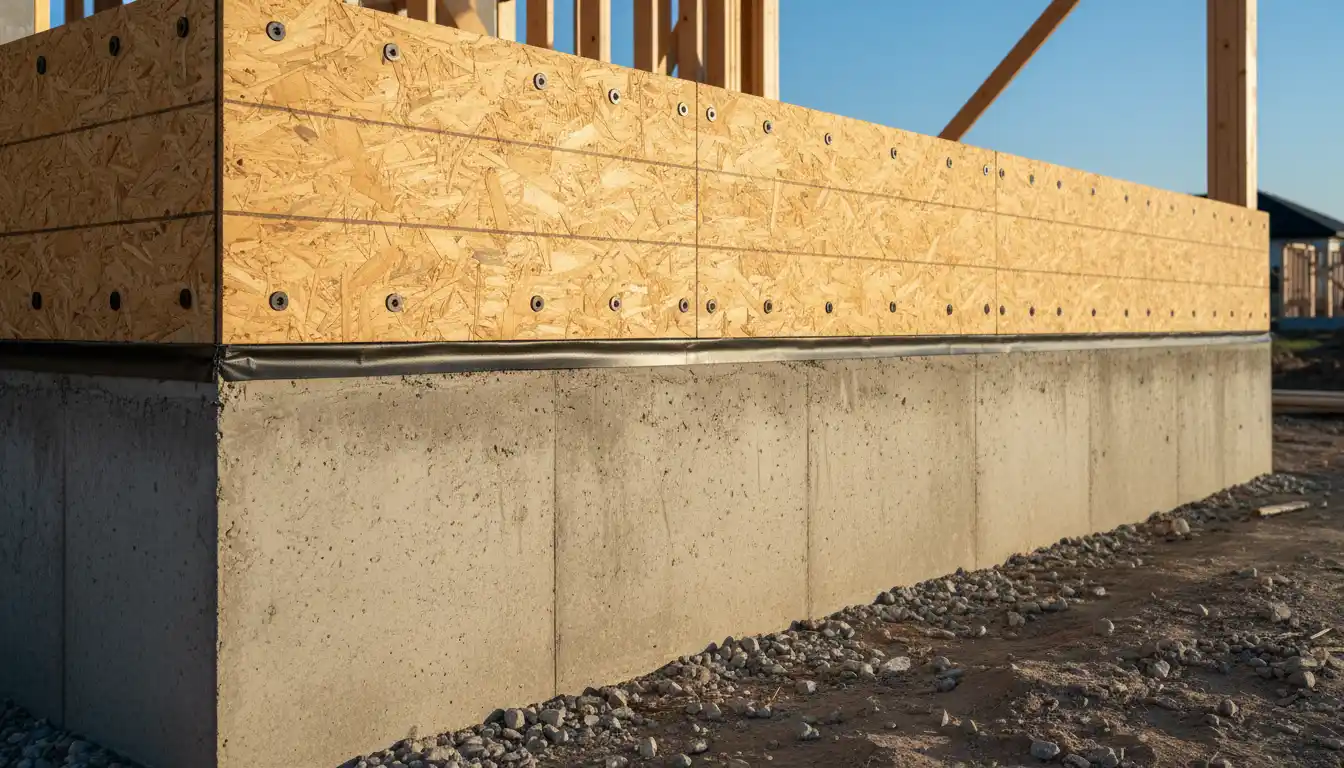
The more common and generally recommended practice is to let the sheathing extend past the sill plate and down onto the concrete foundation wall. This overlap acts as a structural tie, mechanically bonding the wall framing to the foundation. It also serves as a primary air barrier, covering the seam where the sill plate sits on the concrete (often the draftiest part of a house). From a waterproofing perspective, it acts like a shingle, encouraging water to drip off the sheathing and away from the vulnerable sill gasket, rather than being driven into the seam.
Comparison: Flush vs. Overlapped Sheathing
To help you decide which method aligns with your project goals, consider this detailed comparison of the two approaches.
| Feature | Flush Installation | Overlapped Installation (Recommended) |
|---|---|---|
| Structural Strength | Standard. Relies entirely on anchor bolts for uplift resistance. | Superior. Ties the wall studs directly to the foundation, increasing shear strength. |
| Air Sealing | Poor. The sill-to-foundation gap is exposed and requires heavy caulking/taping. | Excellent. The sheathing physically covers the gap, reducing drafts significantly. |
| Moisture Risk | Low. Wood is isolated from damp concrete. | Moderate to High. Requires a capillary break to prevent wicking (sponge effect). |
| Termite Inspection | Easy. The gap is visible (if siding permits). | Difficult. Tunnels can be hidden behind the sheathing overlap. |
| Water Shedding | Neutral. Water can be driven into the sill seam if not flashed perfectly. | Good. Acts as a drip edge, guiding bulk water over the seam. |
Why You Should (Usually) Cover the Sill Plate
For most residential construction, overlapping the sheathing is the superior choice, primarily due to structural load paths and energy efficiency. The International Residential Code (IRC) emphasizes the importance of a “continuous load path” (Section R301.1), which ensures that loads are transferred from the roof, through the walls, to the foundation.
Structural Integrity and Shear Strength
When sheathing covers the sill plate and is nailed into it, you are locking the entire wall assembly together. If you extend that sheathing down to overlap the concrete, you provide an additional layer of resistance against “racking” (the tendency of a wall to lean or twist under wind load). While the anchor bolts hold the sill plate to the concrete, the overlapping sheathing prevents the wall studs from sliding off the sill plate during extreme events.
Superior Air Sealing
The “rim joist” area is notorious for energy loss. The gap between the uneven concrete and the wood sill plate is rarely perfect. Even with a foam sill sealer, air can penetrate. By running the sheathing past this joint, you create a rigid air barrier that seals off these micro-gaps. This creates a tighter envelope, reducing the workload on your HVAC system.
The Critical Risks of Covering the Sill Plate
While overlapping is better structurally, it introduces specific risks that must be managed. Ignoring these can lead to expensive repairs down the road.
The “Sponge Effect”: Moisture Wicking
Concrete is hygroscopic, meaning it absorbs and holds water. If your plywood or OSB sheathing is pressed directly against the concrete foundation, it will suck moisture out of the concrete like a sponge. This leads to edge rot, where the bottom inch of your sheathing disintegrates over time. To prevent this, you must install a capillary break—a barrier that stops moisture transfer—between the sheathing and the concrete.
Termite Inspection and Access
In regions with heavy termite activity, inspectors often dislike overlapping sheathing because it creates a hidden channel. Subterranean termites can build mud tubes behind the plywood, traveling from the ground up into your walls without being seen. If you live in a high-risk termite zone, you may need to install a metal termite shield or leave a specific inspection gap, depending on local codes.
Best Practices for Installation
To get the structural benefits of overlapping without the moisture risks, follow this professional installation protocol.
1. Establish the Capillary Break
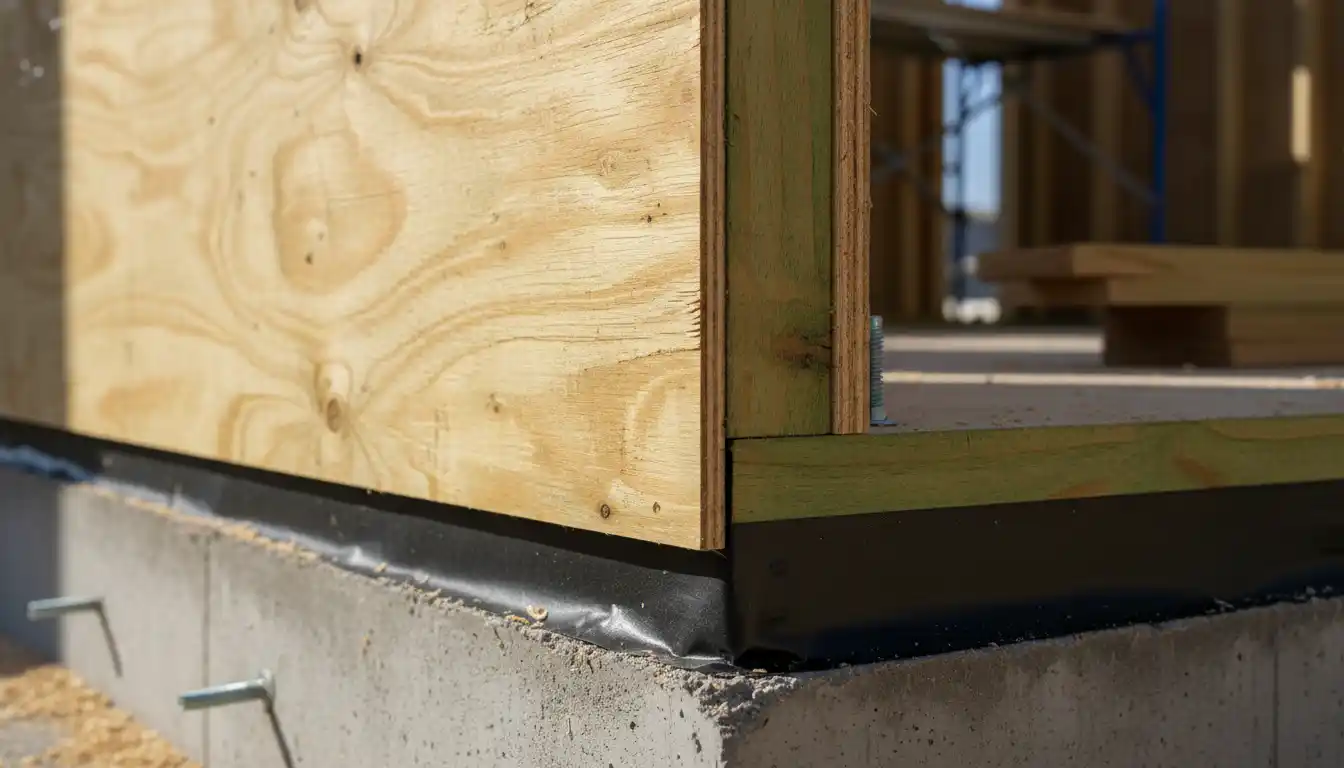
Never let raw wood touch concrete. Before installing the sheathing, you should treat the area of the foundation where the overlap will occur. You can use a fluid-applied waterproofing membrane or a high-quality flashing tape. Alternatively, ensure your foam sill sealer is wide enough to fold down and cover the concrete face, creating a gasket between the sheathing and the foundation.
2. The “One-Inch” Rule
Extend the sheathing minimum 1/2 inch and maximum 1 inch down past the top of the concrete. You do not need to cover 6 inches of the foundation; a small overlap is sufficient to seal the joint and tie the structure together without bringing the wood dangerously close to the soil grade. Remember, building codes generally require wood framing to be at least 6 inches above the finished soil grade to prevent rot.
3. Seal the Bottom Edge
This is the step most builders miss. Once the sheathing is nailed on, the bottom edge of the OSB or plywood is exposed. This cut edge is very absorbent. You should seal this bottom edge with a liquid flashing compound or a specialized tape (like Siga Fentrim or Zip System Liquid Flash). This prevents moisture from splashing up and wicking into the core of the panel.
Detailed Step-by-Step Guide
If you are framing a new wall or repairing an existing one, here is how to execute the overlap perfectly.
Preparation
Ensure your foundation top is level. Lay down your sill sealer foam. If you are dealing with utilities, such as plumbing or electrical conduits entering through the rim joist, plan your sheathing cuts accordingly. For example, if you need to route electrical service entry cables, drill your penetrations before buttoning up the exterior.
Also, logistics matter. If you are hauling 4×8 sheets of plywood or OSB to the site, ensure you can transport them safely without damaging the edges. If you are using a standard vehicle, you might need tips on how to carry long lumber or sheet goods on a roof rack effectively.
Installation Steps
Step 1: Apply a bead of sealant (acoustical sealant or polyurethane caulk) along the top face of the foundation wall, just outside the sill sealer.
Step 2: Install your sill plate and wall framing. Ensure the sill plate is flush with the exterior edge of the foundation (or slightly inset if you plan to insulate the exterior later).
Step 3: Measure your sheathing panels. Calculate the overlap so the panel covers the sill plate and extends 3/4″ onto the concrete.
Step 4: Install the sheathing. Use the nailing schedule required by your local code (typically nails every 6 inches along the edges and every 12 inches in the field). Ensure you are nailing into the sill plate securely.
Step 5: Seal the overlap. Apply a liquid flashing membrane over the bottom edge of the sheathing, bridging the gap to the concrete. This creates a waterproof seal that stops air and bugs.
Dealing with Penetrations
Sometimes you will encounter pipes or vents exiting through the foundation wall or rim joist just below where the sheathing ends. It is vital to integrate these with your sheathing overlap. If you have PVC pipes exiting the foundation, you may need to join PVC pipe with a rubber coupling to allow for slight movement between the foundation and the external systems without breaking the seal.
Code Requirements and Regional Variations
The International Residential Code (IRC) does not explicitly mandate that sheathing *must* overlap the foundation, but it does mandate the load path transfer. In high-wind areas (hurricane zones) or seismic zones, structural engineers will almost always specify an overlap with specific nailing patterns to create a “shear wall.”
Climate Zones: In wet climates (Pacific Northwest), the air seal and overlap are crucial to keep wind-driven rain out of the sill gasket. In dry, pest-heavy climates (Arizona, Florida), the termite inspection gap might take precedence, pushing builders toward a flush install with a metal flashing shield instead.
Conclusion
So, should sheathing cover the sill plate? Yes. The benefits of improved structural rigidity, better air sealing, and water management generally outweigh the risks—provided you mitigate those risks. By overlapping the foundation by nearly an inch and detailing the bottom edge with liquid flashing or high-quality tape, you create a robust building envelope that keeps your home standing strong and your energy bills low. Just remember: concrete is a sponge, and wood is the paper towel. Keep them separated with a capillary break, and your framing will last for generations.