If you live in an older home, there is a good chance you have looked up at a ceiling covered in 12-inch square tiles and wondered what you were dealing with. These glued-on or stapled-on squares were a staple of mid-century residential construction, prized for hiding imperfections, dampening sound, and covering a lot of square footage cheaply. They are also one of the most common materials homeowners ask about when they start a renovation, because the era they came from overlaps with the years when asbestos was used in building products. This guide explains what old 12×12 ceiling tiles are, how to evaluate the risk without creating one, and what your realistic options are for living with them, covering them, or removing them.
What Are Old 12×12 Ceiling Tiles?
Old 12×12 ceiling tiles are typically fiberboard or mineral-fiber acoustic panels installed in a grid of interlocking edges. Unlike modern drop-ceiling panels that sit in a metal grid, most residential 12×12 tiles were stapled to wood furring strips or glued directly to drywall or plaster. The interlocking edges create a continuous surface with thin seams, and the face often has a fissured, pitted, or wormhole texture designed to absorb sound.
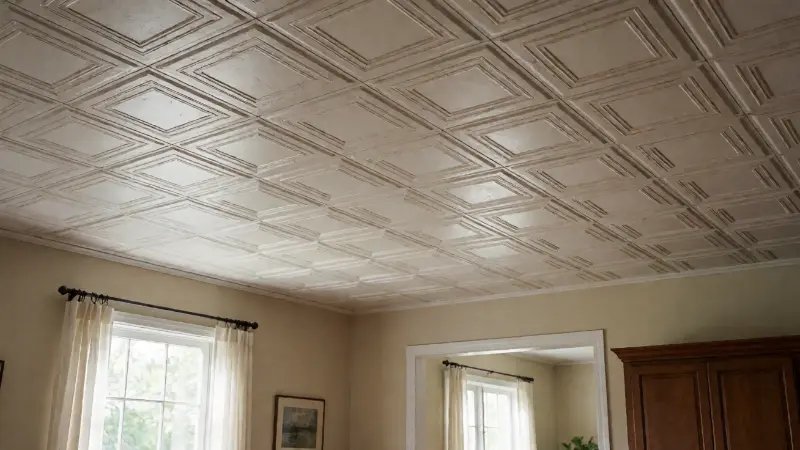
These tiles were common in basements, kitchens, hallways, and finished attics from roughly the 1940s through the 1980s. Homeowners often painted over them to freshen the look, which can complicate identification because the paint obscures the original surface texture and color. The tiles are lightweight and relatively soft, and they can crumble at the edges if they have been water-damaged or if they are very old.
The installation method matters for later decisions. Tiles stapled to furring strips can sometimes be removed without destroying the ceiling beneath, while tiles glued with construction adhesive often pull away chunks of drywall or plaster when removed. Some older installations used a dark, tar-like cutback adhesive, which is itself a material that may contain asbestos. That is one reason the adhesive, not just the tile, should be part of any testing plan.
Why Old 12×12 Ceiling Tiles Raise Asbestos Concerns
Asbestos was added to acoustic ceiling tiles for fire resistance, sound dampening, and structural reinforcement. Published industry analyses and asbestos product databases note that acoustic tiles were manufactured with asbestos from roughly the 1940s through the 1980s, with the heaviest production period running from the late 1940s to the late 1970s. Both glue-on and stapled 12×12 tiles and larger lay-in panels were produced with asbestos formulations during that window.
Not every tile from that era contains asbestos. Some manufacturers used cellulose, perlite, or fiberglass instead, and some product lines never used the mineral. But visual inspection cannot reliably tell the difference. Industry guidance is consistent on this point: a tile with a low asbestos content can look identical to a tile with a much higher content, and the only way to know is laboratory testing of a sample. Treating an untested tile as presumed asbestos-containing until proven otherwise is the cautious approach that most environmental professionals recommend.
What the Risk Actually Is
Asbestos fibers are a health hazard when they become airborne and are inhaled. A ceiling tile that is intact, painted, and undisturbed is not releasing fibers at a meaningful rate. The risk rises when the material is cut, sanded, drilled, scraped, or broken, because those actions create dust. That is why the standard advice is to avoid disturbing suspected tiles and to avoid the urge to pull one down “just to look.”
A single broken tile during a repair is not a catastrophic event, but it is a reason to stop, isolate the area, and get the material tested. Homeowners who have already disturbed suspect material should avoid sweeping or vacuuming with a standard shop vac, because those actions can spread fine dust. Wetting the material and using a HEPA vacuum are the standard containment steps, and a professional asbestos abatement contractor can advise on cleanup if the disturbance was significant.
How to Identify Potentially Asbestos-Containing Tiles
No visual test can confirm asbestos, but several characteristics raise or lower the likelihood. Age is the strongest signal. Tiles installed before the mid-1980s are more likely to contain asbestos than tiles installed later. Size is another clue: 12×12 squares and 9×9 squares are classic asbestos-era dimensions, although plenty of 12×12 tiles are asbestos-free.
Surface texture can offer hints. Tiles with a soft, chalky feel, a speckled or dimpled face, and small pinholes are consistent with older acoustic products. A fibrous, compressed mineral backing rather than a modern mineral-wool or fiberglass batt is another indicator of the asbestos era. Manufacturer markings can help if they are legible; Armstrong, Celotex, and USG are among the brands associated with older acoustic products, though not every product from those brands contained asbestos and many tiles have no markings at all.
The installation context matters too. Tiles glued with dark cutback adhesive, tiles in basements and utility rooms, and tiles in homes that have not been updated since the 1970s are all reasons to test before disturbing. If the ceiling has been painted multiple times, the paint can seal the surface and reduce fiber release, but it does not eliminate the need for testing if the tile is going to be cut or removed.
| Clue | What It Suggests | What to Do |
|---|---|---|
| Installed before the mid-1980s | Higher likelihood of asbestos content | Test before cutting, sanding, or removing |
| 12×12 or 9×9 size | Classic asbestos-era dimension | Test; size alone is not proof |
| Soft, chalky, speckled, or pitted face | Consistent with older acoustic tile | Avoid breaking; collect a sample safely or hire a pro |
| Dark, tar-like adhesive on the back | Cutback mastic that may also contain asbestos | Test both tile and adhesive |
| Water-stained, sagging, or crumbling | Deterioration can release fibers | Limit access; avoid dry sweeping; get professional advice |
| Modern fiberglass or mineral-wool backing | Lower likelihood, but not a guarantee | Confirm by lab test before major disturbance |
Testing: The Only Way to Be Sure
Asbestos testing involves collecting a small sample and sending it to an accredited laboratory for polarized light microscopy analysis. DIY mail-in kits are widely available and typically cost between roughly thirty and eighty dollars per sample, including lab fees. Professional inspections and sampling cost more, often in the hundreds of dollars, but they include a site visit and a written report that is useful if you are hiring contractors or selling the home.
If you collect the sample yourself, the safety precautions matter. Wear a respirator with P100 filters, eye protection, and disposable gloves. Mist the area with water to keep dust down, and cut a small piece from a tile at a seam or in an inconspicuous area. Place the sample in a sealed bag, label it, and clean the area with wet wipes. Do not break the tile into small pieces, and do not use a power tool to cut it. If the tile is crumbling or the area is difficult to access safely, hire a professional to collect the sample.
Test each distinct material separately. The tile face, the backing, and the adhesive are different layers and can have different asbestos content. A report that says the tile is negative does not necessarily clear the mastic underneath it. If you are planning a renovation that will disturb multiple ceilings, sample each ceiling separately because installations can differ from room to room.
If the Tiles Test Positive: Your Options
A positive test does not mean you must tear the ceiling out immediately. Intact asbestos-containing material can often be left in place and managed. The options generally fall into three categories: encapsulation, enclosure, and abatement.
Encapsulation means coating the material with a sealant that binds the fibers and prevents release. This is common for asbestos pipe insulation and some ceiling surfaces, but it is less practical for acoustic tiles because the sealant fills the pores that give the tile its sound-absorbing properties. Painting with a specialized encapsulant can work if the tiles are in good condition and you are not trying to preserve acoustic performance. The coating must be compatible with the tile and applied according to the manufacturer’s instructions.
Enclosure means covering the material with a physical barrier so it is not exposed. Installing a new layer of drywall over the tiles is a common approach, but it has trade-offs. The drywall adds weight, reduces ceiling height, and conceals a hazard that a future homeowner or contractor might cut into without knowing it is there. Building codes and disclosure requirements vary, and some jurisdictions require that the presence of asbestos be documented even when it is enclosed. If you enclose, leave a clear record of what is behind the new surface.
Abatement means removing the material under controlled conditions. For a small area of intact tile, some jurisdictions allow limited owner-performed removal with specific precautions, but many require a licensed abatement contractor for any asbestos-containing material. Abatement typically involves sealing the work area with plastic, maintaining negative air pressure with HEPA filtration, wetting the material, removing it intact, double-bagging it in labeled asbestos waste bags, and disposing of it at an approved landfill. This is not a DIY project for most homeowners, and the cost reflects the containment and disposal requirements.
If the Tiles Test Negative: Repair, Replace, or Cover
A negative test opens up more options. If the tiles are in good condition and you do not mind the look, you can leave them alone. If they are stained or dated, painting is the least invasive refresh. Acoustic tiles should be painted with a non-bridging or specialty acoustical coating that does not fill the pores, because standard latex or oil-based paint will reduce sound absorption. Clean the surface first, and use a stain-blocking primer over water stains or nicotine residue.
Covering is another route. You can install a new layer of thin drywall over the tiles, or use interlocking overlay panels designed to go over an existing ceiling. Drywall adds mass and can improve sound isolation, but it also adds weight and reduces ceiling height. Overlay panels are lighter and often easier to install, but they may not conceal uneven seams or sagging tiles unless the substrate is sound. If the tiles are stapled to furring strips, you may be able to remove them and expose the original ceiling, which could gain you a few inches of height.
Replacement is the most involved option. If the tiles are glued to drywall, removal will likely damage the drywall beneath, which means patching or installing a new ceiling surface. If the tiles are stapled to furring strips, removal is cleaner, but you may still need to address the furring strips and the underlying surface. Replacement is a good time to inspect for insulation, wiring, and any water damage above the ceiling, and it is an opportunity to improve air sealing if the ceiling is below an attic.

Removal and Disposal Considerations
If the tiles are confirmed non-asbestos and you decide to remove them, the work is a standard demolition task with the usual precautions: protect the floor, wear eye protection and a dust mask, shut off power to fixtures, and work carefully around wiring. Glued tiles can be pried off with a putty knife or flat bar, but expect some substrate damage. Stapled tiles can be pulled free with a pry bar, and the staples can be removed with pliers. If the adhesive is stubborn, a wallpaper steamer can soften it.
Disposal rules depend on the test result. Non-asbestos mineral fiber or fiberglass tiles can usually go with regular construction debris, but some municipalities have separate requirements for ceiling tile. Asbestos-containing tiles must be treated as regulated waste, double-bagged in thick polyethylene, labeled, and taken to a landfill that accepts asbestos. Never put suspected asbestos material in a standard dumpster or burn it.
If the ceiling above the tiles contains wiring, plumbing, or ductwork, removal is a chance to address other issues. Running new wire in a ceiling without an attic access is a common challenge in older homes, and the project is easier before the new ceiling goes up. Our guide to running wire through a ceiling without an attic covers the strategies for routing cable in finished spaces, and it is worth reviewing before you close up the ceiling.
When to Call a Professional
Call a licensed asbestos inspector or abatement contractor if the tiles are damaged, crumbling, or water-stained; if you are planning a renovation that will disturb more than a small area; if you have already disturbed the material and are concerned about exposure; or if you are selling or buying a home and need documentation. A professional inspection typically includes a site assessment, sampling, and a written report. Abatement contractors can provide a scope of work and a cost estimate for removal.
It is also worth calling a professional if you are unsure about the adhesive or the substrate. Cutback adhesive can be difficult to remove without damaging the ceiling, and a contractor can advise on encapsulation or enclosure options that reduce disruption. If your project involves other systems in the home, such as heating or plumbing, it helps to coordinate the work so that trades are not cutting into a ceiling that has just been finished. Our guide to hot water not circulating through baseboard is a reminder that ceiling and wall openings are often the access point for diagnosing distribution problems, so plan that access before you close things up.
If you have already disturbed suspect material, do not panic, but do take it seriously. Limit access to the area, avoid dry sweeping and standard vacuuming, and contact a professional for advice on cleanup and testing. Our article on what to do if you accidentally removed an asbestos popcorn ceiling covers the containment and testing steps in more detail, and the same principles apply to ceiling tiles.
FAQ
Do all old 12×12 ceiling tiles contain asbestos?
No. Many 12×12 tiles from the 1950s through the 1970s were made with cellulose, perlite, or fiberglass and contain no asbestos. However, some tiles from that era do contain asbestos, and visual inspection cannot reliably distinguish between the two. Laboratory testing is the only way to confirm the content of a specific tile.
How much does it cost to test ceiling tiles for asbestos?
DIY mail-in test kits typically cost roughly thirty to eighty dollars per sample, including lab analysis. Professional inspections and sampling often run several hundred dollars and include a site visit and written report. Testing both the tile and the adhesive is recommended because the mastic can also contain asbestos.
Can I just paint over old ceiling tiles?
You can paint over tiles that are intact and confirmed non-asbestos, but acoustic tiles require a non-bridging or specialty acoustical coating. Standard paint fills the pores and reduces sound absorption. If the tiles are suspected asbestos-containing, painting may encapsulate the surface, but it does not remove the hazard, and any future disturbance still requires precautions.
Is it safe to cover old ceiling tiles with drywall?
Covering can be a practical option for intact tiles, but it conceals the material and reduces ceiling height. It also creates a future hazard if someone cuts into the ceiling without knowing what is behind the drywall. Document the presence of the tiles, and check local disclosure requirements before enclosing them.
Can I remove 12×12 ceiling tiles myself?
If the tiles are confirmed non-asbestos, removal is a manageable DIY task with standard dust and safety precautions. If the tiles are confirmed asbestos-containing or have not been tested, removal should be handled by a licensed abatement contractor in most jurisdictions. Disturbing suspect material can release fibers and create a health hazard.
What should I do if a ceiling tile breaks during a repair?
Stop work, isolate the area, and avoid dry sweeping or using a standard vacuum. Mist the debris with water, wear a respirator with P100 filters, and place the broken pieces in a sealed bag. Contact a professional for advice on cleanup and testing, especially if the material was installed before the mid-1980s and has not been tested.