There is a hidden challenge in every construction and remodeling project. How do you run essential plumbing drains and vents through the very structure that holds the building up? It’s a conflict between the unyielding laws of physics and the absolute necessity of modern plumbing.
Cutting or drilling large holes through structural floor joists or wall studs is not just risky; it’s a recipe for disaster. This guide explores the professional solution that safeguards your home’s integrity while creating perfect pathways for your pipes: plumbers box framing.
The Core Problem: Why You Can’t Just Cut and Drill Anywhere
Floor joists and wall studs are the skeleton of your home. They are meticulously engineered to carry specific loads and transfer them safely to the foundation. When you cut a joist or drill a hole that’s too large, you compromise this critical support system.
The result can be sagging floors, cracked drywall, and in severe cases, structural failure. Building codes are extremely strict about the size and location of holes and notches in framing members for this very reason. For large drainpipes, such as a 3-inch toilet drain, a simple drilled hole is often out of the question.
Understanding the Structural Risk
Think of a floor joist like a bridge. It’s strongest when it’s whole. Cutting a large section from it is like removing a support pier; the load that the cut section once carried must be safely rerouted.
Simply drilling a massive hole leaves the surrounding wood weak and unable to perform its job. This is where the strategic and robust solution of a plumber’s box becomes essential for any significant plumbing installation.
The Solution: What is Plumbers Box Framing?
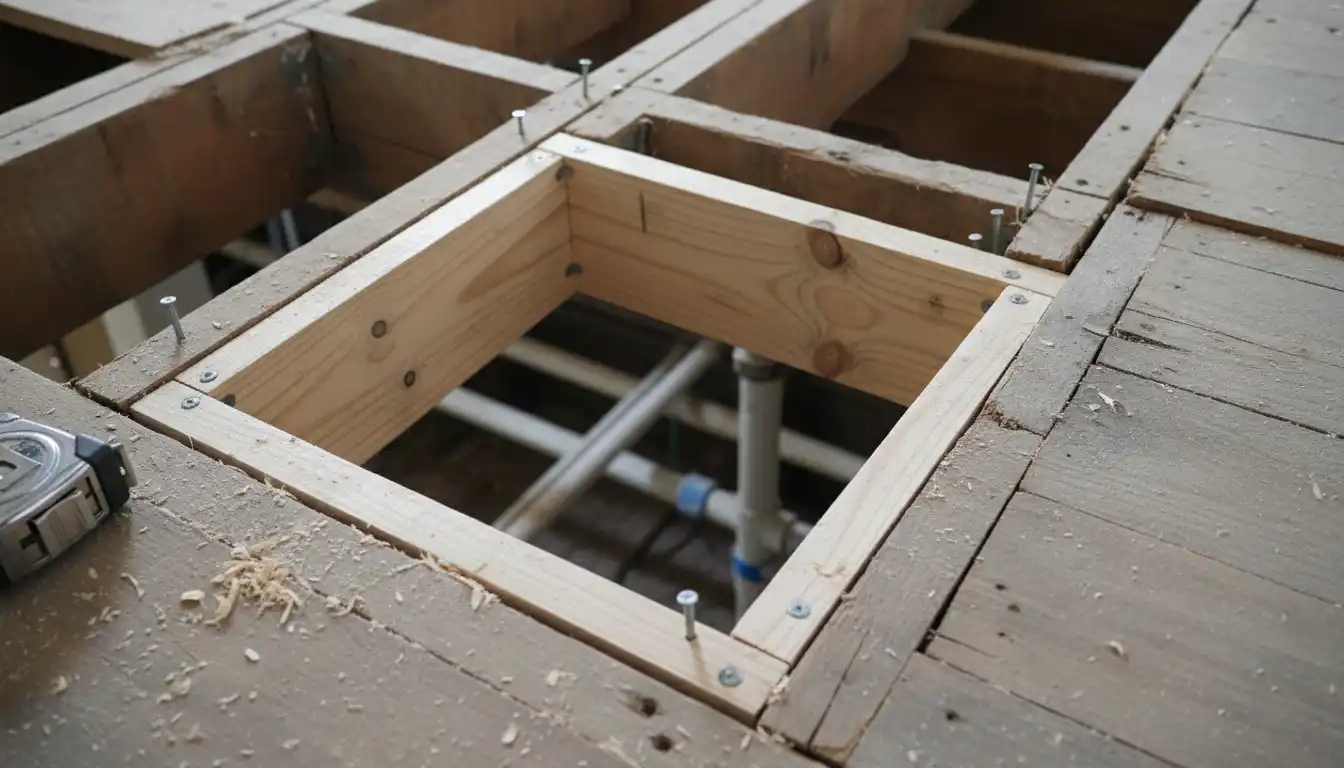
A plumber’s box, also known as a plumbing chase, is a framed-out opening within a floor or wall system. Its purpose is to create a dedicated, structurally sound void through which plumbers can run pipes without compromising any load-bearing members. It’s a box within the frame.
Instead of weakening a single joist, a plumber’s box involves cutting a section of one or more joists and then transferring the load to the adjacent, uncut joists using headers. This technique maintains the structural integrity of the floor or wall while providing ample space for drains, vents, and supply lines.
Horizontal vs. Vertical Boxing
Plumber’s boxes are used in two primary applications. In floor systems, they create a horizontal opening for routing drains for showers, tubs, and toilets. In walls, a vertical box or “chase” is built to conceal stacks of pipes, such as main drain lines and vents, as they travel between floors.
Framing a proper plumbing vent in an exterior wall often requires a chase to accommodate the pipe diameter without sacrificing insulation and structural values. Both applications follow the same core principle of removing a structural conflict and reinforcing the surrounding frame.
Step-by-Step Guide: Building a Plumber’s Box in a Floor
Constructing a plumber’s box requires careful planning and precise execution. It’s a task that combines carpentry and an understanding of structural loads. Always consult local building codes before beginning.
Step 1: Planning and Layout
First, identify the exact location and size of the opening needed for the plumbing fixtures. The plumber should provide the precise centerlines for drains. Mark the joist or joists that need to be cut.
The golden rule is to make the box as small as possible while still providing adequate room for the plumber to work. A typical box for a tub drain might be 12 inches by 24 inches.
Step 2: Adding Support to Trimmer Joists
The joists on either side of the planned opening are called “trimmer joists.” They will carry the extra load from the cut joist. It is critical to reinforce them.
This is done by “doubling up” the trimmer joists. Nail or screw an identical joist alongside each original trimmer, ensuring they are flush at the top. Use a construction adhesive between the joists for a stronger bond.
Step 3: Cutting the Joist
With the trimmers reinforced, you can now cut the interior joist. Use a square to mark your cut lines clearly. A circular saw can make the initial straight cuts, finished with a reciprocating saw.
Be precise. The cleaner the cut, the better the fit for your headers.
Step 4: Installing the Headers
Headers are the pieces of lumber that will span the opening between the trimmer joists, effectively “heading off” the cut joist. For most small openings (under 4 feet), double headers are recommended. These are two pieces of joist material nailed together.
Install the double headers at each end of the opening, fitting them snugly between the trimmer joists. They should be flush with the top of the joists. Secure them by end-nailing through the trimmer joists and into the ends of the headers.
Step 5: Securing with Joist Hangers
For maximum strength, the connection points must be reinforced with metal hardware. Attach the cut joist to the inside of the new headers using joist hangers. Similarly, secure the ends of the headers to the trimmer joists with appropriate hangers.
This metal hardware ensures that the load is properly transferred through a mechanical connection, not just relying on the shear strength of nails. This step is non-negotiable for a code-compliant and safe installation.
Framing a Vertical Plumbing Chase in a Wall
A vertical chase is essential for routing pipes between floors. This is common for main waste stacks or for consolidating plumbing in a central location. The process is similar to a floor box but adapted for a vertical orientation.
Building a “Wet Wall”
Often, a chase is created by building a “wet wall,” which is a thicker-than-normal wall framed with deeper lumber (like 2x6s or 2x8s) or by building two parallel 2×4 walls. This extra depth provides the necessary space for large-diameter drain and vent pipes without needing to cut into studs.
When building a double-stud wall, leave a gap between the two walls to create the chase. The studs in each wall should be staggered to allow pipes to weave through without obstruction. This method also has the added benefit of reducing noise transmission from the pipes.
| Tool/Material | Purpose | Pro-Tip |
|---|---|---|
| Circular Saw | Making initial straight cuts in joists. | Set the blade depth to match the joist depth to avoid overcutting. |
| Reciprocating Saw | Finishing cuts and working in tight spaces. | Use a sharp, new blade for cleaner and faster cuts. |
| Framing Hammer | Driving nails for structural connections. | Use code-approved framing nails for all structural connections. |
| Impact Driver/Drill | Driving structural screws and fastening hardware. | Structural screws can offer superior holding power to nails. |
| Speed Square | Marking accurate 90-degree cut lines. | Essential for ensuring headers and joists fit together perfectly. |
| Level | Ensuring headers and framing are plumb and level. | A 4-foot level is ideal for checking across multiple joists. |
| Joist Hangers & Fasteners | Reinforcing all structural connections. | Always use the specific nails or screws recommended by the hanger manufacturer. |
| Construction Adhesive | Bonding doubled-up joists and headers. | Adds significant strength and stiffness to the assembly. |
Beyond the Basics: Advanced Considerations
A properly built plumber’s box goes beyond just framing. To create a truly professional installation, consider factors like fire safety and noise reduction.
Fireblocking: A Critical Safety Step
A plumbing chase creates a vertical and horizontal channel through which fire and smoke can travel rapidly. Building codes mandate the use of fireblocking to prevent this. Fireblocking materials are installed inside the chase at each floor and ceiling level to seal the concealed space.
Approved materials typically include solid 2-inch lumber, gypsum board, or mineral wool insulation packed tightly into the space. Sealing the gaps around pipe penetrations with a fire-rated caulk is also required.
Noise Reduction Strategies
The sound of rushing water through drainpipes can be disruptive. A framed chase can sometimes act like a drum, amplifying the noise. Fortunately, there are effective ways to mitigate this.
Wrapping the drainpipes with a sound-dampening material, such as mass-loaded vinyl, before enclosing the wall is highly effective. Filling the stud cavities around the chase with sound-batt insulation can also significantly reduce noise. These steps can help prevent the kinds of sounds addressed when you need to stop house popping noises now.
Common Mistakes to Avoid
Even with a good plan, errors can happen. Being aware of common mistakes can save you from costly rework and dangerous structural compromises.
- Inadequate Reinforcement: Failing to double up trimmer joists and headers is a critical error that can lead to sagging.
- Improper Fasteners: Using drywall screws instead of structural nails or screws for hangers and framing is a major safety hazard.
- Ignoring Load Paths: Forgetting that the purpose of the box is to transfer a load. Every connection must be solid and secure.
- Forgetting About Other Systems: A large chase can sometimes interfere with HVAC ducting or electrical wiring. Planning ahead is key, especially when dealing with issues like a room furthest from the furnace being cold due to disrupted airflow paths.
By understanding the principles of plumbers box framing, you can ensure that your plumbing and structural systems coexist safely and effectively. It is a fundamental skill that protects the value and integrity of your home for decades to come.