There’s nothing more frustrating than stepping back to admire your newly cleaned tile, only to notice dark, damp-looking patches on the grout. These persistent wet spots can make even the cleanest floors and walls appear dirty and neglected. You scrubbed, you rinsed, but those stubborn dark areas remain, looking perpetually damp. This common issue can be baffling, but understanding the underlying causes is the first step toward a permanent solution.
Whether you’re dealing with a shower that never seems to dry or mysterious dark lines on your kitchen floor, you’re not alone. The porous nature of traditional cement-based grout makes it susceptible to a variety of issues that can manifest as wet spots. From improper sealing to hidden moisture, we’ll explore what’s really happening with your grout and provide a clear action plan to fix it for good.
Why Does My Grout Look Wet in Spots? Uncovering the Root Causes
Those blotchy, dark areas are more than just a cosmetic annoyance; they are often symptoms of a deeper problem. Identifying the correct cause is crucial for applying the right fix. Simply cleaning the surface might provide a temporary improvement, but the spots will likely return if the root issue isn’t addressed.
The Deceptive Role of Grout Sealer
One of the most common culprits behind wet-looking spots is a compromised or improperly applied grout sealer. Grout is naturally porous, like a sponge, and its primary defense against moisture is a quality sealer. When this protective barrier fails, the grout absorbs water unevenly. Failed or patchy sealer application is a leading reason why some areas get dark when wet while others don’t.
If the sealer was applied too thinly, was missed in some spots, or has worn away due to foot traffic and harsh cleaners, water will penetrate those vulnerable areas. This results in the characteristic blotchy, damp appearance you see after cleaning or showering.
Moisture Lurking Beneath the Surface
Sometimes, the problem isn’t on the grout but coming from underneath it. Moisture can wick up from the substrate, such as a concrete slab that hasn’t fully cured or lacks a proper vapor barrier. This is especially common in basements or ground-floor installations. The moisture travels through the grout lines, causing persistent dark spots that never seem to dry out completely.
In showers, this could indicate a more serious problem with the waterproofing system behind the tiles. If the waterproof membrane was compromised during installation, water can saturate the backer board and continuously feed moisture to the grout from behind.
The Shadow of Stains and Discoloration
What appears to be a wet spot might actually be a deep-set stain. Oils, soap scum, and mineral deposits from hard water can accumulate in the porous grout, creating dark patches that mimic the look of moisture. These residues can build up over time, becoming resistant to regular cleaning methods.
Even the cleaning products you use can be part of the problem. If not rinsed thoroughly, some detergents leave behind a sticky film that attracts dirt, leading to discoloration over time. Using acidic or bleach-based cleaners can also break down the grout and its sealer, making it more susceptible to staining.
The Hidden Threat of Mold and Mildew
Dark spots, especially in damp environments like bathrooms, can be an early sign of mold or mildew. These fungi thrive in the porous, moisture-trapping environment of unsealed or poorly sealed grout. What starts as a small, dark spot can quickly spread, posing not only an aesthetic problem but also a potential health concern.
Black or dark green spots are often indicative of mold growth. It’s crucial to address this promptly to prevent it from penetrating deeper into the grout and the wall behind it.
Grout Porosity and Installation Flaws
Inconsistent grout color can sometimes be traced back to the initial installation. If too much water was used when mixing the grout or during the cleanup process, it can cause the polymers in the grout to cure improperly. This leads to variations in porosity, where some areas are denser and others are more absorbent, resulting in a blotchy appearance when wet.
Your Step-by-Step Action Plan to Fix Wet-Looking Grout
Now that you understand the potential causes, it’s time to take action. This methodical approach will help you diagnose the problem, fix the existing spots, and prevent them from returning. Follow these steps to restore your grout to a uniform and pristine condition.
Step 1: Deep Clean and Assess the Damage
Before you can fix the problem, you must start with a perfectly clean slate. This initial cleaning will remove any surface-level culprits like soap scum, dirt, or mildew, allowing you to see the true state of your grout. Avoid harsh acidic cleaners, which can damage the grout itself.
Start with a pH-neutral or alkaline grout cleaner. Apply the cleaner according to the manufacturer’s instructions and let it sit for 5-10 minutes. Then, scrub the grout lines vigorously with a stiff-bristled grout brush. Rinse the area thoroughly with clean water and let it dry completely for at least 24 hours.
Step 2: The Crucial Water Drop Test
Once the grout is clean and completely dry, it’s time to test the sealer. This simple test will tell you instantly whether your grout’s protective barrier is intact. Place a few drops of water on different grout lines, including the areas that appeared wet and areas that didn’t.
If the water beads up on the surface, the sealer is doing its job. If the water soaks in and darkens the grout within a few minutes, the sealer has failed or was never applied. This is a clear sign that you need to reseal your grout.
Step 3: Choosing and Applying the Right Grout Sealer
Sealing is one of the most effective ways to prevent wet spots and stains. A high-quality sealer will create a barrier that repels water, dirt, and grime. There are two main types of grout sealers: penetrating sealers and membrane-forming sealers.
For most applications, especially in wet areas like showers, a penetrating (or impregnating) sealer is the best choice. It soaks into the grout to provide protection from within without changing the appearance. Make sure the grout is completely clean and dry before you begin. Apply the sealer carefully using a small brush or applicator, wiping any excess off the tile surface as you go. Allow it to cure for the time specified by the manufacturer, which is often 24-48 hours.
Advanced Solutions for Persistent Wet Spots
If deep cleaning and resealing don’t solve the problem, the issue may be more complex. Persistent dampness often points to underlying problems that require more intensive solutions. It’s important to consider these before they lead to more significant damage.
When to Consider Regrouting
If your grout is cracked, crumbling, or permanently stained, simply cleaning and sealing it won’t be enough. In these cases, the best solution is to remove the old grout and replace it. Regrouting is a labor-intensive process but can make your tiled surface look brand new. It also gives you a chance to inspect the substrate for any moisture damage.
Using a grout removal tool, carefully scrape out the old grout to at least two-thirds of its depth. After vacuuming out all debris, you can apply new grout. When dealing with wall structures, understanding the materials used, like the specific applications of different types of sheetrock, can be important for ensuring a lasting repair.
Addressing Underlying Moisture Problems
If you suspect moisture is wicking up from a concrete slab or coming from behind the shower wall, this is a serious issue that sealing alone cannot fix. These situations often require professional intervention to address the root cause, which could be a plumbing leak, a failed shower pan liner, or hydrostatic pressure from the ground. Ignoring these signs can lead to widespread water damage and mold growth. Home maintenance requires vigilance, much like noticing when your HVAC system shows a warning light, spotting persistent moisture issues early is key.
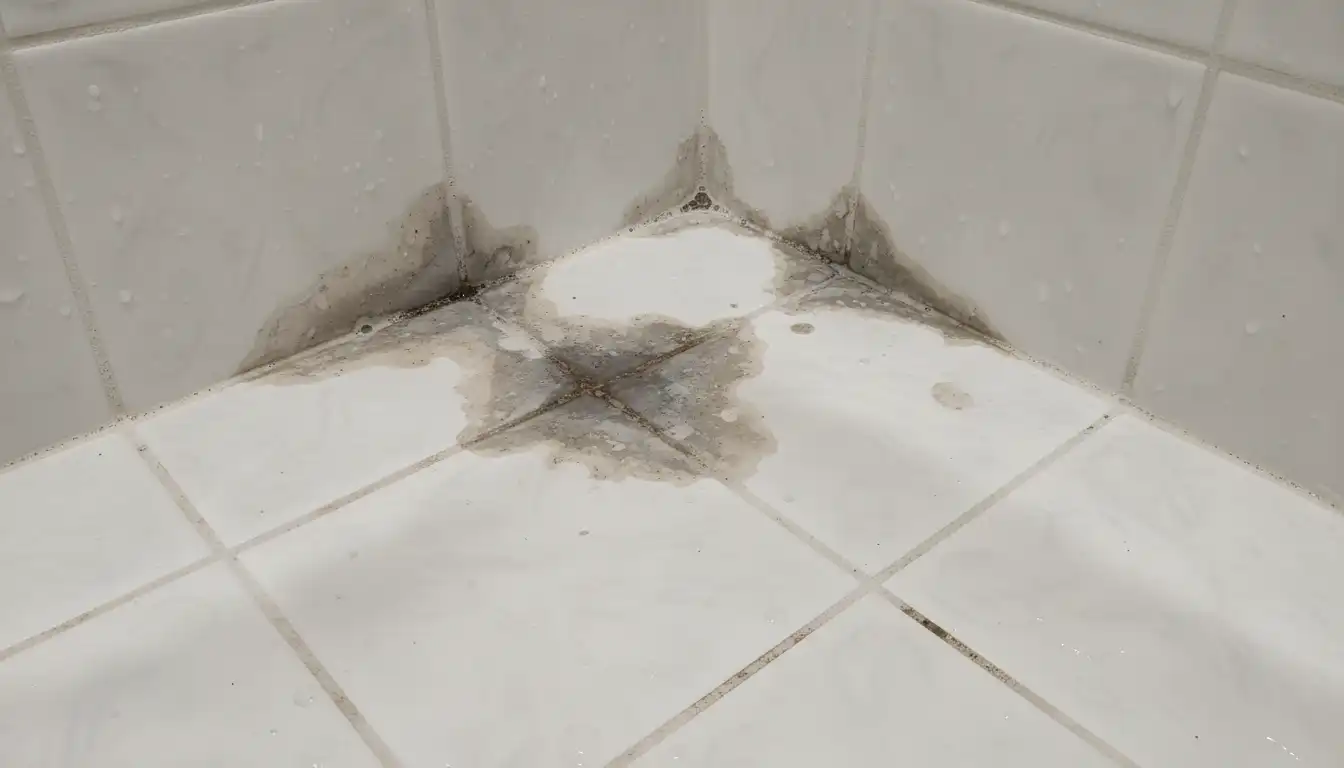
Does the Grout Look Wet in Spots (Even When It’s Dry)
We have a job site issue here that I want to share because not all YouTubers are willing to show their mistakes, but I like doing it so we can all learn together as a community.
What we have are these really splotchy areas of grout—we call this grout shading. It looks like the grout never dried out, even though this job has been finished for about a week and a half. The customer called me and said, “Hey, we got some grout shading stuff happening,” and sure enough, we have these inconsistent dark spots.
The Setup and The Theory
We used Custom’s Polyblend Plus non-sanded grout in the color “Ash,” which is supposed to be a light gray. But in the corners and the niche, we have these dark, wet-looking splotches next to perfectly fine, light-colored areas.
Now, all the grout was mixed the same, applied the same, and wiped the same. So, why is this happening?
My theory—and it is just a theory—has to do with how the thinset cured behind the wall. We installed these 6×12 ceramic tiles using Schluter All-Set thinset over GoBoard. Because GoBoard is completely waterproof, there is nowhere for the moisture to evaporate out the back; it all has to come out the front through the grout lines. I think the chemical cure of the thinset might be reacting with the grout in certain areas as the moisture tries to escape, causing these inconsistencies.
The Fix: The Razor Blade Method
The solution to this is just going to be scraping out the dark areas. Since this is non-sanded grout, we have a bit of an advantage.
Here is the process we used to save this job:
-
Get a lot of blades: You need a razor knife and a massive pack of blades. You’re going to be switching them out constantly to keep them sharp.
-
Score the joint: Start by taking the razor knife and scoring straight into the grout line. Don’t push too hard.
-
Create a V-Groove: After the center score, take the blade and run it at an angle on both sides to create a “V” groove.
-
Depth: You only need to remove about 50% of the grout. Because it is non-sanded, the new grout is going to stick really well in that joint.
-
Take your time: Do not rush. If you get frustrated, you’re going to start chipping tiles, and then you’re into a whole lot more work.
We tested a small area first, regrouted it, and let it dry for an hour and a half. It dried to the correct light color, so we knew the fix would work.
Proactive Care: How to Prevent Grout from Looking Wet
Once you’ve restored your grout, the key is to keep it that way. A consistent maintenance routine will prevent the recurrence of wet spots and keep your tile looking its best. This proactive approach saves you time and effort in the long run.
For outdoor tiled areas, the principles of moisture management are just as critical. Proper drainage and construction, such as when building features on sloped ground, help prevent water from pooling and causing issues.
| Frequency | Task | Purpose |
|---|---|---|
| Daily | Squeegee shower walls and floor | Removes excess water, preventing moisture absorption and soap scum buildup. |
| Weekly | Clean with a pH-neutral cleaner | Safely removes dirt and grime without stripping the grout sealer. |
| Annually | Perform the water drop test | Checks the integrity of the sealer and indicates when it’s time to reseal. |
| Every 1-3 Years | Reseal the grout | Maintains a protective barrier against water, stains, and mildew. |
The Importance of Proper Ventilation
In bathrooms and kitchens, humidity is a major contributor to grout problems. Good ventilation is essential to help moisture evaporate quickly. Always use the exhaust fan during and after a shower for at least 20-30 minutes to help dry out the area.
Regular Cleaning is Non-Negotiable
Sticking to a regular cleaning schedule prevents the buildup of soap scum, minerals, and dirt that can degrade your sealer and stain the grout. A quick weekly wipe-down is far easier than an intensive scrubbing session every few months.
Frequently Asked Questions (FAQ)
Navigating grout issues can bring up many questions. Here are answers to some of the most common inquiries to help you feel more confident in tackling the problem.
Can I just paint over the wet-looking grout?
While grout colorants or “paints” can cover up discoloration, they are not a substitute for fixing the underlying problem. If your grout is absorbing moisture due to a failed sealer, painting over it will only trap that moisture, potentially leading to mold growth underneath. You must first resolve the moisture issue and then you can consider a colorant to restore a uniform look.
How long does grout sealer last?
The lifespan of a grout sealer depends on the type of sealer, the amount of traffic the area receives, and the cleaning methods used. Generally, a good quality sealer in a high-use area like a shower should be reapplied every 1 to 3 years. It’s best to perform the water drop test annually to check its effectiveness.
Is dark grout a better option to hide wet spots?
Darker grout can be effective at hiding dirt and stains, but it will still show a noticeable darkening when it absorbs water. While it may be less obvious than with light-colored grout, the underlying issue of moisture absorption still exists. Choosing a high-quality epoxy grout, which is inherently waterproof, is a more effective long-term solution than simply picking a darker color.
Conclusion: Reclaiming Your Grout’s Uniform Look
Grout that looks wet in spots is a solvable problem. By systematically diagnosing the cause—whether it’s a sealer issue, deep-set stains, or underlying moisture—you can apply the correct solution. A thorough cleaning, followed by the application of a high-quality sealer and a commitment to regular maintenance, is the most effective strategy to restore and maintain the beautiful, uniform appearance of your tiled surfaces.