It starts at 05:19 AM.
The room is pitch black, save for the faint, green glow of the digital clock. You are in a deep sleep, the kind of rest you desperately need. The house is silent. And then, it begins.
Tick.
A pause.
Tick.
It is faint at first. The video shows the sound level hovering around 34.6 dB. It isn’t a roar; it is a rhythmic, metallic tapping. It sounds like someone is gently rapping a coin against a pipe inside your wall. By 05:41, the sound is persistent. By 06:00, it is a constant companion. As the heating system kicks into high gear to warm the house for the morning, the noise does not stop.
This is the sound of Thermal Expansion.
If you have ever laid in bed staring at the clock, just like the footage above, waiting for the noise to stop so you can fall back asleep, you know it is psychological torture. The gain on the microphone picks it up clearly: the click, the pop, the creak. It is the sound of metal moving against metal, or metal moving against wood.
Here is a comprehensive guide on understanding why your house is making these noises and, more importantly, how to stop them so you don’t have to stare at your clock until 12:00 PM wondering when the silence will return.
Understanding the “Tick”: What is Happening?
Before you can fix the silence, you have to understand the noise. The phenomenon documented in the video is known as thermal expansion and contraction.
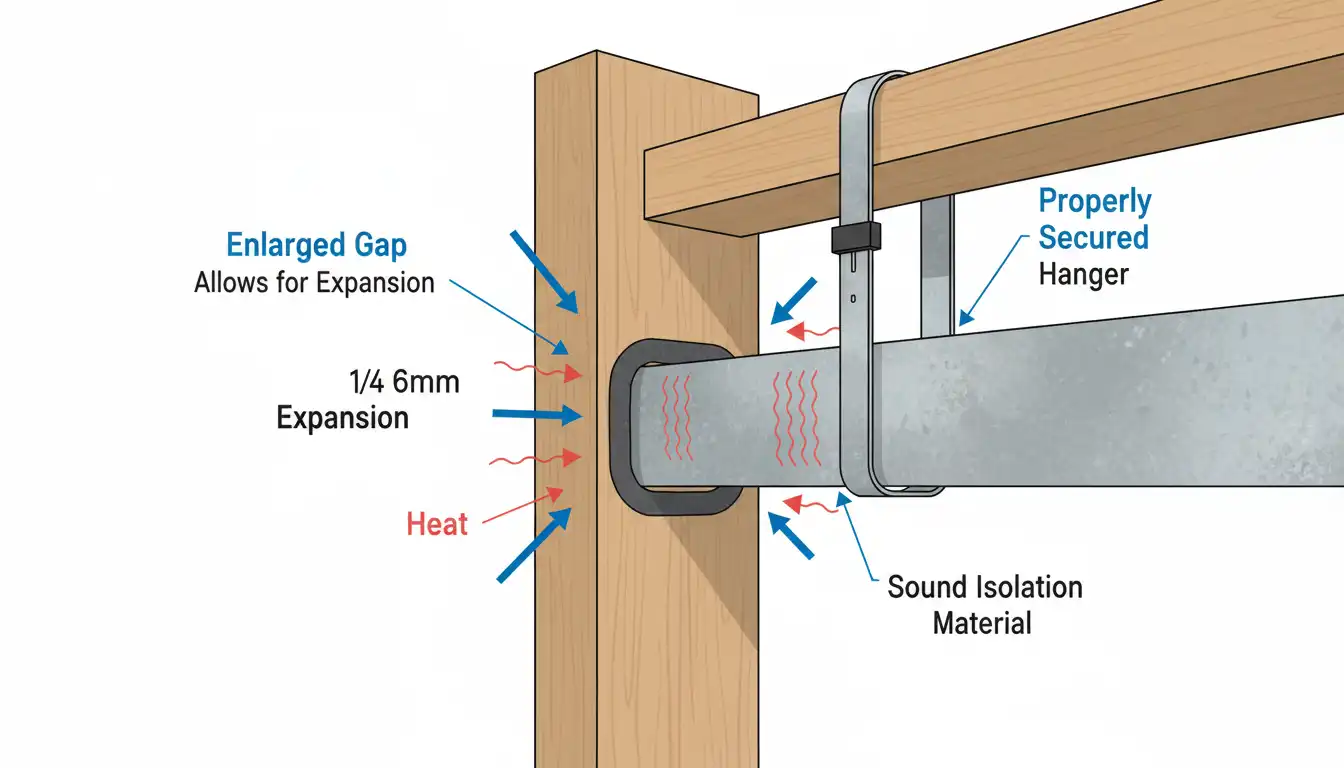
When your heating system turns on—whether it is forced air, hydronic baseboards, or steam radiators—the materials that transport that heat (pipes, ducts, and fins) heat up rapidly. Basic physics dictates that when metal heats up, it expands. It gets physically larger, lengthening by fractions of an inch.
The noise you hear is not the expansion itself; it is the friction.
As a copper pipe or an aluminum fin expands, it needs somewhere to go. If it is touching a wooden stud, a metal bracket, or a floorboard, it will slide against that object. If the fit is tight, it doesn’t slide smoothly. It sticks, builds up pressure, and then slips suddenly.
- Stick… (Pressure builds)
- Slip! (Energy releases as sound)
This is called “stick-slip” friction. That release of energy creates the sharp tick or pop sound. As the system cools down (thermal contraction), the process reverses, often creating a similar ticking sound as the metal shrinks back to its original size.
The Most Common Culprit: Baseboard Heaters
Based on the sound profile in the video—that sharp, metallic ticking—the most likely offender is a hydronic or electric baseboard heater. These are notorious for waking people up in the early morning hours.
Baseboard heaters consist of a heating element (a pipe with aluminum fins) running through a metal enclosure. As hot water or electricity heats that element, it expands lengthwise. If you have a 10-foot run of baseboard, that element can expand significantly.
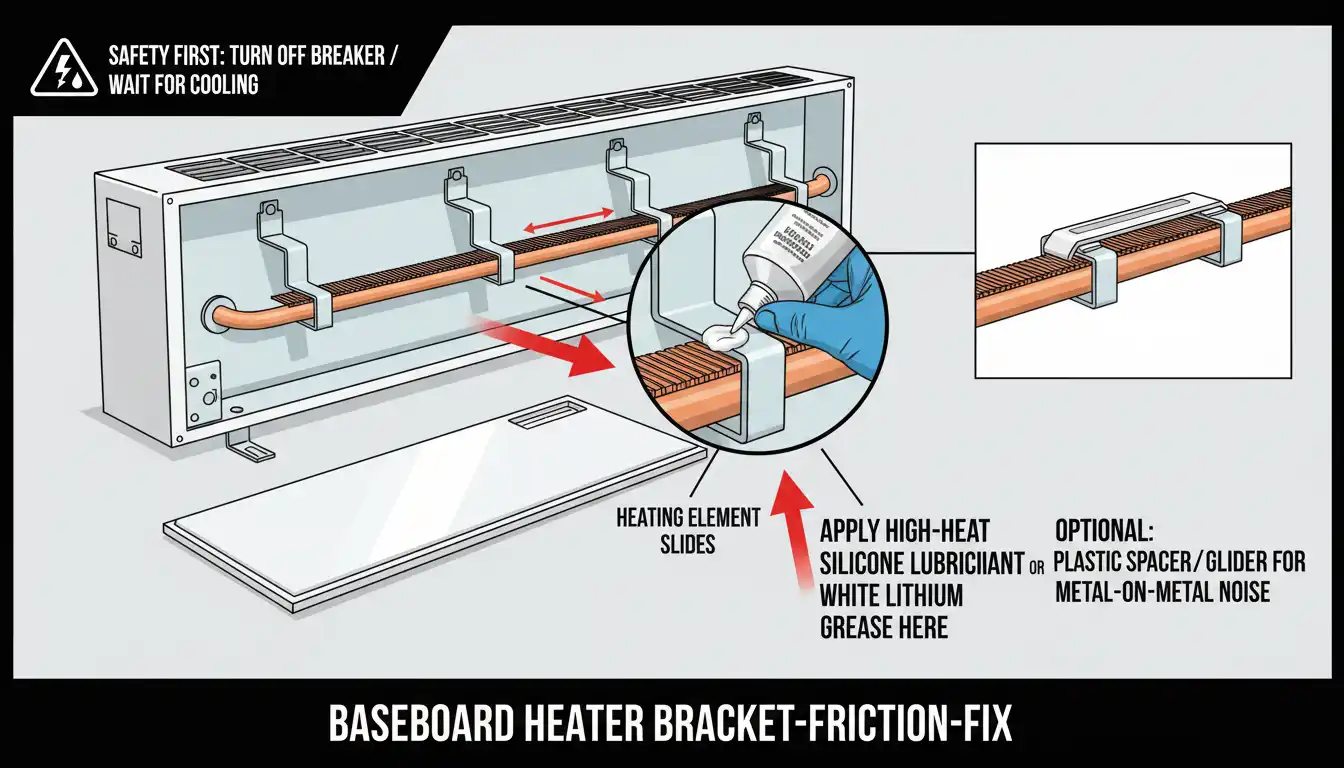
1. The Bracket Friction Fix
The heating element inside the baseboard is usually suspended by metal or plastic cradles (brackets) to keep it off the floor. When the element expands, it slides across these brackets.
The Fix:
- Safety First: If it is an electric heater, turn off the breaker. If it is hydronic (hot water), wait for it to cool down completely.
- Open the Cover: Remove the front metal cover of the baseboard heater. This usually snaps off or lifts up.
- Locate the Noise: Look for the brackets holding the finned tube. wiggle the tube gently (if cool) to see where it rubs.
- Lubricate: The most effective solution is to reduce the friction. Apply a small amount of high-heat silicone lubricant or white lithium grease to the top of the bracket where the heating element rests. Do not use standard WD-40, as it evaporates quickly and creates a smell when heated.
- Plastic Spacers: If the metal-on-metal sound persists, you can retrofit the brackets with heat-resistant plastic clips or “gliders” that allow the element to slide silently.
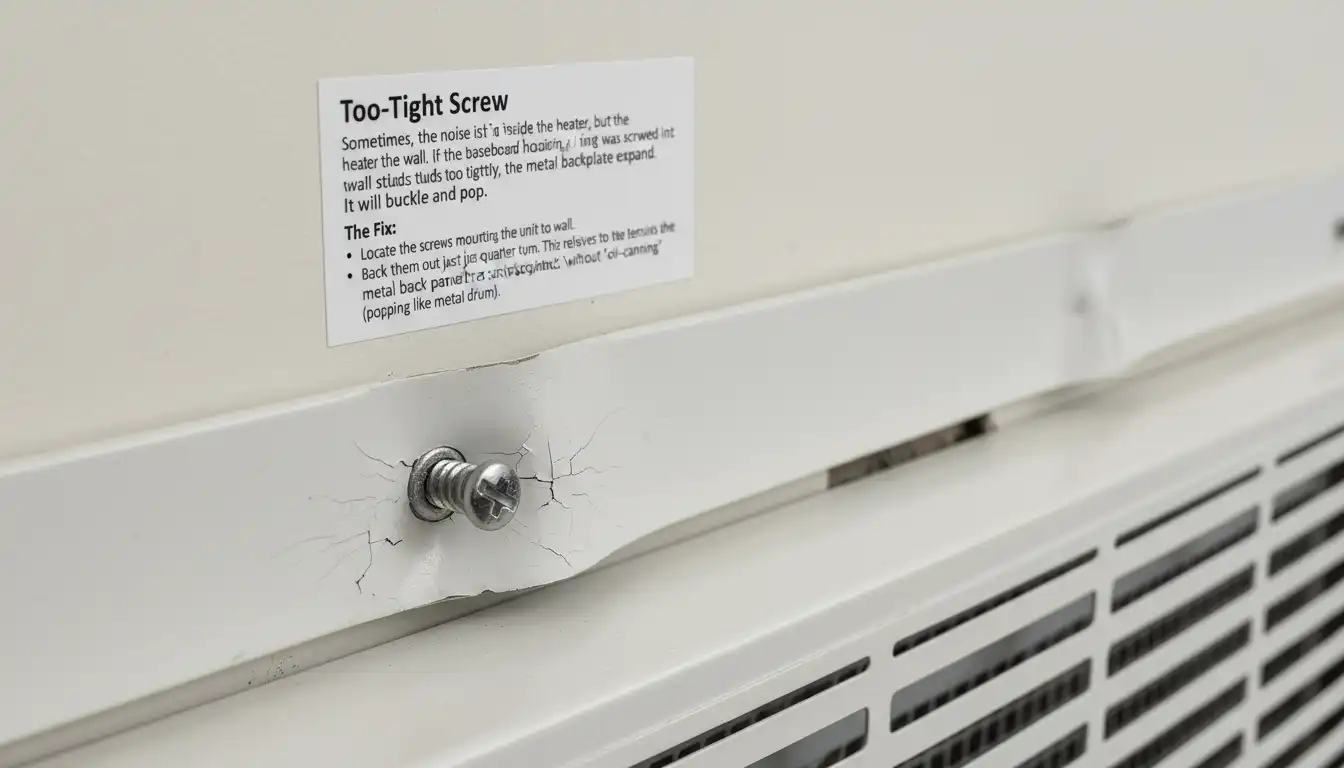
2. The Too-Tight Screw
Sometimes, the noise isn’t inside the heater, but the heater itself fighting the wall. If the baseboard housing was screwed into the wall studs too tightly, the metal backplate cannot expand. It will buckle and pop.
The Fix:
- Locate the screws mounting the unit to the wall.
- Back them out just a quarter turn. This relieves the tension and allows the metal back panel to expand and contract without “oil-canning” (popping like a metal drum).
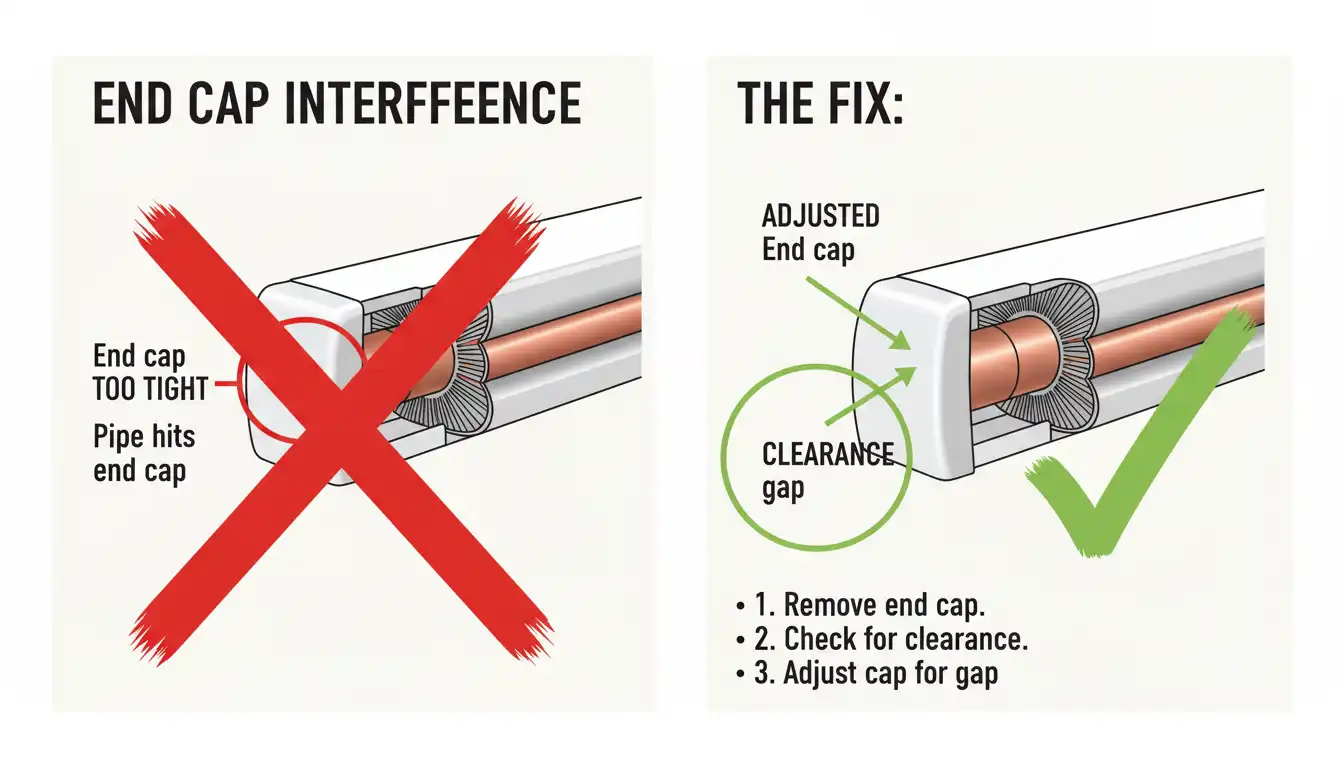
3. End Cap Interference
Check the ends of your baseboard heater. If the installer put the end caps on too tight against the internal pipe, the pipe has nowhere to expand to. It will hit the end cap and make a loud bang.
The Fix:
- Remove the end cap.
- Check for clearance.
- If necessary, trim the pipe slightly (a job for a pro) or simply adjust the end cap so there is a gap between it and the internal heating element.
If you find that your baseboard heaters are simply too old, damaged, or noisy to save, you might consider alternative heating solutions for specific areas, like the kitchen or bathroom. In these cases, understanding the toe kick heater can help you decide if moving the heat source underneath a cabinet—freeing up wall space and potentially reducing noise—is the right move for your home.
The Deep Wall Ticking: Heating Pipes
If the sound in the video seems to come from inside the wall or ceiling rather than a visible heater, you are likely hearing the supply pipes rubbing against the structural wood of the house.
This is harder to fix because the pipes are hidden, but it is not impossible.
1. The Pipe Clamp Release
Plumbers often secure pipes to wooden joists using metal clamps. If these clamps are too tight, the pipe cannot slide through them when it expands. It jerks through the clamp, creating a loud crack.
The Fix:
- If you have access to the pipes (in a basement, crawlspace, or unfinished room), inspect every clamp.
- Replace metal clamps with plastic suspension clamps. These allow the pipe to glide.
- If you must use metal clamps, insert a piece of felt or foam pipe insulation between the pipe and the clamp.
2. The Joist Penetration
Where a pipe passes through a hole drilled in a wooden stud or floor joist, it can rub against the raw wood.
The Fix:
- Wedges: If there is a gap, gently tap a plastic shim or a wedge of heat-resistant rubber into the gap to immobilize the pipe so it flexes rather than slides, or to center it so it doesn’t touch the wood.
- Spray Foam: For larger gaps, expanding foam can sometimes lock a pipe in place or provide a cushion, though this prevents movement which might cause stress elsewhere. A better option is creating a sleeve using pipe insulation.
3. Dealing with Electrical Proximity
When you are hunting for these noises in your walls or ceilings, you will often encounter electrical wiring running alongside your heating pipes. It is vital to be careful. You might find that in older homes, repairs or renovations require you to move or extend heavy-duty wiring that powers electric furnaces or heaters.
If you discover that you need to extend a line to move a heater or reroute power to stop a vibration, you need to know the proper way to handle heavy-gauge wire. You should read up on splicing wires to ensure that any electrical modifications you make are safe, code-compliant, and secure. A loose electrical connection is a fire hazard, which is much worse than a noise hazard.
HVAC Ductwork: The “Boom” and “Pop”
While the video sounds very much like a pipe or baseboard, forced air systems have their own symphony of thermal expansion noises. This usually manifests as a loud boom or thud shortly after the furnace turns on, and another when it turns off. This is called oil-canning.
It happens when the sheet metal of the main supply trunk expands and pops outward due to pressure and heat.
The Fix:
- The Crease Method: A professional HVAC tech can use a specialized tool to create a crease across the large, flat surfaces of your ductwork. This adds rigidity to the metal, preventing it from popping in and out.
- Screws and Braces: screwing a piece of angled metal (like a drive cleat) across the center of the large duct panel can stop the metal from flexing.
- Check the Dampers: Sometimes the noise is a loose damper rattling inside the duct. Ensure all dampers are tight and secure.
Radiators: The Hiss and Clang
If your home uses steam radiators, the “ticking” might be accompanied by hissing or banging (water hammer).
The Fix:
- Shim the Radiator: Steam radiators must pitch toward the inlet pipe so condensed water can drain back to the boiler. If the radiator is flat or pitched the wrong way, water gets trapped, hits the incoming steam, and creates a massive bang. Use wooden shims under the feet of the radiator to create a slight slope toward the pipe.
- Insulate the Valve: The ticking can occur where the inlet pipe rubs against the floorboard. Wrap the pipe in felt tape where it touches the wood.
A Step-by-Step DIY Guide to a Silent Morning
If you are tired of the 5:19 AM wake-up call, follow this systematic approach to silence the noise.
Phase 1: Identification
- Replicate the Conditions: You don’t have to wake up at dawn. Turn your thermostat up 5 degrees high during the day.
- Pinpoint the Sound: Walk around the room. Put your ear near the baseboard ends, the middle of the wall, and the floor. Use a mechanic’s stethoscope (or a cardboard tube) to isolate the location.
- Mark it: Put a piece of painter’s tape exactly where the sound is loudest.
Phase 2: The Intervention (Baseboard Focus)
- Shut Down: Turn off the heat and let the system cool.
- Disassemble: Remove the front panel of the heater at the marked location.
- Clean: Vacuum out years of dust and pet hair. Believe it or not, debris can increase friction.
- Lubricate: Apply silicone spray to the plastic or metal saddles holding the heating element.
- Loosen: Check the screws holding the backplate to the wall. Loosen them slightly.
- Reassemble: Put the cover back on.
Phase 3: Testing
- Turn the heat back up.
- Sit and wait.
- If the ticking is gone, congratulations. If it is reduced but still there, you may have missed a friction point, or the issue may be inside the wall.
When to Call a Professional
Sometimes, the noise is a symptom of a systemic issue that DIY methods cannot fix.
- Piping Design: If the plumber did not install “expansion loops” or “offsets” in long runs of pipe, the pipe has literally nowhere to expand. It will eventually break itself or the fittings. A plumber may need to cut the pipe and install an expansion compensator.
- Boiler Pressure: In hydronic systems, incorrect water pressure can exacerbate noise.
- ** inaccessible Locations:** If the noise is deep inside a finished ceiling, you have to weigh the cost of tearing down drywall against the annoyance of the noise.
Conclusion: Reclaiming Your Sleep
The video ends at 12:00. The day has moved on, and the noise is likely lost in the ambient sounds of daily life. But we know it will return tonight.
Thermal expansion noise is not a sign that your heating system is broken. It is a sign that it is working—getting hot as it should. However, a house should be a sanctuary of peace, not a percussion instrument.
You do not have to live with the tick… tick… tick. By understanding that the noise is simply friction, you can hunt it down. Whether it is a dry bracket in a baseboard heater, a tight clamp on a copper pipe, or a duct that needs stiffening, there is almost always a solution.
Don’t let your clock taunt you at 5:19 AM. Grab a can of silicone spray, a screwdriver, and some patience, and silence the thermal expansion for good.