Choosing the wrong screw for your baluster installation is a surprisingly common misstep that can lead to a wobbly, unsafe railing and damaged materials. It’s a frustrating problem that transforms a straightforward project into a structural headache. The security of your entire railing system hinges on these small but critical components, yet finding clear guidance on the exact size and type can feel like searching for a needle in a haystack.
This uncertainty often leads to using screws that are too short, providing inadequate grip, or too long, causing them to poke through the other side of the railing. The wrong material can lead to rust and corrosion, staining your beautiful wood and compromising the screw’s strength over time. This guide eliminates the guesswork, providing a clear and direct path to selecting the perfect screw for a safe, secure, and long-lasting baluster installation.
Why the Right Screw Size for Your Balusters Is Non-Negotiable
The integrity of a deck or staircase railing is paramount for safety. Each baluster acts as a protective barrier, and its connection to the top and bottom rails must be rock-solid. A screw of the correct length and gauge ensures maximum thread engagement into the railing material, creating a powerful grip that resists loosening from vibrations, impacts, or the natural expansion and contraction of wood.
Beyond safety, the right screw prevents cosmetic and structural damage. A screw with too large a diameter can split the wood of the baluster or railing, especially without a proper pilot hole. Conversely, a screw that is too thin may not have the shear strength to withstand lateral pressure, leading to a wobbly and unstable feel. The entire system’s stability is only as strong as its weakest connection point, highlighting the critical role of proper fastener selection.
Decoding Screw Sizes and Types: A Quick Primer
Understanding screw specifications is the first step to making an informed choice. Screw sizes are typically defined by two numbers: the gauge (diameter) and the length. The gauge is represented by a number (e.g., #8, #10), where a higher number indicates a thicker screw. The length is measured in inches, from the base of the head to the tip.
For baluster installation, you’ll primarily encounter wood screws or deck screws. Deck screws are the superior choice for outdoor applications, as they are specifically designed with coatings to resist corrosion from moisture and the chemicals in pressure-treated lumber. For indoor staircases, standard wood screws are sufficient, but for any area exposed to the elements, always opt for fasteners with a protective coating or, even better, stainless steel.
Key Factors in Choosing Your Baluster Screws
Selecting the right screw is not a one-size-fits-all situation. The optimal choice depends on several variables, including the material of your balusters and railings, and whether the installation is indoors or outdoors. Considering these factors will ensure a secure and durable assembly.
Baluster and Railing Materials: Wood, Metal, or Composite?
The materials you are joining together heavily influence the ideal screw. Fastening wood balusters to a wooden rail is the most common scenario. Here, you need a screw with coarse threads designed to grip wood fibers effectively.
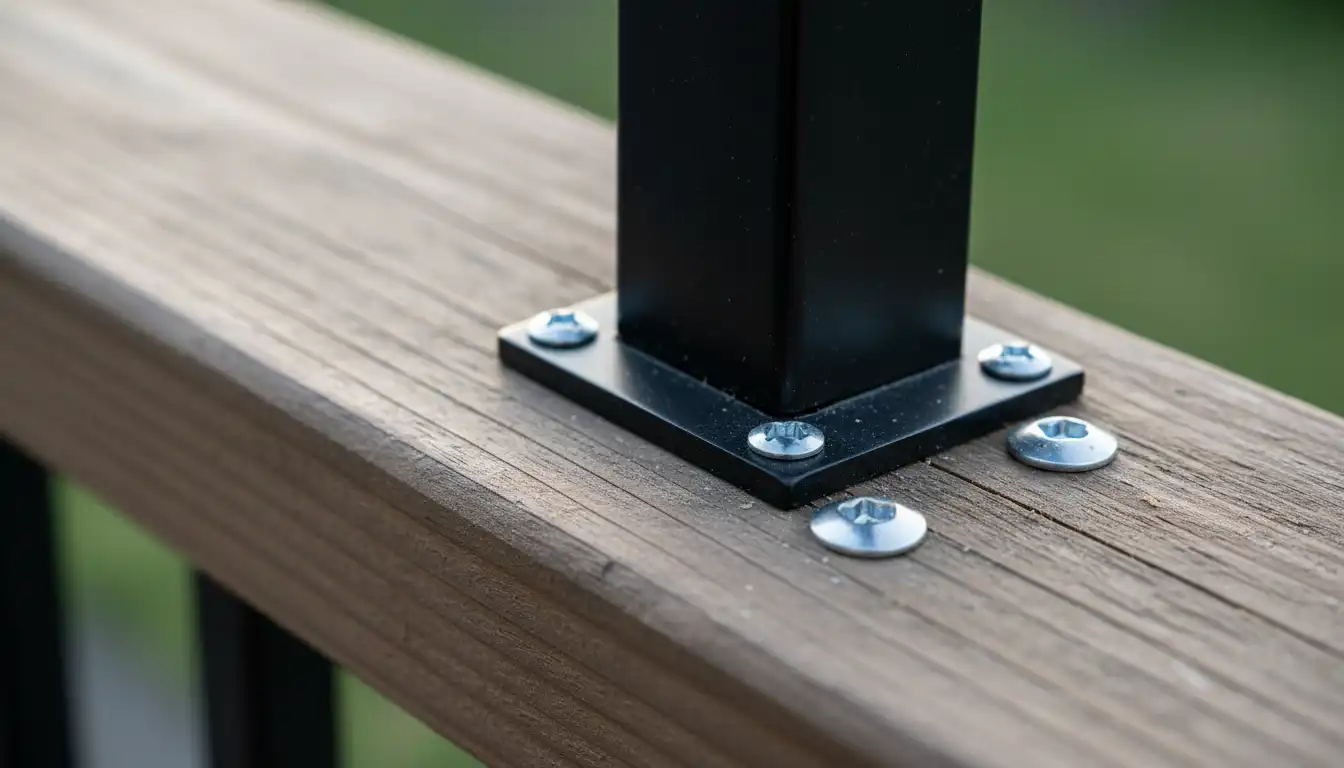
When installing metal balusters, they often come with specialized connectors or “shoes” that are screwed into the wooden rail first. The screws for these connectors need to be robust enough to hold the connector firmly, but not so long that they interfere with the baluster itself. For composite railings, it is crucial to use screws specifically recommended by the manufacturer, as composite materials have different densities and holding properties than wood.
Indoor vs. Outdoor: The Battle Against Corrosion
The installation environment is a critical factor. For interior staircases, standard steel wood screws are generally adequate. However, for any exterior application like a deck, corrosion resistance is essential. Pressure-treated lumber, cedar, and redwood contain chemicals and tannins that can accelerate the corrosion of unprotected steel.
For outdoor projects, you have two primary choices: coated screws or stainless steel screws. Coated screws have a protective layer (often ceramic or polymer) that resists rust. Stainless steel screws offer the ultimate protection, especially in coastal areas with salt in the air or around pools. While more expensive, stainless steel provides the best long-term durability and prevents unsightly rust stains on your railing.
The Ultimate Baluster Screw Size Chart
To simplify your selection process, here is a clear guide to the most commonly recommended screw sizes for various baluster installations. Always consider pre-drilling a pilot hole, especially when working close to the edge of a board, to prevent the wood from splitting.
| Baluster Type | Railing Material | Recommended Screw Size (Gauge x Length) | Best Screw Type |
|---|---|---|---|
| Wood (e.g., 2×2) | Wood (e.g., 2×4) | #8 x 2 1/2″ or #8 x 3″ | Coated Deck Screw or Stainless Steel |
| Metal (with connectors) | Wood | #8 x 1 1/4″ or #8 x 1 5/8″ (for the connector) | Coated Deck Screw or Stainless Steel |
| Wood | Composite | #10 x 2 1/2″ (Consult manufacturer) | Composite-Specific or Stainless Steel |
| Interior Wood | Interior Wood | #8 x 2 1/2″ | Standard Wood Screw |
Step-by-Step Guide to a Perfect Baluster Installation
Achieving a professional and secure baluster installation involves more than just picking the right screw. Following a methodical process ensures every baluster is plumb, secure, and evenly spaced for a flawless finish.
First, carefully measure and mark your baluster locations on both the top and bottom rails. Consistency is key to a professional look. For wooden balusters, the connection point is often a simple face-screw or toe-screw application. For metal balusters, you will typically install a connector or shoe first, which provides a clean and secure base.
The Hidden Power of the Pilot Hole
One of the most critical steps, often overlooked by DIYers, is drilling a pilot hole. A pilot hole is a hole drilled before the screw is driven, slightly smaller than the screw’s diameter. This simple action prevents the wood from splitting as the screw threads bite in, a common issue especially with hardwoods or when screwing near the end of a board.
The pilot hole also makes driving the screw easier and ensures it goes in straight. As a general rule, the pilot hole for hardwoods should be about the same diameter as the screw’s shank (the solid part without threads), while for softwoods, it should be slightly smaller.
Driving the Screw: Torque and Technique
When driving the screws, use a drill or impact driver with a clutch setting if available. Start with a lower torque setting and gradually increase it. The goal is to drive the screw until the head is snug and flush with the wood surface. Over-tightening can strip the hole, causing the screw to lose its grip, or crush the wood fibers, weakening the connection.
For a truly secure structure, the stability of your railing posts is just as important as the balusters themselves. The principles of creating a strong anchor point are universal, whether for a deck railing or when considering a project like reinforcing a garage ceiling for a hoist, where structural integrity is everything.
Common Mistakes and How to Avoid Them
Even with the right screws, a few common errors can compromise your project. The most frequent is failing to pre-drill, which almost guarantees some wood splitting. Another is choosing the wrong length; a 2 1/2-inch screw is generally ideal for connecting a standard 1 1/2-inch thick baluster to a 1 1/2-inch rail, providing about 1 inch of solid penetration.
Using interior-grade screws for an outdoor deck is another critical mistake. They will rust within a year, leading to failure and staining. Finally, ensure your spacing is code-compliant, which typically requires that a 4-inch sphere cannot pass between the balusters. Tackling a railing project correctly from the start prevents the kind of headaches you might encounter in other complex DIY tasks, such as trying to run wire through a ceiling without attic access.
Achieving a Flawless Finish
Once your balusters are securely installed, the final touches make all the difference. If you plan to paint or stain your railing, now is the time. A quality finish not only looks great but also adds another layer of protection against the elements. Applying it correctly is key.
When painting, issues can sometimes arise, like the appearance of unwanted textures. Understanding the cause of a problem, such as when a paint roller is leaving texture, can help you achieve that perfectly smooth, professional-grade surface on your new railing system.
Frequently Asked Questions
Navigating the specifics of baluster installation can bring up several questions. Here are answers to some of the most common inquiries to ensure your project is a success.
Do you have to use screws for balusters?
While screws are the most common and recommended method for strength and durability, other options exist. Some systems use dowels and wood glue, particularly for interior staircases. However, for outdoor decks, the superior holding power and corrosion resistance of deck screws make them the safest and most reliable choice.
Can I use drywall screws for balusters?
Absolutely not. Drywall screws are brittle and not designed to handle the shear stress or racking forces a railing endures. They will snap under pressure. Furthermore, they have no corrosion resistance and will rust quickly when exposed to moisture, making them completely unsuitable and unsafe for this application.
How far should a screw go into the railing?
For a strong connection, the screw should penetrate at least 1 inch into the bottom piece of wood (the rail). For a typical 2×2 baluster (which is 1.5 inches thick) attached to a 2×4 rail (also 1.5 inches thick), a 2.5-inch screw is ideal, as it passes through the baluster and provides 1 inch of embedment into the rail.