You’re faced with a plumbing puzzle: two sections of PVC pipe that need to become one. Whether it’s a cracked drain line under your sink or an ambitious irrigation project in the yard, the challenge is the same. The traditional route involves messy purple primers and solvent cements that require perfect conditions and cure times, but there’s a simpler, more forgiving solution.
A rubber coupling, often known by the brand name Fernco, offers a fast, reliable, and leak-proof way to join PVC pipes without chemicals or flames. This guide will walk you through every step of the process, ensuring your connection is as durable as any solvent-welded joint.
Why a Rubber Coupling Is Your Go-To Plumbing Solution
When you are faced with repairs on a 3-inch vent, a rubber coupling is frequently the go-to plumbing solution. It stands out because it is incredibly useful for quick repairs, specifically in scenarios where someone cuts into a pipe and an immediate fix is required. The goal is often not just to patch the area, but to repair and reuse the piece of pipe that was removed. This approach is efficient; if the piece being reused has no holes, there is simply no point in wasting it.
To start the process, precision is key. The repair area is cut exactly where the previous cut was located. This prepares the gap for the re-insertion of the pipe. However, before placing the coupling, the material requires some preparation. It should be ground down a little bit. This grinding ensures that it fits in properly with a repair coupling and a slip coupling. Visual aids are also helpful during this stage; using a marker, you can mark out the slip so it is easy to get into place when you are moving quickly.
The application of adhesives is a critical part of the assembly. Glue is added to the top first. This lubrication allows the component to slide on the piece effectively, ensuring it can just slide right down once it is in place. Once the piece of pipe is out and the coupling is slid on, you must prepare the surfaces chemically. Primer should be added to both the bottom and top pieces to ensure a solid bond.
Following the primer, glue is added again, and then the slip coupling is dropped right into the markers you created earlier. This alignment is vital for a leak-free seal. Finally, to ensure the coupling stays in place securely, glue should also be added on the top and the bottom of the connection.
Overall, this method proves that a rubber coupling arrangement is a simple and quick way to fix pipes. Because of its utility in saving materials and speed of installation, it is a must for any plumber’s toolkit. whether you are a professional or handling a home repair.
Before You Begin: Gathering Your Tools and Materials
A successful installation starts with having the right equipment on hand. A rushed trip to the hardware store mid-project is something to be avoided. Before you make the first cut, assemble the following items.
Essential Materials:
- The Correct Size Rubber Coupling: Ensure the coupling is designed for the outer diameter of your PVC pipe.
- PVC Pipe: The new section of pipe you are installing.
- Cleaning Rags: For wiping down the pipe ends.
Essential Tools:
- Tape Measure: For accurate pipe measurements.
- Marker: To mark your cut lines clearly.
- PVC Cutter or Saw: A ratchet-style cutter provides the cleanest cut, but a hacksaw or reciprocating saw will also work.
- Deburring Tool or Utility Knife: To smooth the inside and outside edges of the cut pipe.
- Torque Wrench with Nut Driver Bit (Recommended): For precise tightening of the band clamps. A standard nut driver or flathead screwdriver can also be used.
- Safety Glasses: Always protect your eyes when cutting materials.
Step-by-Step: How to Join PVC Pipe with a Rubber Coupling for a Perfect Seal
With your tools and materials ready, you can now proceed with the installation. Following these steps carefully will ensure a secure, watertight connection that will last for years. Precision at each stage is key to a professional result.
Step 1: Measure and Cut the PVC Pipe
Accuracy is paramount. Measure the distance between the two pipes you intend to join and transfer that measurement to your new piece of PVC pipe. For repair situations, cut out the damaged section of the existing pipe, ensuring your cuts are as straight and square as possible.
A square cut provides the maximum surface area for the rubber coupling to seal against, minimizing the risk of leaks. A ratchet-style PVC cutter is ideal for this, as it’s specifically designed to make clean, 90-degree cuts. If using a saw, a miter box can help guide your blade for a perfectly straight cut.

Step 2: The Critical Importance of Pipe Preparation
This is a step many people rush, but it is arguably the most crucial for a leak-proof seal. After cutting, the end of the PVC pipe will have small burrs and rough edges. These imperfections can slice or damage the soft rubber of the coupling, creating a path for water to escape.
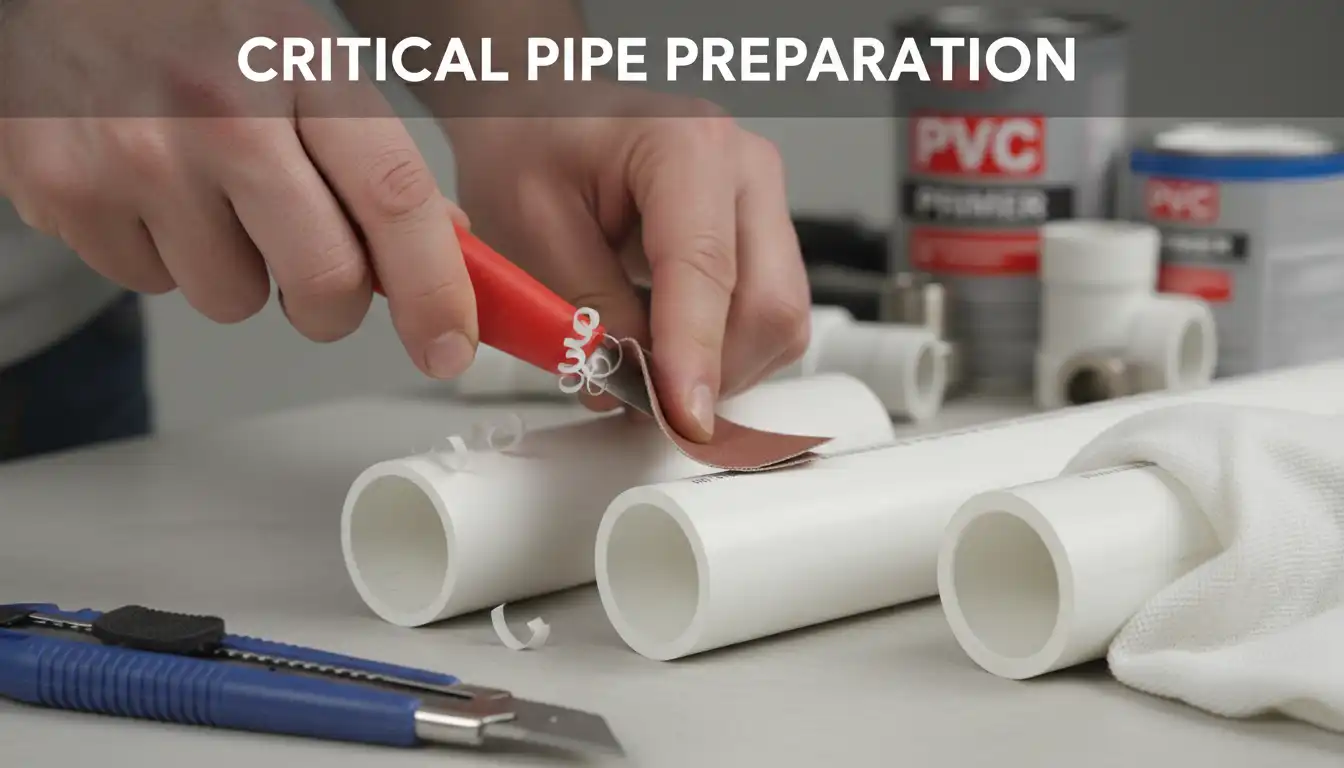
Use a deburring tool, a utility knife, or even a piece of sandpaper to smooth the inside and outside edges of both pipe ends. The goal is a clean, chamfered edge. Once deburred, wipe the ends of both pipes with a clean, dry rag to remove any dirt, dust, or moisture that could interfere with the seal.
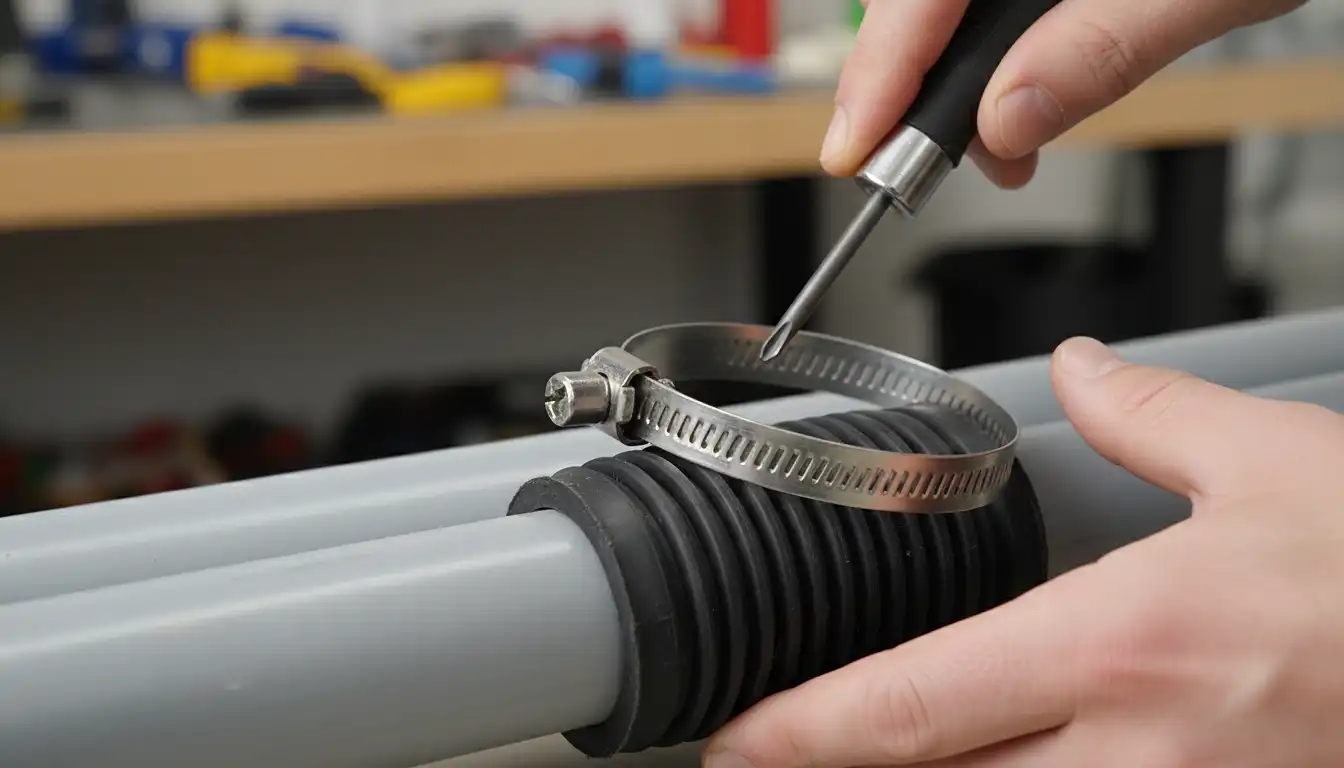
Step 3: Installing the Rubber Coupling
Begin by loosening the stainless steel band clamps on the rubber coupling using your nut driver. You don’t need to remove them completely, just loosen them enough so the coupling can easily slide over the pipe. Slide the entire coupling onto one of the pipe ends.
Next, align the second piece of pipe with the first. Slide the rubber coupling back over the joint until it is centered, with an equal amount of the coupling covering each pipe. Most couplings have a small internal ridge or stop to help you feel when the pipe is seated correctly.
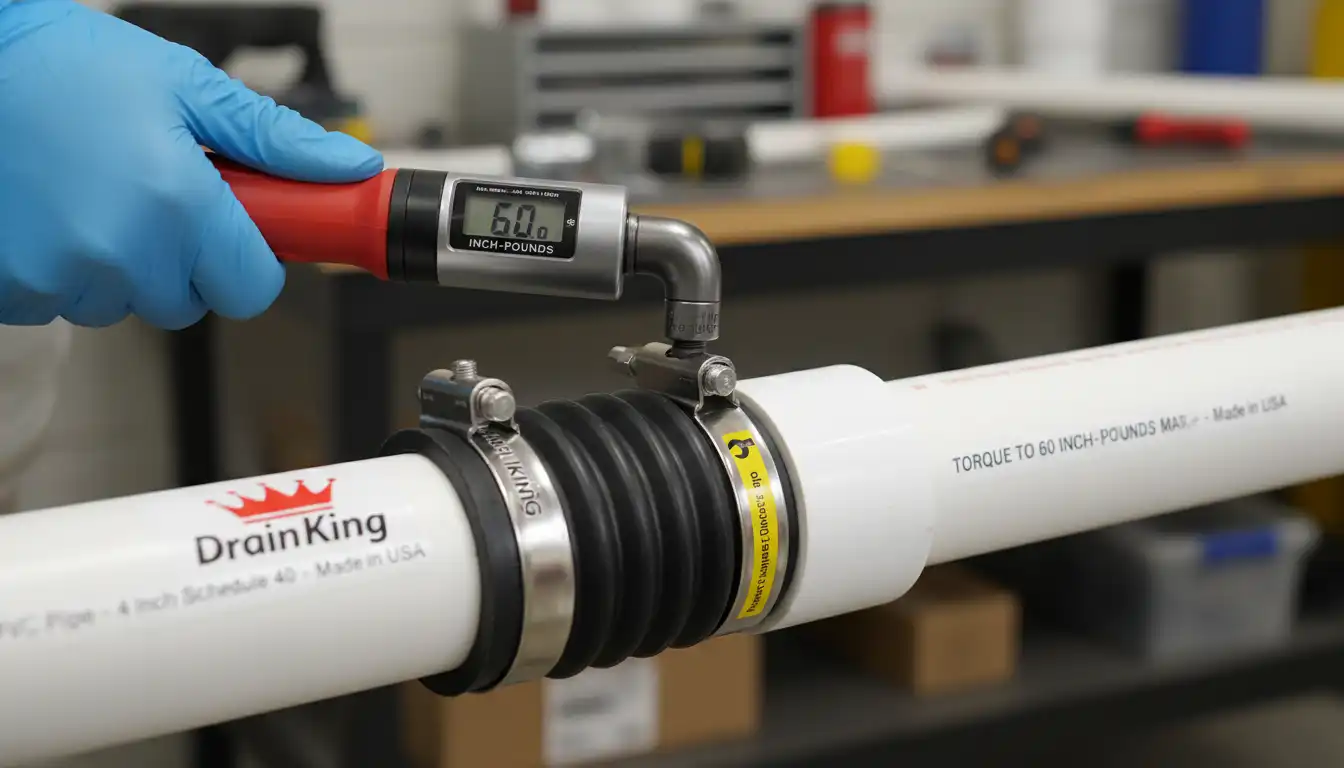
Step 4: Achieving the Perfect Torque on the Band Clamps
The final step is to tighten the band clamps. This is what creates the watertight seal. While it’s tempting to tighten them as much as possible, over-tightening is a common mistake that can damage the rubber or even crack the PVC pipe.
The manufacturer specifies a torque value, typically 60 inch-pounds, for a reason. Using a torque wrench is the best way to achieve this precise tightness. If you don’t have one, tighten with a nut driver until the clamp is snug, then give it an additional quarter to a half turn. The rubber should compress slightly under the band, but not bulge out excessively.
Choosing the Right Coupling: Shielded vs. Unshielded Explained
The decision between a shielded and an unshielded coupling depends entirely on the application. For an exposed drain line under a sink or in a basement, an unshielded coupling is perfectly adequate and more flexible. Its ability to accommodate slight misalignments is a significant benefit in these situations.
However, for any pipe that will be concealed within a wall, ceiling, or buried underground, a shielded coupling is non-negotiable. The metal shield provides critical structural support, preventing the joint from sagging or shifting over time due to ground movement or the weight of the pipe itself. This added rigidity ensures the long-term integrity of the connection in inaccessible locations.
Transitioning Between Different Pipe Materials
One of the most powerful applications for a rubber coupling is joining dissimilar materials. It’s common in home renovations to need to connect new PVC pipe to an older cast iron or galvanized steel drain line. A rubber coupling makes this transition simple.
Because these different materials have slightly different outside diameters, you will need a specific “transition” coupling. These are designed with different internal diameters on each side to create a perfect seal on both the PVC and the metal pipe. Always check the packaging to ensure the coupling is rated for the specific materials you are joining.
The Plumber’s Nightmare: Common Mistakes to Avoid
Even a seemingly simple task has pitfalls. Avoiding these common errors will save you from the frustration of a leaking joint and the need to redo your work.
- Forgetting to Deburr: Sharp PVC edges are the number one enemy of a rubber seal. Always take the time to smooth the pipe ends.
- Using a Dirty Pipe: Any debris, grease, or moisture on the pipe surface can compromise the seal. A quick wipe-down is essential.
- Over-tightening the Clamps: More is not better. Excessive torque can damage the coupling and the pipe. Stick to the manufacturer’s specification.
- Incorrect Sizing: Using a coupling that is too large or too small will inevitably lead to leaks. Double-check your pipe’s outside diameter before purchasing.
- Misaligned Pipes: While couplings are flexible, they can’t fix major alignment issues. Ensure your pipes are reasonably straight before making the connection. A major plumbing overhaul might be part of a larger project, where you could find yourself learning how to splice 6 gauge wire for a new appliance one day and joining pipes the next.
Advanced Insights: Beyond the Basics
For a truly professional installation, consider the forces at play. In vertical applications, the weight of the pipe and the water inside can cause the connection to slowly pull apart over time. Even when using a shielded coupling, it’s wise to support the pipe with hangers or straps on both sides of the joint to prevent strain.
If your repair requires cutting into a wall, you’ll need to patch it properly afterward. Having a basic understanding of drywall, like knowing what is 3/8 sheetrock is used for, can be incredibly helpful for achieving a seamless finish. This kind of holistic approach to home repair sets a professional job apart from a temporary fix.
| Clamp Size (Diameter) | Recommended Torque (Inch-Pounds) | Common Applications |
|---|---|---|
| 1-1/2 inch | 60 in-lbs | Sink Drains, Sump Pumps |
| 2 inch | 60 in-lbs | Shower Drains, Laundry Drains |
| 3 inch | 60 in-lbs | Main Drain Lines, Toilets |
| 4 inch | 60 in-lbs | Main Sewer Lines |
Troubleshooting a Leaking Rubber Coupling
If you’ve completed your installation and discover a drip, don’t panic. The most common cause of a leak is insufficient or uneven torque on the band clamps. First, try tightening both clamps by another quarter turn.
If the leak persists, you will likely need to disassemble the joint. Loosen the clamps, slide the coupling off, and carefully inspect both the inside of the rubber sleeve and the pipe ends for any nicks, debris, or imperfections you may have missed. Re-clean the surfaces and reinstall, paying close attention to achieving the correct torque.
Frequently Asked Questions About Joining PVC with Rubber Couplings
Is a rubber coupling a permanent fix?
Absolutely. When installed correctly in the proper application, a high-quality rubber coupling provides a durable, long-lasting seal that is considered a permanent repair. Many plumbing codes approve their use, especially shielded versions for concealed locations.
Can you bury a rubber coupling underground?
Yes, but you must use a shielded rubber coupling. The metal shield is essential to resist the heavy loads and shear forces from the surrounding soil, preventing the connection from failing over time.
Do I need to use any sealant or glue with a rubber coupling?
No. Do not use any pipe dope, silicone, or other sealants on a rubber coupling. These chemicals can degrade the rubber over time and interfere with the mechanical seal created by the clamps. The connection is designed to be made clean and dry.
How do I remove an old rubber coupling?
Removing an old coupling is straightforward. Simply use a nut driver or screwdriver to loosen and remove the stainless steel band clamps. The rubber sleeve should then be pliable enough to be cut away with a utility knife or pulled off the pipes. While you’re tackling plumbing repairs, you might run into other stubborn fixtures; for example, discovering you can’t remove your Kohler faucet handle can bring a simple project to a halt.
Final Words
Mastering the art of joining PVC pipes with a rubber coupling, such as a Fernco flexible connector, opens up a world of efficient plumbing repairs and installations. This method stands out for its simplicity—no glue or primer required—making it ideal for tight spaces, misaligned pipes, or transitions between materials like PVC to cast iron.
By selecting the correct size, preparing clean pipe ends, sliding the coupling into place, and tightening the stainless steel clamps to the recommended 60 inch-pounds of torque, you achieve a durable, leak-proof seal resistant to chemicals, movement, and soil conditions.
Whether for underground drainage, sewer lines, or quick fixes, rubber couplings offer flexibility and reliability that rigid glued joints can’t match. Always check local codes for above-ground use, test for leaks after installation, and enjoy the satisfaction of a professional-grade connection that saves time and hassle. With practice, you’ll tackle any PVC project confidently.