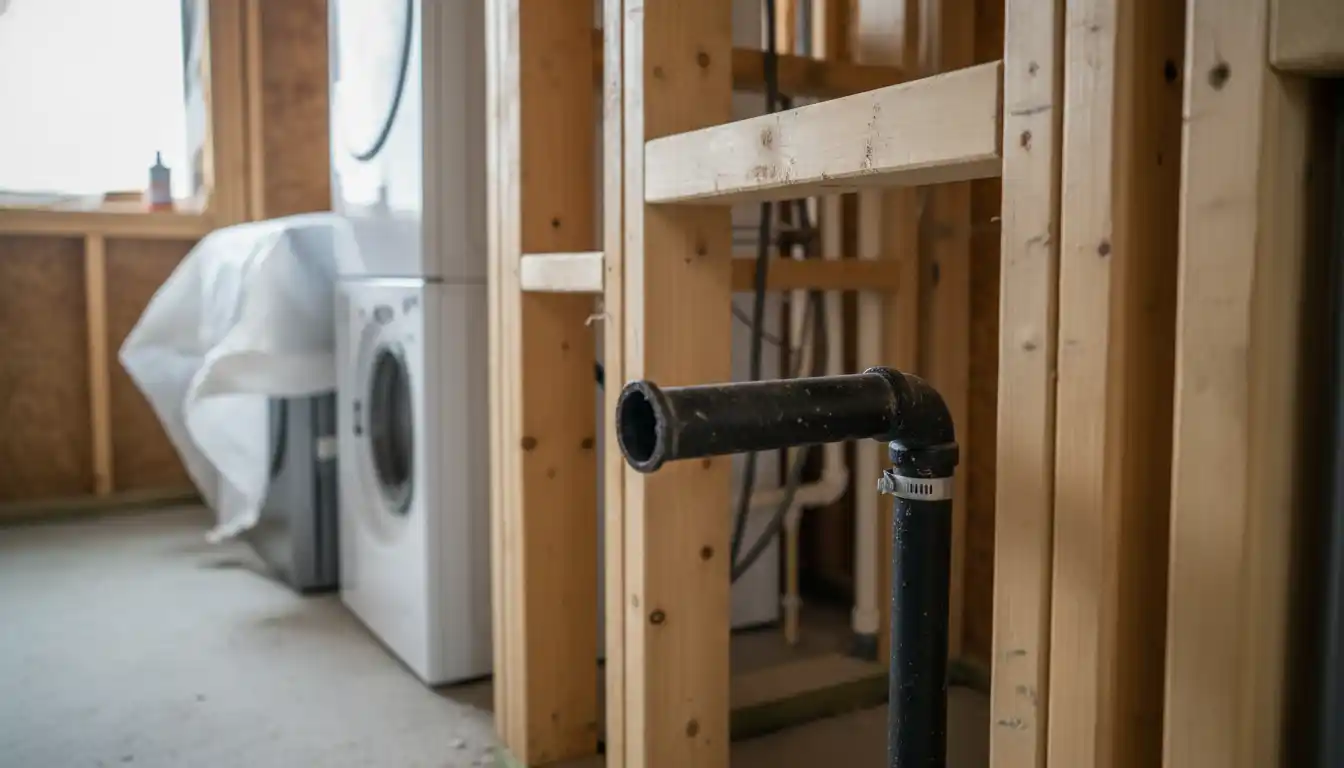
A proper gas line rough-in for a dryer typically involves running a 1/2-inch black iron or CSST gas pipe to the laundry location, terminating it with a shut-off valve within six feet of the appliance, and installing a mandatory sediment trap (drip leg) downstream of the valve to protect the dryer’s internal components. Ensuring the stub-out is correctly positioned—usually near the floor or in a recessed box—allows the dryer to sit flush against the wall while keeping the safety valve accessible.
Installing a gas line is one of the more intimidating home improvement tasks because the stakes are higher than with carpentry or drywall. A small leak can be dangerous, and code violations can void insurance policies. However, with the right planning, materials, and understanding of the specific requirements for gas dryers, a rough-in can be a straightforward project for experienced DIYers. This guide will walk you through the essential sizing, material choices, and critical code requirements like the often-missed sediment trap.
Planning Your Gas Line Rough-In
Before you drill a single hole or buy a pipe wrench, you must map out your route and determine your load. A gas dryer is not a high-demand appliance compared to a furnace or tankless water heater, but it still requires specific volume and pressure to operate safely.
Sizing the Pipe Correctly
Most residential gas clothes dryers have a rating of approximately 20,000 to 22,000 BTUs per hour. For this load, a 1/2-inch IPS (Iron Pipe Size) line is the industry standard and is sufficient for most runs up to 100 feet. While some older codes or specific situations might allow for 3/8-inch copper tubing for very short runs, sticking to 1/2-inch pipe ensures you have adequate flow and future-proofs the line slightly should you ever upgrade to a professional-grade unit.
If you are tapping into an existing main line that already serves a furnace and water heater, you must perform a load calculation. You need to ensure the main branch has enough “leftover” capacity to feed the dryer without starving the other appliances. If you are unsure, consulting a load table or a professional plumber is the safest route.
Material Selection: Black Iron vs. CSST
You generally have two main choices for the material: rigid black iron pipe or Corrugated Stainless Steel Tubing (CSST).
Black Iron is the traditional choice. It is extremely durable, fire-resistant, and relatively inexpensive. However, it requires precise measuring, cutting, and threading. If you are transporting materials yourself, keep in mind that buying full lengths of pipe can be cumbersome. You might face challenges similar to hauling 16-foot lumber on a roof rack; ensure your vehicle can safely handle 10-foot lengths of heavy steel pipe.
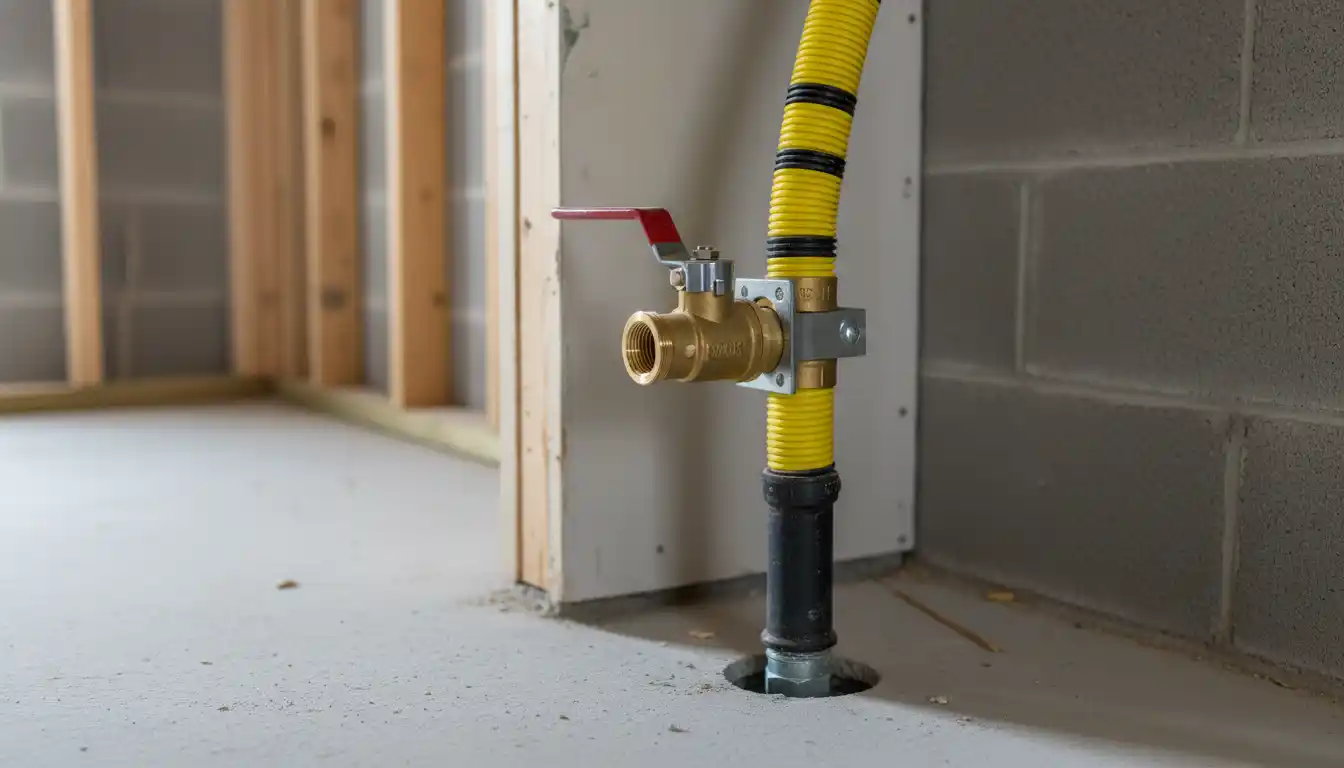
CSST (often recognized by its yellow jacket) is much easier to install because it is flexible. You can snake it through walls and joist bays like electrical wire, significantly reducing the number of joints and potential leak points. The downside is the cost—CSST fittings are expensive—and the strict requirement for electrical bonding to prevent damage from lightning strikes or electrical surges.
Location and Positioning
The placement of your stub-out is critical for the final look and function of your laundry room. If the pipe sticks out too far, your dryer will be pushed away from the wall, wasting valuable floor space. Ideally, the gas line should enter the room in a “void” space behind the dryer, typically at the bottom right or left corner depending on your specific machine’s design.
Many modern installations use a recessed gas outlet box. Similar to a washing machine box, this sets the valve inside the wall cavity, allowing the dryer to be pushed back almost flush against the drywall. If you are not using a box, a common rough-in height is about 2 to 4 inches off the floor, usually coming out of the wall. This keeps the connection low and out of the way of the dryer drum and vent.
Step-by-Step Installation Process
Once you have your plan and materials, the physical work begins. Safety is paramount here—ensure the gas is turned off at the meter before cutting into any existing lines.
Drilling and Routing
When routing the pipe, avoid notching structural joists in ways that weaken them. If you are running CSST, use strike plates where the tubing passes through studs to protect it from future drywall screws. This is similar to the precaution you would take when running electrical wires.
If you are working in a basement to feed a laundry room above, consider how the pipe runs relative to other infrastructure. For example, if you are finishing a basement area, you might be dealing with tight clearances similar to installing lattice under a deck on a slope where accessibility is tricky. Plan your route to minimize elbows, as every 90-degree turn adds resistance to the gas flow.
Assembling the Pipe
For black iron, clean all threads with a wire brush before assembly. Apply a high-quality pipe dope or gas-rated Teflon tape (yellow tape) to the male threads only. Tighten fittings securely with two pipe wrenches—one to hold the stationary pipe and one to turn the fitting—to prevent twisting the entire line.
Installing the Shut-Off Valve
The code requires a shut-off valve to be installed within 6 feet of the appliance and in the same room. The valve must be accessible. Do not hide the valve inside a cabinet that requires tools to open or behind a finished wall without an access panel. The valve usually marks the end of the rigid “rough-in” piping and the beginning of the flexible connector.
Critical Components and Code Compliance
There is one specific component for gas dryer installations that is frequently installed incorrectly or omitted entirely by amateurs: the sediment trap.
The Importance of Sediment Traps
Also known as a “drip leg” or “dirt leg,” a sediment trap is a T-fitting installed downstream of the shut-off valve. The gas enters the side of the T and exits the top (or vice versa), while the bottom of the T extends down into a capped nipple (usually 3 inches long).
Gravity is the key here. Debris, moisture, and pipe scale flowing through the line will carry momentum and fall into the capped nipple trap rather than making the sharp 90-degree turn into your dryer’s delicate gas valve. If this trap is installed horizontally, it is useless. It must be vertical to be code-compliant and effective.
Venting Considerations
While this article focuses on the gas line, the gas rough-in location dictates where your dryer sits, which affects venting. Gas dryers produce carbon monoxide and moisture, so they must be vented outdoors using rigid metal ducting. Never use plastic or foil ducting for gas dryers, as they are fire hazards and can trap lint.
Common Mistakes to Avoid
Even seasoned renovators can make errors when dealing with gas lines. Avoid these common pitfalls to ensure a safe inspection.
Incorrect Valve Placement
Placing the valve directly behind the center of the dryer is a common mistake. The back of a dryer usually has a bulge for the drum mechanism. If your valve hits this bulge, the dryer will stick out 6 inches or more. Offset the rough-in to the side (check your dryer’s manual for the “cove” location) or keep it very low to the floor.
If you are extremely tight on space, you might be looking for alternatives to bulky appliances. In other areas of the home, solutions like toe kick heater pros and cons are discussed for saving space, but for a dryer, your best space-saving bet is correct rough-in placement.
Using Wrong Sealants
Standard white Teflon tape is for water, not gas. It is not rated for the chemical composition of natural gas or propane and can break down over time, causing leaks. Always use the yellow gas-rated tape or a pipe thread compound approved for gas.
Ignoring Support and Strapping
Gas pipes are heavy. If you don’t strap them securely to the joists or studs, the vibration from the dryer or water hammer from nearby washing machine pipes can loosen joints over time. Code typically requires support every 6 to 8 feet for rigid pipe and more frequently for CSST.
Gas Pipe Sizing Reference
The following table provides a general guideline for sizing gas lines based on distance. Note that this assumes a standard natural gas pressure (usually less than 0.5 psi) and a dedicated run for the dryer.
| Pipe Material | Pipe Size (Diameter) | Maximum Run Length (approx.) | Capacity (BTU/hr) |
|---|---|---|---|
| Black Iron (Schedule 40) | 1/2 Inch | 10 ft | 175,000 |
| Black Iron (Schedule 40) | 1/2 Inch | 50 ft | 75,000 |
| Black Iron (Schedule 40) | 1/2 Inch | 100 ft | 50,000 |
| CSST (Corrugated Stainless) | 1/2 Inch (EHD 18/19) | 50 ft | 65,000 – 80,000 |
Note: Since a dryer typically uses ~22,000 BTU, a 1/2-inch line is almost always sufficient unless the run is exceptionally long (over 150 feet) or shares the line with other appliances.
Final Connections and Safety Checks
After the rough-in is complete and the drywall is finished, you will connect the appliance. This is where the rough-in meets the machine.
Connecting the Flex Line
Use a new stainless steel flexible gas connector. Never reuse an old one, as they can become brittle and crack. Connect one end to the flare fitting on your shut-off valve and the other to the dryer inlet. Do not use pipe dope on the flare threads; the seal is made by the metal-to-metal compression of the flared cone.
Soap Bubble Test
Before plugging in the electrical cord or pushing the dryer back, turn on the gas valve and spray every new connection with a non-corrosive leak detection solution (or a mix of dish soap and water). Watch for expanding bubbles. If you see bubbles, turn the gas off immediately and tighten the fitting. If no bubbles appear after a few minutes, your rough-in is secure.